• Skip to primary navigation
  • Skip to main content
  • Skip to primary sidebar
  • Skip to footer

GF-Zing! logo

  • Home
  • Coupon Collection
  • GF Foods & Groups
  • Ask Gf-Zing!
    • About the Author
    • About Gf-Zing!
  • Nav Social Menu

    • Email
    • Facebook

chocolate

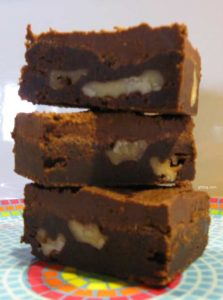
Gourmet Gluten Free Brownies

0 · Mar 18, 2011 · Leave a Comment

Gourmet Gluten Free Brownies from gfzing dot com

A gourmet gluten free brownie that is just like the best wheat brownie you ever had.

Use the absolute best quality gluten free chocolate you can obtain.  It is worth doing the website and company research to find the richest, darkest gluten free chocolate that is available.

For the brownies:

Melt the following in a small pot, then set aside to cool briefly:

  • 1 1/2 sticks (12 ounces) unsalted butter
  • 7 ounces bittersweet gluten free chocolate
  • 3 ounces gluten free unsweetened chocolate

Place the following in a large bowl:

  • 1 1/2 cups sugar
  • 1 1/2 teaspoons vanilla or 1/2 teaspoon of Authentic Foods gluten free powdered vanilla
  • 1/4 teaspoon salt
  • 4 eggs

Beat the sugar/egg mixture with a spoon, then stir in the melted chocolate/butter mixture.

In a small bowl, combine

  • 1 cup Authentic Foods GF traditional flour blend
  • 1/2 teaspoon xantham gum

Mix the GF flour mixture in to the chocolate batter.  Stir just to combine well.

Stir in:

  • 1 cup walnut pieces, sized according to your preference.

Line a 9 x 13″ pan with parchment paper leaving quite a bit up paper going up the sides (so that you can grab the paper later and pull the whole brownie unit out of the pan.  Pour and spread the batter in to the paper-lined pan and ease the batter out to the edges and corners of the pan.  Bake at 350 F degrees for 30 minutes.  Remove from the oven and cool completely before frosting.     Don’t remove the brownies from the pan yet – frost first!

Frosting:

Melt in a microwavable glass dish:

  • 6 ounces unsalted butter
  • 4 Tablespoons milk (can be non-fat milk if you want)

Add:

  • 4 Tablespoons (1/4 Cup) best quality gluten free cocoa powder
  • 1 teaspoon vanilla
  • 2 2/3 cups gluten free confectioner’s sugar

Stir together with a kitchen spoon until completely smooth.  Because the butter is melted, the frosting can still be a bit loose or runny when you spread it, because the frosting will stiffen up later, as the butter cools and hardens. Spread the frosting on the brownies, then transfer the pan to the refrigerator to chill until firm.

To remove brownies from pan, just grab the edges of the parchment paper and lift. Transfer the paper of brownies to a cutting board and proceed to cut them.

Cut the brownies with a sharp knife.  To make clean cuts, occasionally run the knife blade under hot water then wipe dry with a clean towel.  Using a heated, clean knife will ensure a clean cut with no crumbs.

Make sure to use all gluten-free ingredients.  If you are using a wheatavore kitchen, ensure that the sugar container is not contaminated with flour by wheatavore cooking adventures.

Christmas, Cookies, Dessert, Holidays, Recipes, Spring, Summer, Vegetarian, Winter brownie, chocolate, cookie, dessert, gluten free, vegetarian

Chocolate Sweet Potato Cake

0 · Sep 12, 2010 · Leave a Comment

This excellent  flourless chocolate cake is a variation of a recipe that is most often attributed to Marcy Goldman’s  A Treasury of Jewish Holiday Baking.  The glaze suggested here is not from the original recipe.

The quality of the finished cake is entirely dependent on the quality of the chocolate that is chosen – take great care to choose an excellent chocolate.

Cake ingredients

1/2 cup (1 stick) butter
1/3 cup plus 2 tablespoons granulated sugar
6 large eggs, separated
1 1/2 cups cooked and mashed sweet potatoes, baked fresh and peeled – 2 or so
1 teaspoon vanilla
10 ounces good-quality gluten free semi-sweet chocolate chips, melted and cooled
1/4 teaspoon salt

Chocolate Glaze ingredients


1/4 cup water, 2 Tablespoons sugar, 1 Tablespoon corn syrup

4 ounces bittersweet gluten free chocolate, broken up

1 Tablespoon butter

Preheat the oven to 350°F. Line a 9-inch springform pan with baking parchment.  To line the pan, first trace the bottom of the pan on a sheet of parchment paper, making a circle, then cut out the circle.  Next, measure the height of the pan, and cut a strip of parchment paper that is that wide by 14 and a half inches long. Grease the pan, then line with the parchments paper, putting the circle on the bottom and the strip on the side.  If you like, you can line the bottom and then clamp on the sides, trapping the circle of paper with the sides.

Cake batter instructions:


In a food processor, cream the butter with the 1/3 cup sugar until light. Blend in the egg yolks until light, then the mashed sweet potatoes, vanilla, and cooled chocolate. Mix until smooth.

In a large bowl, use clean beaters to whip the egg whites gently until they are a bit foamy.  You can use a hand-crank-style manual rotary egg beater to do this – it is easy, and great exercise! Then add in the salt and whip harder to make meringue, sprinkling in the last two tablespoons of sugar to form stiff and shiny (but not dry) peaks. With this amount of sugar, you could also dump all the sugar in at once – it won’t make much difference.

Fold the cooled sweet potato/chocolate mixture into the egg whites gradually, keeping the mixture light and airy – don’t beat it now or you will lose all the air you have beaten in to the egg whites. The air trapped in the egg whites is what is going to make the cake rise in the oven.

Spoon the batter into the prepared pan, shake the pan briefly to settle it, and bake  at 350 degrees for about 40 minutes (that is what the first version of this recipe said, but that was not correct – it took over 70 minutes).  Depending on your oven, you will need to check the cake starting at 40 minutes, but leave yourself an extra half hour in case the baking takes longer.  When the cake rises high and looks dry, and slightly cracked on top, it is done cooking – if it doesn’t look like this, give it more time. The middle should be soft but firm – a toothpick tests almost dry.  The cake will have risen really high, but it will fall as it cools.  Don’t worry about it though.

Cool in the pan for 20 minutes, then place the cake (in its pan) on a wire rack.  Refrigerate completely to cool – overnight seems reasonable. At this point, the cake can be removed from the pan and frozen for up to a month (haven’t tried that). Even if serving it the same day, chill the cake for two hours before finishing it with the glaze.   This is a dense cake which holds the heat.

Glaze instructions:

In a pot, mix water, sugar and corn syrup and bring to a boil to dissolve the sugar.  Off the heat add the chocolate (bittersweet is best).  Stir until completely melted, then stir in the butter which will make it shinier.

Remove the cake from the pan, leaving the top side up.  Do not try to flip it over. Put the cake on a serving plate. There will be a slight indentation where the cake has fallen in the middle. The final cake will have shrunk down from its lofty height that it was in the oven – maybe it will be 2 inches high. Pour the glaze into the indentation of the cake and, using a spatula, even out the glaze and urge it along to ooze attractively over the edges in places.

The cake is excellent served with whipped cream, and it seems like it would be pretty good if you used bittersweet instead of semisweet in the cake part too as well as the icing.

Make sure ALL your ingredients are gluten free.  If you are making this for a gluten free friend, take care that there is no stray wheat flour in your sugar canister, transferred there during previous baking adventures.

Dessert, Fall, Potatoes, Recipes, Winter cake, chocolate, cooking, food, gluten free, sweet potato

Homemade Hot Cocoa Mix

0 · Apr 29, 2010 ·

Hot cocoa mix from GfZing! is easy to make at home.  Here’s how to make an instant cocoa mix that will spice up your breakfast. Make sure that each individual component of the mixture is gluten free – the cocoa, the spices etc.

In a jar that holds 750 ml, place:

  • 3/4 cup sugar (or the equivalent sweetening amount of a gluten free sugar substitute)
  • 1/2 cup unsweetened cocoa powder
  • 1 teaspoon cinnamon
  • 1/2 teaspoon instant espresso
  • 1/4 teaspoon cayenne pepper (optional to add spiciness – you can grind up one dried cayenne pepper and add that)
  • 1/4 cup finely ground skinned almonds (optional – this adds a gritty texture)
  • 3.2 ounces of nonfat powdered dry milk (the amount to make one quart)

Shake this mixture up until it is completely homogeneous.

Use 3-4 Tablespoons of the mixture with 1 mug of hot water to make your cocoa.

Drinks, Recipes, Winter chocolate, cooking, food, GF, gluten free, gourmet, homemade, hot cocoa, mix, recipe

Primary Sidebar

Check out our Coupon Collection

Click Here to go directly to the Coupon page

Read more at The Rambling Epicure:

Click Here: The Rambling Epicure

QR code for your phone

qrcode for gfzing
NFCA logo

Blogroll

  • Aloha World Ono Recipes
  • Book of Yum
  • Dulce Cocina sin Gluten
  • Gluten Free Beer Association
  • Glutenfreie Rezepte | kaMehl
  • Hawai'ian Electric
  • Laylita's – Ecuador
  • Nombudsman
  • Papilles et Pupilles
  • Sea Salt with Food
  • The Rambling Epicure The Rambling Epicure is a daily international food chronicle, and the first online newspaper to follow global food trends and news.
  • Triumph Dining

Monthly Archive

Proud member of FoodBlogs

Load up on new recipes, exclusive goodies, + more!

Get the exclusive content you crave straight to your inbox.

Things to Read

Find by keyword

bacon baked baking beans beef berries blueberry cake cheese chicken chocolate coconut cooking curry dessert DIY dried beans easy fish food fruit GF ghee gluten free gourmet homemade lamb maple syrup meat microwave New England Hard Cider pie pork pumpkin recipe recipes rice salad sauce soup stewed strawberries sweet potato thai red curry vegetarian

Copyright © 2023 GF-Zing! on the Cravings Pro Theme