• Skip to primary navigation
  • Skip to main content
  • Skip to primary sidebar
  • Skip to footer

GF-Zing! logo

  • Home
  • Coupon Collection
  • GF Foods & Groups
  • Ask Gf-Zing!
    • About the Author
    • About Gf-Zing!
  • Nav Social Menu

    • Email
    • Facebook

recipe

Homemade Poultry Seasoning

0 · Nov 23, 2010 · Leave a Comment

herbs drying gfzing.com

Once again, Gfzing.com cracked the binding on a bunch of cookbooks to find a tasty gluten free poultry seasoning for the Thanksgiving turkey stuffing.  We looked through the usual suspects, those older books that included formulas for standard seasonings and came up empty! Then, on an old bottle marked “poultry seasoning,” we found a typed list, taped to the bottle.  The ingredients are listed below.

The herbs and spices for poultry seasoning are similar in all  formulations, it is just the proportions that change. The sage and thyme should predominate.  Some poultry seasoning recipes include nutmeg, and some include celery seed.

We dried the herbs from our garden, at the end of the fall, by hanging them upside down in the kitchen to dry.  If you don’t have home-dried herbs, you can use bottled herbs.

  • 2 parts dried sage
  • 3/4  part dried rosemary
  • 1 part dried marjoram
  • 1/2 part ground black pepper
  • 1/2 part grated nutmeg
  • 1  1/2 parts dried thyme

These ingredients are listed in “parts” – you can substitute teaspoon or Tablespoon for “part” in the recipe, depending on how much poultry seasoning you want to make.  You can assemble all of these in a large, stone mortar and pestle and grind them quickly to a fluffy powder. It is the sage that adds the fluffiness to this preparation.

Condiments and Sauces, Fall, Meat Dishes, Meat-eater, Recipes, Thanksgiving gluten free, homemade, recipe, seasoning, spice mixture

Thanksgiving Turkey – why does it seem to take forever to cook?

8 · Nov 14, 2010 · 2 Comments

Almost a decade ago, we enlisted the kids’ help to keep careful tabs on the temperature of the Thanksgiving turkey as it was roasting. We roasted a 24 pound, unstuffed turkey from a local farm (all natural, no “solutions” injected in to it, and minimally processed) at a constant temperature of “325” F – that is what the oven dial was set to, at any rate. We used a thermometer with a probe connected to a digital display – this type of thermometer allows you to run this experiment while making only one puncture in the turkey.  The turkey started cooking at 40 degrees.

As you can see from this graph, it took about 6 hours to bring the roast from 40 degrees to 175.  The temperature rose quite quickly for the first 4 hours, then the change in temperature slowed down considerably.

turkey roasting graph from gfzing.com
The temperature of a roasting turkey, over time (gfzing.com)

This experiment, and subsequent discussions with scientists, gave us a greater understanding of the Thanksgiving paradox: as the turkey gets closer and closer to being done it never seems to be done. After several hours, as the house fills with the good smell of roast turkey, the recalcitrant turkey sits there with the thermometer showing clearly that it is not yet cooked. We always start to wonder if the oven has gone out or if the oven thermostat has ceased working. We shake the drumstick, we poke the turkey, we open the oven way too many times, putting a hand in to see if it still feels hot etc.  Why do we do this, year after year – with the Thanksgiving turkey, a Christmas roast beef, and any other large piece of roasting meat?

I spoke with a well-known astrophysicist, to try to get some answers. He says people tend to view trends as linear processes, so they will see the temperature rising quickly at the beginning,  assume that this quick trend will continue at the same rate, and feel that the turkey should be done much earlier than it really will be.  He says in fact “the plot above is a solution of a well-known heat diffusion equation* which applies to all cooking processes with the exception of microwaves.” The steepness of the line in the curve is a measure of the heating rate of the turkey.  The heating rate (the change in temperature in a particular time) is proportional to the change in temperature between the turkey and the oven. The temperature of the turkey will approach, but never reach, the temperature of the oven. As the turkey gets warmer, the temperature change in an hour decreases (it goes up, but less quickly).

The astrophysicist, who likes to simplify problems so they can be solved, says you can “view the turkey as a solid,” “assume a spherical turkey” and “assume a non-spherical turkey.”  He then considered the problem of cooking stuffed turkeys vs. unstuffed turkeys, the stuffed turkey being closer to a spherical turkey and the unstuffed turkey having an empty cavity which reduces the thickness of the material to be cooked and effectively reduces the size of the turkey.  The concept of a spherical turkey provoked a lot of laughs, but in the real world, there are no spherical turkeys. Real turkeys have wings and drumsticks.

He provided a helpful reference to The Science of Cooking, by Peter Barham, which notes “… the cooking time is always proportional to the square of the size of the food, rather than its weight.”   You can understand this if you consider that the same weight of turkey, cut in to pieces, will cook in much less time than the same exact turkey cooked whole.

This is why chefs will tell you to cut the turkey up in pieces,  roasting the light meat and dark meat for different amounts of time so that the light meat does not become dry and the dark meat gets more time in the oven.  However, the “dissected turkey” method of cooking the Thanksgiving turkey is impractical for those cooks who want to present a Norman Rockwell turkey (visually appealing whole turkey on a platter) at the table.  The Norman Rockwell turkey requires compromises, and more time than you may think.

*the solution of the heat diffusion equation is an exponential process, if you extrapolate a line from the early cooking temperature data you will expect the turkey to be cooked many hours sooner than when it is actually cooked.

Christmas, Holidays, Meat Dishes, Meat-eater, Recipes, Thanksgiving gluten free, recipe, roasting, turkey

How to make gluten free beer

0 · Nov 5, 2010 · 8 Comments

gfzing.com gluten free beer At gfzing.com we have tried all the commercially available gluten free beers.  Our favorites were those made by Green’s – there are three that are imported in to the U.S., and in our area they generally sell for a mind-boggling $7/bottle.  This was the motivating factor behind a successful attempt at home brewing gluten free beer, the techniques of which are outlined here. A reasonable glass of gluten free beer (in the weissbier or weiss beer style), can be made for less than a dollar a bottle after start-up costs.  The beer is similar to the St. Peter’s Sorgham Beer from Suffolk England.

The major difference between most  fine artisanal beers and gluten free beer is that the ordinary beer is made with malted barley and wheat, and the gluten free beer cannot contain either barley or wheat.   Therefore, the gluten free brewer must rely on other malted grains. The ingredients for gluten free beer are available from home brewing shops.  The two tricky items to locate are the sorghum syrup, which lately we have had to purchase online from morebeer.com, and the gluten free brewing yeast.  The actual link for purchasing the syrup is here.

To make home brewed beer, you should first read some of the fine homebrewing websites and chats on the net, and learn the basic technique.  You are going to make a sort of soup called wort, and then ferment this soup with yeast in a large container with an airlock.  When it has finished fermenting, it gets bottled with a little “priming sugar” added to each bottle to cause another fermentation in the bottle – this produces the carbonation.  An excellent discussion with photos is available at WikiHow.

These instructions are provided here for use by adults of legal brewing age.

Recipe from gfzing.com for about 48 twelve ounce bottles of gluten-free beer requiring 2-3 hours of cooking time and about 7 weeks from starting the process to pouring:

Ingredients:
Malt Base – 6lb Sorghum Extract

Specialty Grain –

  • 1lb Flaked Maize
  • 1/2lb Whole Sorghum (for toasting)
  • 1/2lb gluten free Oats (for toasting) – optional

Specialty Sugar – 1/4lb Belgian Dark Candi Syrup (this is a product that is worth the trouble of obtaining – it can be ordered online)

Hops –

  • 1 oz UK Northern Brewer Leaf hops (bittering)
  • 1oz Cascade hops (aroma)

Yeast- Notthingham Yeast (check for gluten free status on the package)
Other-

  • 1/4 tsp Irish Moss
  • 3/4 oz Coriander Seeds
  • 3/4 oz. Bitter Orange Peel (in the event of a beer emergency, you can use the zest of one fresh orange)
  • 8oz Malto-dextrin (a weird, nearly flavorless material that makes a smooth “mouth-feel”)
  • 15 black peppercorns

Other: Priming sugar (about 1 cup for five gallons) dissolved in a couple of cups of water

Instructions:
Toast Whole Sorghum & gluten free Oats in the oven for 20 minutes @ 375 F.

Grind toasted Sorghum & Oats using a grain mill that is only used for gluten free grains, and then combine these with flaked maize.
Maize, Oats and sorghum go in a muslin bag in one and a half gallons cold well water in a large pot – large enough to hold at least 3 gallons.
Heat to 160F, hold at this temperature for 10 minutes.
Remove grains (the muslin bag full of grain will have swelled considerably) and discard.
Add Sorghum extract & Belgian Dark Candi syrup to the grainy water, stir to dissolve. If you have no Belgian Dark Candi syrup you may be tempted to use molasses.  Our advice – don’t use molasses because it will impart a distinctive molasses flavor to the finished beer.  If you must substitute for the Dark Candi syrup, try dark brown sugar or panela.
Bring to boil. ALERT: at this point, there are 60 minutes left in the cooking process. All the times listed next to the ingredients below are the total cooking time for that ingredient. When we say “set the timer” that is to indicate the time between steps.

Start proofing yeast in a cup of water – Nottingham yeast (marked gluten free).
While grainy water and sugars boil, add the following for the minutes indicated (this is a standard beer recipe convention, and you have to study on how beer is made so that this series of instructions will make sense):

  • 1 oz. Northern Brewer Hops (60 min)
  • Set Timer for 45 minutes

When timer goes off, start adding the following ingredients and cook them for the amount of time indicated:

  • 1 ounce Cascade hops (15 minutes)
  • Set timer for 5min, when timer goes off, add
  • 1/4  tsp Irish Moss (10 minutes)
  • Set Timer for 5min, when timer goes off, add
  • 1/2 lb. Malto-dextrin mix with cold water first (5 minutes)
  • 3/4 oz coriander seeds (5 minutes)
  • 3/4 oz bitter orange (5 minutes)
  • 15 black peppercorns(5 minutes)
  • After 5 more minutes, all the cooking is done.

The total cooking time, from the time an ingredient is added to the end of the cooking is show in parentheses next to each ingredient. This is how beer-making recipes are generally written. The instructions about “set the timer for X minutes” are our own addition and show the time between steps. So, the Northern Brewer hops go in, then you wait 45 minutes and add the Cascade Hops, then wait 5 minutes, then add the Irish Moss etc. The last 4 ingredients all go in at once, and they only cook for the last 5 minutes of the boil.

Pour wort through a fine strainer  in to 2 gallons of cold water in a sterilized 6 gallon fermenter.

Add cold water to increase to 5 gallons total volume in the fermenter (it helps to mark the fermenter at the five-gallon level so you know when you have added enough water).
Cool to 72 degrees F.
Measure the starting specific gravity and record.  It should be around 1.040.
Add  the  proofed yeast, give a stir, cover the fermenter and add an airlock.  This mixture should ferment for two or more weeks. This beer will not bubble as vigorously as a barley or wheat beer – it is a gentle fermentation and does best at around 70 degrees.
After the primary fermentation, rack off the beer in to another vessel, add the dissolved priming sugar, give the mixture a vigorous mixing, and bottle in sterilized bottles. Cap the bottles with new caps (you cannot re-use caps).  The beer will be ready to drink in about 3 weeks.

*Most Popular Recipes*, Ask Gf-Zing! - Responses, Drinks, Recipes, Vegetarian beer, gluten free, gourmet, homemade, recipe, vegetarian

Homemade Spicy Tomato and Sweet Pepper Ketchup

0 · Nov 3, 2010 · Leave a Comment

Making your own custom ketchup is easy-peezy!  At gfzing.com, we made a careful study of the available recipes for homemade ketchup, and concluded that the ingredients in most tomato ketchups are pretty much identical.  The spicy ketchup variant here is gluten free and can be served with fries, meatloaf, Shepherd’s Pie, hamburgers, hash browns, corned beef hash or any other dish that requires ketchup.

We tasted the typical store-bought ketchup which is very smooth, mostly sweet, with heavy tomato and celery seed notes – sort of like sweetened and thickened V8 juice! We also read Malcolm Gladwell’s interesting discussion of why there are so many mustards and only one ketchup.  Afterward reading that, we thought that we would not like a ketchup substitute, but we were wrong.  This ketchup is better than bottled ketchup!

Spicy Tomato and Red Pepper Ketchup
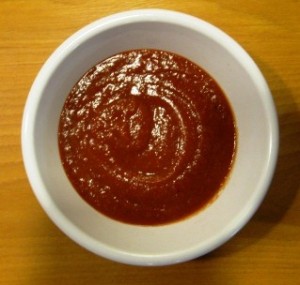
Homemade Ketchup has a rich color and complex flavors

We started with a Saveur recipe for homemade ketchup. We replaced half the tomatoes with sweet red peppers, added sweet potato and dates for sweetening and thickening, and switched out their brown sugar with some agave syrup and gluten free fruit jam, to reduce the amount of refined sugar in the recipe.  We changed the amount of spices, and upped the hot peppers.  The final ketchup has some chutney-like flavors.  It has more flavor than bottled ketchup, and far less refined sugar.  It provides dynamic tension for your meatloaf!

Ingredients:

14 0unces diced or petite cut canned tomatoes

3 long sweet red peppers, stemmed, seeded and sliced

1 cup water

1/2 of a large red onion, peeled and chopped

1 clove garlic, peeled and sliced

1 dried cayenne pepper, stemmed and sliced

2 Tablespoons agave nectar

1/3 cup cider vinegar (we make our own cider vinegar out of homemade New England apple cider, from local apples)

1/4 teaspoon celery seed

1/4 teaspoon dry mustard

1/4 teaspoon ground allspice

1/4 teaspoon ground ginger

1/4 teaspoon ground black pepper

1/8 teaspoon ground cloves

1/8 teaspoon ground cinnamon

1 1/2 teaspoons salt

2 Medjool dates, pitted and sliced

1 1/2 ounces of peeled sweet potato, chopped –  a piece of sweet potato about the size of an extra-large egg

2 Tablespoons plum jam

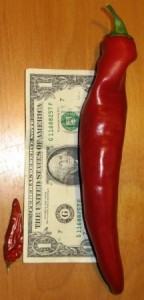
How big are the peppers
A dried cayenne pepper on the left, and a sweet red pepper on the right

The Steps:

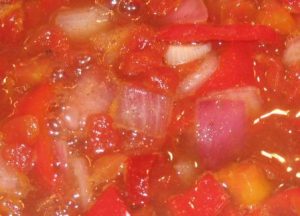
Homemade Spicy Tomato and Sweet Pepper Ketchup before cooking
The ketchup before the cooking...

First, put all the ingredients in a saucepan and cook over medium heat for about 45 minutes, stirring occasionally,  until reduced by half.  The material will start to stick to the bottom of the pan.  Be careful that it does not burn.

When cooked, cool and then puree the mixture thoroughly in a blender or food processor.  Taste, and adjust the salt, sweet, and sour flavors as necessary. That’s it!  Serve warm or cold.  Store, covered,  in the refrigerator.  This is not a “preserve” since it has a low sugar content and low salt content.  It cannot be kept indefinitely.  Make sure all your ingredients, including spices, are gluten free.

Condiments and Sauces, Recipes, Salads and Dressings, Vegetarian cooking, gluten free, gourmet, homemade, recipe, vegetarian

Homemade Garam Masala

0 · Oct 19, 2010 · Leave a Comment

Garam masala is an Indian spice mixture used in many dishes and often added at the very end of the cooking of a dish. It can be 100% gluten free if made correctly.  Like curry powder, garam masala usually seems to be made from a standard list of spices, the amounts of each spice customized according to taste.

Interestingly, if you do a Google search for “homemade garam masala” there are only a million hits – that’s twice as many hits as for “homemade ketchup” or “homemade mayonnaise” but not as many hits as for “homemade mustard”.  What is going on with that mustard?  Are beer drinkers interested in mustard at the season of the Oktoberfest?

Back to the topic at hand.  We compared recipes for Garam Masala from two authors: Julie Sahni and Madhur Jaffrey.  Both have written wonderful cookbooks which are excellent and frequently consulted resources – these authors were instrumental in bringing the world of interesting, largely gluten free, Indian cooking to the North American audience.

For a generic Garam Masala (there are other more specialized types of garam masala as well) these authors offer varying formulas, using the following spices.  The weights in parentheses are just there to give you an idea of the ratio of amounts that could be used – we have measured here the weights for one of the Jaffrey recipes:

Cardamom Seed (25 pods – see the picture below for a couple of pods next to the seeds from 25 pods)

Black Peppercorn (2  1/8 ounces or 62 grams)

Whole Cumin Seed (1 1/4 ounces or 36 grams)

Whole Coriander Seed (1/2 ounce or 15 grams)

Cinnamon Stick (3, 3 inch sticks)

Whole Cloves (4 to 6 cloves)

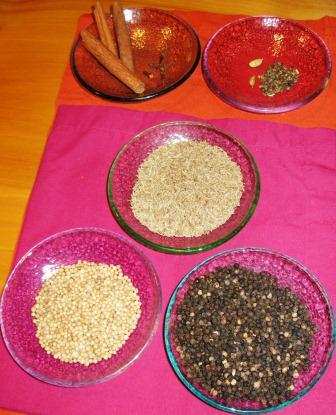
To give you an idea of what this amount of spice looks like, here is the full amount:

Gfzing.com Garam Masala spice picture 3
Garam Masala spices before grinding. Clockwise from top left: Cinnamon and Cloves, Cardamom, Cumin (in cener), Black Pepper, Coriander.

Sahni generally recommends toasting the spices in a dry skillet for 10 minutes, stirring all the while, then cooling and grinding to a powder.  Jaffrey’s instructions generally omit the toasting process and go right to the grinding. Jaffrey sometimes omits the coriander and adds nutmeg.

By volume, Jaffrey’s recipe from Indian Cooking uses 3 times as much black peppercorn as Sahni’s recipe from Classic Indian Cooking.  Other proportions are very similar in both recipes.

Why buy stale old spice mixtures ready-made when you can easily make your own pungent gluten free garam masala using whole spices, toasted (or not) and ground up?

Condiments and Sauces, Cookbooks, Recipes, Vegetarian garam masala, gluten free, homemade, Indian, recipe, vegetarian

Roasted Vegetable Soup

0 · Sep 12, 2010 · Leave a Comment

This recipe from Gf-Zing! is perfect for a cold fall day when eggplants and tomatoes are still plentiful at the local farmers’ market.

Preheat oven to 400 degrees.

On a large cookie sheet with a rim, place

1 eggplant, halved the long way, cut side up
3 medium to large tomatoes, stem end removed
1 onion, peeled and halved
6 cloves of garlic, peeled

Brush all the vegetables with olive oil. Roast for 45 minutes.

Scoop the eggplant flesh in to a large pot. Discard the eggplant skin. Add the rest of the roasted vegetables,  4 cups of gluten free chicken or vegetarian stock, and 1 teaspoon of dried thyme.

Bring to a boil, lower the heat and simmer the vegetable and stock mixture for 45 minutes.

Puree the soup using an immersion blender or by transferring the soup to a food processor or blender.

Season to taste with salt, black pepper, and a small amount of sugar if needed.

Serve the soup with crumbled goat cheese or cheddar to sprinkle on top.

Make sure all your ingredients are gluten free.

Fall, Recipes, Soups, Vegetables, Vegetarian, Winter easy, eggplant, GF, gluten free, gourmet, recipe, soup, vegetarian

Baked Brisket – gluten free

0 · Sep 12, 2010 ·

This is an easy way to cook a beef brisket – no fuss no muss, and no gluten.

For a 2 1/2-3 pound brisket of beef

Preheat the oven to 400 degrees.

Quarter 2 peeled spanish onions and place them on the bottom of a dutch oven. Put the brisket on top of the onions, fat side up.

Sprinkle with 1 envelope of gluten-free onion soup mix *, then mix the following and pour on top:

1 cup gluten free tomato ketchup
1 cup water
1/4 cup brown sugar

Cover the dutch oven and bake for 3+ hours, until done. The meat should be very tender. You can then cool and chill the dish, and then remove the fat. After removing the accumulated fat, you can slice the meat, return it to the dish, heat and serve.

* To make a substitute for a package of onion soup mix, follow the copycat instructions available on the internet. For example, Food.com has 2 such recipes: http://www.food.com/recipe/copycat-liptons-onion-soup-mix-24952 and http://www.food.com/recipe/copycat-lipton-onion-soup-mix-153788. Make sure to verify that the beef bouillon you use in making the copycat version is gluten free.

Make sure all your ingredients are gluten free.

Dairy Free, Fall, Meat Dishes, Meat-eater, Recipes, Winter beef, brisket, cooking, food, GF, gluten free, gourmet, recipe

Corn and Bacon Risotto

0 · Jun 22, 2010 · Leave a Comment

This gluten free risotto is delicious, using fresh corn, New England apple-smoked bacon and New England Hard Cider.

4 strips of apple wood smoked bacon, chopped and cooked in a pan or the microwave
5 cups homemade chicken stock (gluten free)
1/4-1/2 cup New England hard apple cider (like a dry white wine)
4 TB olive oil
2 TB butter
2 large shallots, minced
1 small onion, minced
1 1/2 cups Arborio rice
Kernels from 2 ears of fresh corn
2 inch slice of a log of fresh goat cheese (even better, from a log of marinated fresh goat cheese)
1/3 cup freshly grated parmesan cheese
salt
1/4 teaspoon freshly ground pepper

Heat the chicken stock in a glass measure in the microwave until the temperature of hot coffee.

In a large non-stick skillet (12 inches is good), melt the butter with the olive oil. Add the shallots and onions and cook while stirring, until browned slightly.  Add the rice and stir to coat with oil.  Cook until it becomes slightly more opaque.  Deglaze the pan with the cider.  Add the stock about 1/3 cup at a time, stirring all the while over a low heat, for 10 minutes.  When 10 minutes is up, you will still have stock left.

Add the corn and bacon to the rice mixture and continue adding the stock a little bit at a time and stirring, until all the stock is used up (about 10 more minutes).  If the rice is cooked al dente, you are done; if not, add some more stock and cook further.

When the rice is al dente, add the goat cheese and the parmesan cheese and stir to completely mix.  You may add chooped parsley, salt and the pepper to taste at this point.  Serve immediately, with New England Hard Cider to drink.

Make sure that all your ingredients are gluten free!

© Gf-Zing! | Alice DeLuca

Fall, Recipes, Rice, Summer, Vegetables, Winter bacon, cooking, corn, food, GF, gluten free, gourmet, New England Hard Cider, recipe, rice, risotto

Microwave Chicken Wings

1 · Jun 12, 2010 · Leave a Comment

We acquired a new microwave oven and have been playing around with it – a new way to save energy resources while cooking.

For 1.5-2 pounds of chicken wings, mix the following sauce in a large bowl:

1/4 cup gluten free orange marmalade

1 tablespoon honey

1 clove of garlic, minced

1/4 cup gluten free soy sauce

1 1/2 tablespoons fresh lime juice (about 1/2 of a lime)

black pepper

Remove the wing tips from the wings, and cut each wing in to two pieces at the joint. Mix the sauce with the chicken wings.  Place the wings and sauce in a glass pie plate (in a single layer) and cover loosely with plastic wrap.  Microwave for 10 minutes. Remove plastic wrap and microwave for 5-10 more minutes, until cooked through.  Preheat a broiler and broil the wings for 4-5 minutes to crisp up the skin.

If your microwave has an automatic sensor, follow the instructions for cooking chicken parts, remove the plastic wrap half way through the cooking time.  When the wings are done, broil as above.

Use all gluten-free ingredients!

Appetizers, Dairy Free, Fall, Meat Dishes, Meat-eater, Microwave Cooking, Recipes, Spring, Summer, Winter chicken, chicken wings, cooking, food, GF, gluten free, marmalade, microwave, recipe

Curried Tofu meatballs

1 · Jun 9, 2010 · 1 Comment

These gluten free “meatballs” from Gf-Zing! have the texture of gnocchi.  The cream-based curry sauce is delicious with sweet potato fries.

Mix the following with your hands:

1 block (1 pound) firm tofu

1 egg

1 cup minced scallion (both the white and green)

2 tablespoons chopped parsley

2 tablespoons potato starch (katakuriko)

6-8 tablespoons sweet brown rice flour – this is like mochiko or sweet rice flour (also called glutinous rice flour even though it does not contain gluten) – it is made from sweet brown rice

1 tablespoon oil

1 tablespoon curry powder (make your own using Rebecca Reilly’s recipe from Gluten Free Baking)

1 teaspoon ground ginger

1/2 teaspoon salt

Mix all these ingredients and as you mix you will notice that the liquid is taken up by the flours.  Add sweet brown rice flour as needed to reach a consistency where “meatballs” can be formed.  Make walnut sized balls.

Fry the balls in 1 tablespoon of oil in a large non-stick frying pan over medium heat until they are golden. Remove the balls to a plate.  To the oil remaining in the pan, add

2 tablespoons curry powder and fry briefly.  Add

1 1/2 cups of New England hard cider (this is like white wine – it is not sweet).

Reduce the wine to 1/3 cup.  Add the tofu balls back to the pan and add

1 cup heavy cream or coconut milk

2 cups gluten free chicken stock

Bring to a boil, cover and simmer for 20 minutes.  The sauce will thicken as the balls absorb the stock.  Check from time to time and stir.

When cooked, serve with sweet potato fries.

Make sure all your ingredients are gluten free!.

Fall, Recipes, Spring, Summer, Vegetables, Winter cooking, creamy sauce, curry, food, GF, gluten free, gourmet, meatballs, recipe, tofu

Sweet Potato Fries

0 · Jun 9, 2010 · Leave a Comment

Serve these awesome baked fries with any dish that has a curry sauce.

For every 2 pounds of sweet potatoes, place the following in a large bowl:

2 teaspoons of Kosher salt (or 1 teaspoon of table salt)

1 teaspoon ground cumin

1 teaspoon cayenne pepper (or to taste)

2-4 TB olive oil

Cut peeled sweet potato in to french fry size – make 1/2 inch slices crosswise, then cut each slice in to 1/2 inch slices.  Mix these fries with the oil and spices to distribute evenly.  Place the spiced fries on a foil lined baking sheet in a single layer.  Do not use a silpat mat because the baking temperature exceeds the tolerance of silpat.

Preheat oven to 500 degrees F.  Bake the fries on the top shelf for 15 minutes, stir, then bake an additional 5 minutes.  Do not worry if some fries are slightly blackened.  The flavor will be awesome.

Serve with any dish that has a rich curry sauce, or as an accompaniment to meat dishes.

Dairy Free, Fall, Potatoes, Recipes, Spring, Summer, Vegetables, Winter baked, cooking, food, fries, GF, gluten free, gourmet, recipe, sweet potato

Rich Lamb and Cornish Game Hen Curry

0 · May 11, 2010 ·

Try this excellent curry – you won’t be sorry!

Fry one onion, chopped, in 2 Tablespoons of oil until browned.  Add 2 lamb shanks and brown them as well. De-glaze the pan with 1 cup of New England Hard Cider.

In to a pressure cooker, put:

1 can of coconut milk

2 Tablespoons of gluten free thai red curry paste

1 stalk of lemon grass, the white part at the root end only, chopped

2 Tablespoons of fresh ginger, chopped

Add the lamb shank mixture to the coconut milk mixture. Close the pressure cooker and bring up the pressure.  Pressure cook for 10 minutes, then let the pressure drop on its own.  Lamb shanks take a long time to cook. This pressure-cooking step will give the lamb a head start, ensuring that eventually the lamb gets nice and tender.

Carefully transfer the hot lamb shanks in their curry sauce in to a casserole that has a lid.  To this mixture, add

1 Cornish Game Hen

1 mango, peeled seeded and cut in to chunks (an under-ripe mango is perfect for this purpose.)

Braise the dish, covered, in a 350 degree oven for 2 hours, until the lamb is tender.  Skim off any fat that has accumulated.  Season with salt if needed.

Serve with Jasmine rice topped with plenty of fresh chopped cilantro, and fresh ground sea salt.

Note: If you don’t have a pressure cooker, you can cook everything except the game hen and mango for 1-1 1/2 hours and then add the game hen and mango and bake for an additional hour and a half.

Dairy Free, Fall, Meat Dishes, Meat-eater, Recipes, Winter, with New England Hard Cider chicken, coconut milk, cooking, cornish game hen, food, gluten free, gourmet, lamb, New England Hard Cider, recipe, thai red curry

Homemade Hot Cocoa Mix

0 · Apr 29, 2010 ·

Hot cocoa mix from GfZing! is easy to make at home.  Here’s how to make an instant cocoa mix that will spice up your breakfast. Make sure that each individual component of the mixture is gluten free – the cocoa, the spices etc.

In a jar that holds 750 ml, place:

  • 3/4 cup sugar (or the equivalent sweetening amount of a gluten free sugar substitute)
  • 1/2 cup unsweetened cocoa powder
  • 1 teaspoon cinnamon
  • 1/2 teaspoon instant espresso
  • 1/4 teaspoon cayenne pepper (optional to add spiciness – you can grind up one dried cayenne pepper and add that)
  • 1/4 cup finely ground skinned almonds (optional – this adds a gritty texture)
  • 3.2 ounces of nonfat powdered dry milk (the amount to make one quart)

Shake this mixture up until it is completely homogeneous.

Use 3-4 Tablespoons of the mixture with 1 mug of hot water to make your cocoa.

Drinks, Recipes, Winter chocolate, cooking, food, GF, gluten free, gourmet, homemade, hot cocoa, mix, recipe

Blueberry Pie sweetened with Maple Syrup

1 · Apr 19, 2010 · Leave a Comment

You can make a fine blueberry pie using dark maple syrup as a sweetener instead of granulated sugar.  This pie is refreshingly fruity and not as sweet as the more common sugar-sweetened pie.

Here are the general rules:

for 5-6 cups of Maine wild blueberries, add the following in a large bowl:

1 cup of pure maple syrup

2 Tablespoons of cornstarch

3 Tablespoons of flavorless tapioca starch (Authentic Foods offers a tapioca starch) or 1/4 cup instant granulated tapioca.  If you use instant granulated tapioca, let the whole mixture sit for 15 minutes before constructing the pie.

1/8 teaspoon salt

3-4 Tablespoons of fresh lemon juice to offset the maple syrup

1/4 teaspoon of ground cinnamon

Use a 2-crust recipe for pie crust, and use a 9 or 10 inch glass pie dish. If you use a larger pie dish, the pie will have less depth, and if you use a smaller pie dish then the pie will be more “heaped up.”  Line the pie dish with 1 piece of crust pastry, fill with the blueberry mixture, top with the second crust. Sprinkle the top crust with 1/4 cup of granulated sugar.

Bake in preheated 375 degree oven for 1 hour.  If the blueberries are frozen, the pie may need a few extra minutes.  Cool the pie on a rack before cutting.

Use all gluten-free ingredients!

Dessert, Pie, Recipes baking, blueberry, cooking, dessert, food, fruit, GF, gluten free, gourmet, maple syrup, pie, recipe

Flageolet Beans with Smoked Paprika

0 · Oct 5, 2009 · Leave a Comment

This is a tasty dish to serve in the fall using your locally grown peppers, cayenne peppers, leeks, and garlic, along with your fabulous imported flageolet beans.  This is a bean stew which would go well with chicken, pork or just plain bread and a salad.

1 leek, cleaned and sliced
2 tbsp olive oil
3 small green or long italian peppers, deseeded and cut into strips
1 dried cayenne pepper, chopped finely
2 clove of garlic, peeled and crushed
1/2 tsp smoked spanish paprika
4 small tomatoes, chopped coarsely
1 pound flageolet beans, soaked and pressure cooked until done (pressure cook about 12 minutes after the pressure is up – use plenty of water), then drain
3 cups homemade chicken stock
1 teaspoon sugar
3/4 to 1 teaspoon salt

Clean the leek and slice it thinly. In a 12″ non-stick pan, heat the oil for 30 seconds then add the sliced leek. Stir and fry for 2-3 minutes until beginning to soften then add the green peppers and the cayenne pepper. Stir and fry for 3 – 4 minutes,  then add the garlic and the smoked paprika. Cook for another minute over medium heat. Add the tomatoes and the chicken broth,  stirring all the while. Cook the this sauce for another 2 minutes then add the drained flageolet and cook for another 3-4 minutes until heated through. Season to taste with sugar, salt and pepper. Adjust the seasoning as needed.

The quality of this dish is entirely dependent on the quality of the chicken stock you use, so it is best to make your own.

Make sure all your ingredients are gluten free!

Fall, Recipes, Vegetables, Winter beans, cooking, dried beans, flageolet, food, gluten free, gourmet, recipe, smoked paprika, stewed

White Chocolate and Strawberry Dessert

0 · Jun 11, 2009 · Leave a Comment

For this dessert, you need fresh local strawberries, high quality white chocolate (gluten free) in a bar form, and gluten free orange liqueur.

Find a bowl that will hold 3 cups exactly when filled to the top with water.  This will be serving dish.  Set it aside.

Melt a 4-ounce bar of gluten free white chocolate over hot water.  Take it off the heat, add 1 Tablespoon sugar, 1 Tablespoon gluten free orange liqueur, 1/2 teaspoon vanilla and 1 ounce of cream cheese.  Beat well until mixed.

In a different bowl beat 1/2 cup of heavy cream until stiff.  Fold in the white chocolate mixure.

Put enough strawberries (or other berries) in the serving bowl to cover the bottom of the bowl.  Spoon the whipped cream/white chocolate mixture on top.  Smooth the top and chill the dessert for 3 hourss or overnight.  This will serve 3-4 people.

You can triple the mixture, make a crumb crust in a spring-form pan, and triple the amount of berries, put the berries on the crust, add the cream mixture, chill, then cut the dessert like a cake (since it has a crust.)

Make sure all your ingredients are gluten free.

Dessert, Recipes, Spring, Summer baking, berries, cooking, dessert, food, fruit, gluten free, gourmet, recipe, strawberries, white chocolate

Mujaddara – a Lebanese lentil dish

1 · Jun 10, 2009 · Leave a Comment

Inspired by a wonderful Mujaddara from a Lebanese restaurant in Troy, New York, we set out to find out how to make the dish at home.  Luckily, we found a good recipe in the interesting Arab Cooking on a Saskatchewan Homestead, by Habeeb Salloum (published by the University of Regina, 2005).  The secret to this terrific dish for lentil lovers is the enormous quantity of fried onions.  We have found that adding a cup of turnip gratin to the finished dish makes it even better!

Here is the revised recipe:

Wash one cup of regular lentils (the inexpensive kind found in any grocery store), and put them in a pan with 5 cups of water.  Bring to a boil, cover and cook over medium heat of 15 minutes, then add 1/4 cup white rice , cover and cook another 20 minutes until both the lentils and the rice are cooked.

Melt 2 Tablespoons of ghee (or butter), but ghee is better, in a frying pan and fry 3 thinly sliced big spanish onions for 10 minutes, stirring, until they are golden brown. (The original recipe called for an alarming 6 Tablespoons of butter for this process.)  Do not use vidalia or sweet onions for this – they do not break down or brown in the same way as spanish onions.

Stir the fried onions in to the cooked lentils, then add 1 teaspoon salt, 1/2 teaspoon fresh ground pepper, 1/2 teaspoon ground cumin, and 1/4 teaspoon hot New Mexico chili powder.  If you have an extra cup of turnip gratin, add that as well.

Stir everything well, and serve hot with yogurt (add a clove of grated garlic to make a sauce) and salad.

Make sure all your ingredients are gluten free.

*Most Popular Recipes*, Fall, Recipes, Spring, Summer, Vegetables, Winter cooking, easy, food, garlic, gluten free, gourmet, lebanese, lentils, recipe, stewed, vegetarian

White Hakurei Turnip Gratin

0 · Jun 6, 2009 · 6 Comments

The first turnips of the spring have arrived, courtesy of a local CSA.  We have learned to love the strong umami of white hakurei turnip prepared with cream and seasonings.  In many recently issued cookbooks there is a complete dearth of recipes for turnip, but if you turn to the older books, notably the 1961 New York Times Cookbook by Craig Claiborne, or the stellar 1979  From Market to Kitchen Cookbook by Perla Meyers, you will find many recipes for this neglected vegetable.  The well-cooked turnip will take you on a time-travel journey back to the days when real vegetables, packed with flavor, made people grateful for every meal.

An excellent recipe for a gratin of white turnip appeared in Gourmet magazine 2007 but that recipe called for a whole cup of heavy cream and a matching cup of grated parmesan.  It was hard on the arteries and on the wallet, and required both top of the stove and oven baking. So, Gf-Zing! has modified it slightly for recession and health reasons.  Serve the turnips with a small steak, and a salad.  You will want to obtain more fresh spring turnips, once you try them this way.

Melt 1 Tablespoon butter in a non-stick 12 inch skillet (make sure you have a top to fit the pan.)

Wash one bunch of white hakurei turnips well, top and tail them, and slice them in 1/4 inch slices.  Save the turnip greens for another recipe. You don’t need to peel the turnips.  Layer the slices in the pan.  Sprinkle the sliced turnips with 1 teaspoon dry thyme, 3/4 teaspoon salt, 1/4 tsp. freshly ground pepper, and 1/8- 1/4 teaspoon cayenne pepper.

Cook for 3 minutes over medium heat, then pour 1/2 cup heavy cream and 1/2 cup gluten-free chicken stock over the top.  Cover and cook the turnips over medium heat for 20 minutes.  The turnips will be completely cooked through, but there will be considerable liquid left in the pan.  Remove the cover and cook to reduce the liquid.  When most of the liquid has reduced (about 5-10 minutes), and the sauce is thickened, grate finely 1/2 cup of fresh parmesan cheese evenly over the top.  Watch closely as the cheese melts and make sure that the liquid does not entirely cook away. Recipe credit: www.gfzing.com

Serve the turnips hot.  The recipe is supposed to serve 6, but maybe realistically it would only serve 4, once they discover that they love turnips!

If you should happen to have a cup or so of the finished dish left over, by all means add it to a lentil dish like Mujaddara.

Make sure all your ingredients, including the spices, are gluten-free.

*Most Popular Recipes*, Recipes, Spring, Vegetables cheese, cooking, food, GF, gluten free, gourmet, hakurei turnip, recipe

Salad for two, with fried eggs

0 · Jun 3, 2009 · Leave a Comment

We are all excited that the first food share has arrived from a local CSA – a local community agriculture program.  The first share of the year included beautiful red lettuce, spinach, radishes, white turnips, and bok choy.

For this salad, we chose to use what was in the cupboard to approximate a recipe from the Hamersley’s cookbook – Bistro Cooking at Home.  This is a great spring meal after a hard day’s work.  It makes you realize how a few simple things are all that are needed for a truly fine meal!

Make a whole red lettuce ready for a salad dressing (clean and tear the salad).  Fry a couple of slices of gluten-free bacon until crispy, then drain the fat and reserve the bacon and a tablespoon of the melted fat. Toast up some regular wheat bread for the wheatavores, and a couple of slices of Glutino bread for the celiacs.  Set out some butter, the bacon pieces, and a couple of glasses of Riserva Ducale Chianti, 2005.

Next, make the dressing:

Mix: 1 teaspoon gluten-free Dijon mustard

1/2 a medium shallot, chopped fine

1/2 a clove of garlic, minced

1/4 teaspoon dried thyme

salt

fresh pepper

1 Tablespoon red wine vinegar

1/2 a Tablespoon sherry wine vinegar (that’s 1 1/2 teaspoons)

1 Tablespoon reserved bacon fat

2 Tablespoons olive oil

Dress the lettuce, then fry 4 eggs, over easy, in the remaining bacon fat.  Season them with salt and pepper.  Serve the dressed salad with fried eggs, bacon pieces, toast and butter on the side, and a glass of chianti!

Make sure all your ingredients are gluten-free!

Dairy Free, Recipes, Salads and Dressings, Spring, Summer, Vegetables bacon, cooking, eggs, food, gluten free, gourmet, greens, lettuce, recipe, salad

Banana Coconut Ice Cream

0 · May 24, 2009 · Leave a Comment

It’s time for the Memorial Day barbecue, and with 6 extra-ripe bananas on the countertop, our minds wandered – what to do, should we make 4 loaves of gluten free banana bread?  No, and although deep-fried banana fritters were sounding pretty good what ended up seeming much better was homemade ice cream.

This recipe is refreshing, and not high in fat.  The bananas have a slight tartness, and the dulce de leche’s deep brown color covers up the color of the overripe bananas, making an attractive finished ice cream.  There are no egg yolks or heavy cream in this ice cream, but the texture is creamy.  The major ingredient is banana.

Make the following mixture (use a potato masher to mix), and chill in the refrigerator for a few hours:

3 cups 1% milk

1 cup coconut milk

2/3 cup sugar

6 very overripe bananas, too mushy for anything but banana bread

13.4 ounce can of gluten free Dulce de Leche (or you can make your own)

1/2 teaspoon cinnamon

1/8 teaspoon cardamom

1/8 teaspoon cloves

1/8 teaspoon nutmeg

The mixture will be brown, like caramel.  After the mixture has chilled, freeze it in an ice cream maker according to the directions.

Make sure all your ingredients are gluten free!

Dessert, Fall, Recipes, Summer banana, coconut, cooking, dessert, dulce de leche, food, gluten free, gourmet, ice cream, recipe

Gluten Free Trifle

0 · Mar 24, 2009 · Leave a Comment

It’s spring and the temptation to purchase strawberries is renewed again.  Unfortunately, “strawberry disappointment” follows, when the first strawberries to arrive in the supermarket, while red, are not flavorful!  Time to make trifle, but how to do this in an interesting and gluten-free way?

We searched the internet for gluten free trifle recipes, and found the most interesting recipe, not quite gluten-free and way too complicated, at this address: Teafactory.  Even though this recipe is “simplified” it is still too complex for ordinary humans like us, and it includes puff pastry which is not gluten free, and 2 custards.  So, we have modified it to a delicious, easy and gluten-free dessert.

At the request of a fan, we have added the measurements for volume, rather than weight, for the dry ingredients, but we strongly recommend using the weights.  GF flours can be ground finely or coarse, and that changes the volume tremendously.  When we measured the ingredients with tablespoons, we used Koda Farms mochiko, and finely ground cornmeal and garbanzo bean flour from the natural foods store nearby.

Included in the original recipe is a Cardamom Biscuit which is gluten free and a very close textural approximation of an English digestive biscuit, but with a whallopping cardamom punch.  This is an excellent cookie in its own right.

You need to make 4 layers:  The strawberries, the cookies, the custard, the whipped cream.  Use a scale to measure the ingredients.

Berry Jelly:

Make a compote by mixing the following ingredients and simmering them for 20 minutes:

250 grams of strawberries, cut in quarters

40 grams of sugar (3 TB or slightly more)

1 teaspoon gluten free amontillado sherry or vanilla

1 teaspoon lemon juice

(the original recipe includes rose water which we omitted)

When it has cooked for 20 minutes, add 1 envelope of plain gelatin (no flavor) which has been softened in cold water.  Do not add the gelatin directly to the strawberries without first softening the powder in water or the gelatin will form globs of glue in a strawberry soup – not what you want.  Cool to room temperature then distribute amongst 8 dishes that hold about 1 cup each. Refrigerate these 8 dishes until the strawberry layer has firmed up. (If you do not add the gelatin, the strawberry liquid would soak through the biscuits which are the next layer.)

Cookie layer: (this has been altered to eliminate some refrigerating and freezing steps)

Use a scale to weigh out the ingredients – this really makes a difference!

70g unsalted butter (softened) – about 5 Tb

45g white sugar – about 3 Tb + 1 tsp

25g ground almonds – about  3 Tb + 1 tsp

¼ tsp salt

½ tsp baking powder

35g glutinous rice flour (also called mochiko) – about 4 Tb + 1 tsp

25g cornmeal – about 3 Tb + 1 tsp if finely ground

20g chickpea (garbanzo bean) flour – about 2 Tb + 2 tsp

1 tsp freshly ground cardamom (skin the pods, and grind 1 teaspoon of seeds in a mortar and pestle)

1/2 tsp powdered vanilla from Authentic Foods

1 egg yolk

  1. Cream the butter & sugar.
  2. Add all the dry ingredients & mix well.
  3. Add the egg yolk and mix until a dough forms.  Make the dough in to a disk shape.
  4. The original recipe calls for chilling the dough for one hour here, but we just proceeded since the air is cold in winter.
  5. Get 2 pieces of waxed paper about the size of a cookie sheet.  Put 1/8 cup of white rice flour on the bottom piece, put the disk of dough on the flour and turn it over to coat both sides with rice flour.  Put the second sheet of waxed paper on top. Roll the dough to 1/8 inch thick and cut cookies in a size that will fit in the dishes that have the strawberry mixture in the bottom.  Re-roll the dough as necessary to make 16 cookies (17 if you want to taste one.)
  6. preheat the oven to 300F
  7. Transfer the cookies to a parchment lined baking sheet and bake for 10-12 minutes until golden. Cool on the pan, then remove them gently and put one cookie on top of the strawberry mixture in each dish.  You will have 8 cookies left for the next layer.

Custard layer:

Mix 1 cup 2% milk, 3/4 cup light cream, 1 teaspoon amontillado sherry and one small (3 oz.) package of gluten free instant vanilla pudding.  Beat with a whisk until thick.  Divide amongst the 8 dishes on top of the cookie layer.  Add another cookie on top of this custard.

Whipped cream:

Whip one cup of heavy whipping cream with some sugar to sweeten. Add vanilla or sherry to flavor this whipped cream and distribute on top of the last cookie layer.

Candied nuts (can be omitted):

Taste some pumpkin seeds and sunflower seeds to see if their flavor will be an asset to the dish.

In a pan that can be heated relatively hot, put 2 Tb of pumpkin seeds and 2 Tb of sunflower seeds with 2 Tb of sugar.  Heat the nuts over medium heat, stirring constantly until the sugar melts and the nuts brown slightly.  Transfer to a plate immediately and cool completely.  Garnish the top of the whipped cream with these nuts if you want an extra crunch texture.

Make sure all your ingredients are gluten free!

Dessert, Recipes, Winter berries, cardamom, cooking, custard, dessert, food, gluten free, gourmet, recipe, strawberries, strawberry, trifle

Ghee

0 · Jul 5, 2008 · Leave a Comment

Ghee is a useful type of highly flavored clarified butter. You can use it in French and fusion recipes, substituting 1/4 the amount of ghee for the amount of butter in some sauces, achieving great flavor without all the fat.

To make ghee, put one pound of unsalted butter in a pot, and simmer it on low-medium heat without stirring for about 20 minutes. There will be foam that rises to the top, and then the butter will bubble and boil as the water content evaporate – when the solids at the bottom of the pot start to brown, remove the pot from the heat. The flavor of the browned bits in the bottom of the pan will permeate the butter, giving ghee its distinctive browned-butter taste! Make sure that the solids do not burn, but also make sure that they get browned. You have to walk a fine line, when making ghee.
Strain the ghee through a fine strainer in to a one-pint Mason jar (canning jar that can withstand high heat), being careful not to burn yourself, and let it cool. When this clarified butter is cool, you can store it in the refrigerator. Some recipes say that you can store it without refrigeration, but we always keep it in the refrigerator anyway.

Condiments and Sauces, Recipes cooking, ghee, gluten free, recipe

Dal

0 · Jun 28, 2008 · 1 Comment

We love dal – it is an Indian lentil dish which is very useful for gluten-free households containing vegetarians!

This is an easy and delicious dal with homemade spice mixtures, so you can use known gluten-free spices from companies that guarantee the gluten-free status of their products.

In a large casserole that can go in the oven (we don’t like the term “flame-proof” and refuse to use it), put all of these ingredients:

3 Tablespoons ghee (a clarified browned butter, or use unsalted butter)

1 Tablespoon ground cumin

1 teaspoon whole cumin seeds

1 teaspoon ground turmeric (this spice stains clothes – be careful!)

1/2 teaspoon ground ginger

1/2 teaspoon fresh grated nutmeg (optional)

1/2 teaspoon cayenne pepper (or one dried cayenne pepper)

1/2 teaspoon garam masala (make your own, using a recipe by Madhur Jaffrey or Julie Sahni)

1/4 teaspoon cinnamon

1 teaspoon brown sugar

1/2 teaspoon vinegar

1 teaspoon fresh grated orange zest (orange part of the orange peel)

Juice of one orange

1 onion, sliced

1 1/2 cups masoor dal (red lentils) washed (see note below)

1/2 cup moong dal (split, yellow in color and elongated in shape) washed (see note below)

4 cups hot water

2 teaspoons salt

Notes: Make sure to wash the dals carefully, removing any small stones. Put the dals in lots of water, stir around and remove the water. Repeat several times until the water runs clear. It does not really matter what proportions of red lentils and masoor dal are used. The original recipe this is based on called for 2 cups red lentils.
Ghee gives a better flavor than butter, and butter is better than other alternatives. If you use margarine or oil instead of the butter, the depth of flavor will be compromised. If you can use the ghee or butter, by all means do!

Stir everything together, cover and bake in a 300 degree oven for 45 minutes. Remove the top and bake for 15 more minutes. Check to make sure it doesn’t get too dry.

Serve with basmati rice, chutney (homemade!), and yogurt.

This recipe includes the vegetarian aspects of a recipe for Capon from the cookbook called “Braise” by Daniel Boulud.

Fall, Recipes, Spring, Summer, Vegetables, Winter dal, garam masala, ghee, orange, recipe

Batter Fried Fish – gluten free!

0 · Mar 2, 2006 · 2 Comments

One of the most popular postings on the Gf-Zing! website is this method of making batter for frying fish.  It originally comes from Julie Sahni’s Classic Indian Cooking book. She uses cornstarch and chickpea flour, which yields a much nicer fried fish than any wheat flour will do. The batter is excellent for hake, cod, scallops etc. Cut larger firm-fleshed fish filets (skinless) in to 2 x 1 inch pieces. The recipe for the batter can be halved.

You marinate the fish in seasoning to flavor it, then dip it in batter, then fry and serve.

Seasoning for 2 pounds fish or scallops (marinate in this mixture for 2 hours):

1 teaspoon minced garlic
1 Tablespoon grated fresh ginger
1-2 jalapenos, minced (omit if you don’t like spicy food)
1/2 teaspoon coarse salt (or 1/4 teaspoon table salt)
pepper
juice of 1/4 lemon

Alternative seasoning:

Sprinkle the fish liberally with a few teaspoons of a spice mixture of your choice, for example (the following makes a lot of extra spice mixture):

1 teaspoon of gluten free cayenne pepper
1 Tablespoon of fresh ground black pepper
1 Tablespoon gluten free paprika
1 1/2 teaspoons dried EACH thyme and oregano
1 Tablespoons gluten free garlic powder
2 Tablespoons kosher or sea salt

The batter:

3/4 cup corn starch
3 Tablespoons chick pea flour (store this in the freezer)
1/4 teaspoon cayenne pepper or other seasoning
1 teaspoon coarse salt (or 1/2 teaspoon table salt)
1 Tablespoon gluten free baking powder
3 Tablespoons peanut oil
2 large eggs
3 Tablespoons cold water

Mix the dry ingredients together, then add the wet ingredients and stir until smooth. Dip pieces of seasoned hake, cod or whole scallops in the batter and fry in very hot oil (2″ deep) until golden brown. If you use a deep fryer, the result will be superior.

Make sure all your ingredients are gluten free.

*Most Popular Recipes*, Dairy Free, Fall, Fish and Seafood, Recipes, Spring, Summer, Winter battered, ceci bean, chickpea flour, cooking, deep fried, fish, fish batter, food, fried, garbanzo bean flour, gluten free, gourmet, recipe

  • Go to page 1
  • Go to page 2
  • Go to Next Page »

Primary Sidebar

Check out our Coupon Collection

Click Here to go directly to the Coupon page

Read more at The Rambling Epicure:

Click Here: The Rambling Epicure

QR code for your phone

qrcode for gfzing
NFCA logo

Blogroll

  • Aloha World Ono Recipes
  • Book of Yum
  • Dulce Cocina sin Gluten
  • Gluten Free Beer Association
  • Glutenfreie Rezepte | kaMehl
  • Hawai'ian Electric
  • Laylita's – Ecuador
  • Nombudsman
  • Papilles et Pupilles
  • Sea Salt with Food
  • The Rambling Epicure The Rambling Epicure is a daily international food chronicle, and the first online newspaper to follow global food trends and news.
  • Triumph Dining

Monthly Archive

Proud member of FoodBlogs

Load up on new recipes, exclusive goodies, + more!

Get the exclusive content you crave straight to your inbox.

Things to Read

Find by keyword

bacon baked baking beans beef berries blueberry cake cheese chicken chocolate coconut cooking curry dessert DIY dried beans easy fish food fruit GF ghee gluten free gourmet homemade lamb maple syrup meat microwave New England Hard Cider pie pork pumpkin recipe recipes rice salad sauce soup stewed strawberries sweet potato thai red curry vegetarian

Copyright © 2023 GF-Zing! on the Cravings Pro Theme