• Skip to primary navigation
  • Skip to main content
  • Skip to primary sidebar
  • Skip to footer

GF-Zing! logo

  • Home
  • Coupon Collection
  • GF Foods & Groups
  • Ask Gf-Zing!
    • About the Author
    • About Gf-Zing!
  • Nav Social Menu

    • Email
    • Facebook

Thanksgiving

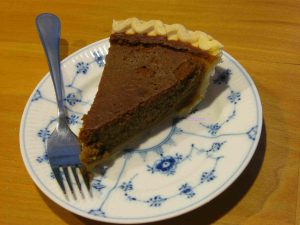
Maple Pumpkin Pie, no dairy, from fresh pumpkin

0 · Jan 14, 2011 · Leave a Comment

small pumpkin pie
Non Dairy, Gluten-Free Pumpkin Pie

This interesting recipe from gfzing.com has no milk, cream, rice milk or any other type of milk, is gluten free and uses fresh rather than canned pumpkin. The type of pumpkin used is the small “pie” or “sugar” pumpkin – they are sold at farm stands for the purpose of making pies. The natural liquid in the freshly cooked pumpkin is sufficient liquid and no added milk products are needed.  Do not use canned pumpkin for this recipe.

The pie is quite light, and since the only sweeteners are maple syrup and molasses the pie is not too sweet.

Ingredients:

  • 1 “pie” or “sugar” pumpkin
  • 1/2 cup dark maple syrup
  • 1/4 cup molasses
  • 3 eggs
  • 1/2 teaspoon salt
  • 1 teaspoon cinnamon
  • 1/2 teaspoon ginger
  • 3/4 teaspoon freshly grated nutmeg
  • 1 unbaked Whole Foods gluten free (gf) pie shell, thawed and cracks repaired

Preheat the oven to 450 degrees F.

Defrost the gluten free pie shell and repair any cracks.  Sometimes frozen pie crusts get broken, but you can smush the crust back together along the breaks to make a whole crust.

Next, remove the stem (just break it off) from the pumpkin and stab the pumpkin through the shell to the center in 4 or 5 places with a pairing knife – to let out steam.  You don’t need to cut the pumpkin up or remove the seeds before cooking.  Set the prepared pumpkin in the microwave oven and cook it as for baked potato (use the setting on the microwave).

Remove the very hot pumpkin from the oven using potholders and let cool completely.   Now cut the cooked pumpkin in half, use a large spoon to scoop out and discard the seeds. Then, scoop out the cooked flesh, set it aside for use and finally discard the peel.  You should have about 24 ounces cooked pumpkin (weigh the cooked flesh.)  You do not need to mash or strain the pumpkin flesh.

In a food processor, combine about 24 ounces ( one and a half pounds) of cooked fresh pumpkin (not canned) with all the rest ingredients except the pie shell.  Process until the mixture is completely smooth. Pour most of the pumpkin mixture in to the uncooked pie shell until the pie shell is filled almost to the top.  Depending on the size of the pumpkin, there may be a cup or so of extra filling.  If so, grease a small oven-proof dish and pour the excess in there.

Put the pie in to a 450 degree oven for 10 minutes, then reduce the heat to 350 and cook for another 45 minutes.  Check the pie – if the filling is set, the pie is done.  Cool and serve with your favorite pie topping.

For the extra filling, bake that along with the pie but it will be done and ready to take out of  the oven well before the pie. You can use this cooked pumpkin pie filling to make a nice pumpkin parfait, layering the cooked chilled filling with your favorite gluten free pie topping (whipped cream if you use it).

Breakfast, Dairy Free, Dessert, Fall, Microwave Cooking, Pie, Recipes, Thanksgiving, Vegetarian, Winter dairy free, gluten free, pie, pumpkin, vegetarian

Thanksgiving Recovery Salad

0 · Nov 29, 2010 · Leave a Comment

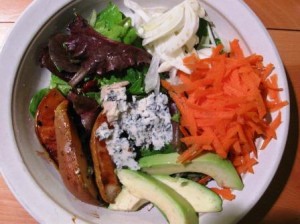
After three days of recovery from the delicious Thanksgiving feast, we want a GF salad!  This one from www.gfzing.com has lots of vegetables and fruits, with a little cheese and nuts.

Thanksgiving Recovery Salad gfzing.com
Thanksgiving Recovery Salad from gfzing.com

A composed salad of the following ingredients fits the bill exactly:

  • 2 Roasted Pears (recipe is below)
  • 1/2 Avocado, peeled, pitted and sliced
  • 1/2 bunch Fennel, sliced or shaved
  • 2 ounces Goat Cheese or gluten free blue cheese, chunked (optional)
  • 2 TB sweetened dried cranberries or raisins (gluten free)
  • 1/3 cup Candied Nuts
  • 6 cups Salad Greens, washed
  • 1 Carrot, grated
  • 1 recipe Tangerine Dressing

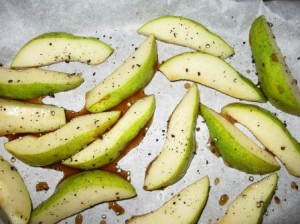
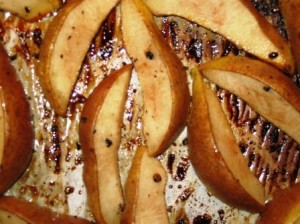
Roasted Pears: wash 2 unripe (hard) Bartlett pears, remove the cores and cut them in to 8 pieces, stem-to-blossom end.  No need to peel them. In a small bowl, mix 1/4 cup pure Grade B maple syrup (or Grade A Dark Amber) and 1 TB minced fresh ginger (optional).  Combine the pear slices with this syrup mixture, then spread the pear slices on a foil or parchment paper-lined baking sheet.  Sprinkle with salt and pepper.  Bake at 500 degrees for 15 minutes.  Turn the slices over and bake an additional 5 minutes if desired.  You cannot use a silpat lined pan for this process because the oven temperature exceeds the heat tolerance of silpat.

Roasted Pears gfzing.com before baking
Roasted Pears before baking
Roasted Pears after baking
Roasted Pears after baking gfzing.com

Avocado: Peel, pit and slice 1 ripe avocado, then mix the slices with the juice of a lemon or tangerine.  The citric acid in the fruit juice will keep the avocado from turning brown.

Candied Nuts: Mix walnut meats, pecans or almonds with 2 TB granulated sugar.  Place in a small frying pan and fry over medium heat for about 5-10 minutes, stirring constantly, until the sugar melts and begins to caramelize, sticking to the nuts.  Remove the nuts from the pan at this point and place on a parchment paper-lined plate to cool.  Separate the nuts so they don’t form one big nut mass.

Assemble the salad – Gfzing.com recommends that the greens, fennel, grated carrot, and cranberries or raisins can be tossed with the dressing.  On each individual salad plate, gently arrange the avocado slices, pear slices, candied nuts and optional cheese on top of the dressed greens.  Don’t try to toss avocado slices with the salad – disaster that way lies!

Fall, Recipes, Salads and Dressings, Thanksgiving, Vegetarian gluten free, pears, salad, tangerine dressing, vegetarian

Homemade Poultry Seasoning

0 · Nov 23, 2010 · Leave a Comment

herbs drying gfzing.com

Once again, Gfzing.com cracked the binding on a bunch of cookbooks to find a tasty gluten free poultry seasoning for the Thanksgiving turkey stuffing.  We looked through the usual suspects, those older books that included formulas for standard seasonings and came up empty! Then, on an old bottle marked “poultry seasoning,” we found a typed list, taped to the bottle.  The ingredients are listed below.

The herbs and spices for poultry seasoning are similar in all  formulations, it is just the proportions that change. The sage and thyme should predominate.  Some poultry seasoning recipes include nutmeg, and some include celery seed.

We dried the herbs from our garden, at the end of the fall, by hanging them upside down in the kitchen to dry.  If you don’t have home-dried herbs, you can use bottled herbs.

  • 2 parts dried sage
  • 3/4  part dried rosemary
  • 1 part dried marjoram
  • 1/2 part ground black pepper
  • 1/2 part grated nutmeg
  • 1  1/2 parts dried thyme

These ingredients are listed in “parts” – you can substitute teaspoon or Tablespoon for “part” in the recipe, depending on how much poultry seasoning you want to make.  You can assemble all of these in a large, stone mortar and pestle and grind them quickly to a fluffy powder. It is the sage that adds the fluffiness to this preparation.

Condiments and Sauces, Fall, Meat Dishes, Meat-eater, Recipes, Thanksgiving gluten free, homemade, recipe, seasoning, spice mixture

Thanksgiving Turkey – why does it seem to take forever to cook?

8 · Nov 14, 2010 · 2 Comments

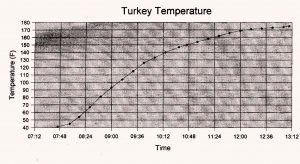
Almost a decade ago, we enlisted the kids’ help to keep careful tabs on the temperature of the Thanksgiving turkey as it was roasting. We roasted a 24 pound, unstuffed turkey from a local farm (all natural, no “solutions” injected in to it, and minimally processed) at a constant temperature of “325” F – that is what the oven dial was set to, at any rate. We used a thermometer with a probe connected to a digital display – this type of thermometer allows you to run this experiment while making only one puncture in the turkey.  The turkey started cooking at 40 degrees.

As you can see from this graph, it took about 6 hours to bring the roast from 40 degrees to 175.  The temperature rose quite quickly for the first 4 hours, then the change in temperature slowed down considerably.

turkey roasting graph from gfzing.com
The temperature of a roasting turkey, over time (gfzing.com)

This experiment, and subsequent discussions with scientists, gave us a greater understanding of the Thanksgiving paradox: as the turkey gets closer and closer to being done it never seems to be done. After several hours, as the house fills with the good smell of roast turkey, the recalcitrant turkey sits there with the thermometer showing clearly that it is not yet cooked. We always start to wonder if the oven has gone out or if the oven thermostat has ceased working. We shake the drumstick, we poke the turkey, we open the oven way too many times, putting a hand in to see if it still feels hot etc.  Why do we do this, year after year – with the Thanksgiving turkey, a Christmas roast beef, and any other large piece of roasting meat?

I spoke with a well-known astrophysicist, to try to get some answers. He says people tend to view trends as linear processes, so they will see the temperature rising quickly at the beginning,  assume that this quick trend will continue at the same rate, and feel that the turkey should be done much earlier than it really will be.  He says in fact “the plot above is a solution of a well-known heat diffusion equation* which applies to all cooking processes with the exception of microwaves.” The steepness of the line in the curve is a measure of the heating rate of the turkey.  The heating rate (the change in temperature in a particular time) is proportional to the change in temperature between the turkey and the oven. The temperature of the turkey will approach, but never reach, the temperature of the oven. As the turkey gets warmer, the temperature change in an hour decreases (it goes up, but less quickly).

The astrophysicist, who likes to simplify problems so they can be solved, says you can “view the turkey as a solid,” “assume a spherical turkey” and “assume a non-spherical turkey.”  He then considered the problem of cooking stuffed turkeys vs. unstuffed turkeys, the stuffed turkey being closer to a spherical turkey and the unstuffed turkey having an empty cavity which reduces the thickness of the material to be cooked and effectively reduces the size of the turkey.  The concept of a spherical turkey provoked a lot of laughs, but in the real world, there are no spherical turkeys. Real turkeys have wings and drumsticks.

He provided a helpful reference to The Science of Cooking, by Peter Barham, which notes “… the cooking time is always proportional to the square of the size of the food, rather than its weight.”   You can understand this if you consider that the same weight of turkey, cut in to pieces, will cook in much less time than the same exact turkey cooked whole.

This is why chefs will tell you to cut the turkey up in pieces,  roasting the light meat and dark meat for different amounts of time so that the light meat does not become dry and the dark meat gets more time in the oven.  However, the “dissected turkey” method of cooking the Thanksgiving turkey is impractical for those cooks who want to present a Norman Rockwell turkey (visually appealing whole turkey on a platter) at the table.  The Norman Rockwell turkey requires compromises, and more time than you may think.

*the solution of the heat diffusion equation is an exponential process, if you extrapolate a line from the early cooking temperature data you will expect the turkey to be cooked many hours sooner than when it is actually cooked.

Christmas, Holidays, Meat Dishes, Meat-eater, Recipes, Thanksgiving gluten free, recipe, roasting, turkey

Susie’s Cheesecake

0 · Jul 5, 2010 · Leave a Comment

Sue Carnase, of the Bronx, New York, made the best cheesecake ever.  It was tested many times in double-blind taste tests and it always came out at the top of the rankings. Here is her recipe, in her own words, with a slight modification that will make the recipe gluten free.

“In a large bowl cream together 1 pound each of cream cheese, softened, and ricotta and one cup sugar and beat in 4 large eggs at room temperatures, one at a time, beating well after each addition.  Add 1/2 stick (2 ounces) butter melted and cooled, 3 tablespoons each of gluten free flour mix* and cornstarch, and 2 1/2 teaspoons vanilla and 1 teaspoon fresh lemon rind, beat mixture well until well combined.  Fold in 2 cups sour cream, pour batter in ungreased 9 inch springform pan and bake the cake in the middle of a preheated moderately slow oven (325) for 1 hour and 15 minutes.

The cake will be soft in the center.  TURN OFF THE HEAT (DO NOT OPEN THE OVEN DOOR.) Let the cake stand in the oven for 2 hours.  Let the cake cool completely in the pan on a rack and chill it loosely covered for at least 4 hours.  Remove the sides of pan and transfer cake to a plate.  You can freeze it at this point.  Remove from the freezer the day before use and refrigerate.

HINTS: Cheesecakes often crack while baking and some rise high and later fall, but these are not matters of concern.  Cheesecakes do not take kindly to sudden changes in temperature.  SO DO NOT OPEN OVEN DOOR DURING THE BAKING.

I find it much easier to cream the cheeses by putting them through the Cuisinart.”

*original recipe called for wheat flour

Further notes from GF-Zing!: The batter will fill most of the pan and during the baking the cake will rise to the very top of the pan or higher.  Do NOT use a smaller pan than called for in the recipe.  Full fat ricotta makes a nice cake.  We use Friendship brand sour cream because its only ingredients are milk, cream and enzymes. We line the bottom of the spring form pan with parchment paper to make transferring the cake to a plate a little easier.

Shopping List for Susie’s Cheesecake:

1 pound cream cheese

1 pound ricotta

Sugar

4 large eggs

Butter

GF Flour

Cornstarch

Vanilla

Sour Cream

1 lemon

Dessert, Fall, Holidays, Recipes, Spring, Summer, Thanksgiving, Winter baking, cake, cheesecake, cooking, delicious, food, GF, gluten free, gourmet, ricotta

Gluten Free Thanksgiving, pies, sides

0 · Nov 6, 2006 · Leave a Comment

There is a good collection of gluten free recipes for Thanksgiving dishes to grace your table this year – click on the Thanksgiving link in the index on the right hand side of this page, and enjoy!

Holidays, Pie, Recipes, Thanksgiving pie, sides, Thanksgiving

Gluten Free Turkey Dressing (stuffing)

0 · Oct 14, 2006 · Leave a Comment

A few thoughts on gluten free Thanksgiving dining…the first year, we felt obligated to pursue some type of exact replica of glutenated turkey dressing – and were disappointed by many expensive and wasteful batches of dressing with the consistency of wet kitty litter.  We eventually made something good – but –  the second GF year, a relative made an excellent wild rice and mushroom dressing – better than good. A new pathway for gluten free Thanksgiving dining!  And, with the wild rice being native to North America it seemed very fitting somehow.
To find the recipe for Wild Rice Stuffing with Wild Mushrooms, buy some dried pears and seek the recipe here:

http://www.epicurious.com/recipes/recipe_views/views/105886

That dressing turned our minds around, and this year we will consider using a butternut squash risotto, along the lines of the one in the Bistro Cooking at Home by Hamersley.  Hamersley’s butternut squash ristotto is made with maple syrup, rosemary, sherry and sherry wine vinegar, along with cubes of butternut squash. We sometimes use shallots, and sometimes onions and garlic. The flavors are nicely balanced, with plenty of “umami” or fifth taste flavor as well, even if you cut the amount of butter in half.

We heartily recommend using a rice dressing (or stuffing) for the gluten free turkey dinner, and making it in a separate dish rather than stuffing it in to the bird.

Update for 2010: You can also use Against the Grain rolls for making any normal stuffing recipe.  If you like, you can use a mixture of half Udi’s Bread and half Against the Grain Rolls.  Cut the rolls, or the rolls and bread, in to large cubes and toast in the oven for 20 minutes at 325.  The Against the Grain rolls will maintain their structural integrity and stand up to the liquids in the dressing, while the Udi’s bread will disintegrate somewhat.  The combination of the two textures works well together.

*Most Popular Recipes*, Fall, Holidays, Recipes, Rice, Thanksgiving

Cranberry Orange Walnut Quick Bread

0 · Mar 2, 2006 ·

It is up to the individual to decide whether they can eat oats or not. To eat oats or not is a controversial issue in the gluten free world. Please research the oat issue carefully for yourself, and decide what you want to do in consultation with your healthcare professional. If you are feeding a gluten-free guest, please inquire whether they eat oats or not. You may substitute dried coconut for the oats in this recipe. This recipe was developed by Gf-Zing! , which celebrates flavor in the gluten free world.

2 cups gluten free cookie flour
1 cup rolled quick or old-fashioned gluten free oatmeal, uncooked or oat substitute
3/4 cup sugar
2 teaspoons gluten free baking powder
1/2 teaspoon baking soda
1/2 teaspoon Authentic Foods powdered gluten free vanilla
1/2 teaspoon salt
1 teaspoon xantham gum

3/4 cup orange juice
1 teaspoon almond extract
2 eggs
1/3 cup extra light olive oil
grated zest of one orange
3/4 cup chopped dried cranberries
1/2 cup chopped walnuts

Mix the first 8 ingredients in one bowl, and mix the second 7 ingredients in a second bowl. Grease a 9×5 inch loaf pan, line the bottom with parchment paper, and grease again. Flour the pan lightly with mochiko (sweet rice flour).

Combine the contents of both bowls and stir briefly just until thoroughly blended. Spoon the dough in to the prepared pan. Bake at 350 degrees for 1 hour to 1 hour and ten minutes. When a toothpick inserted in the center comes out clean, the bread is finished.

Remove the pan from the oven and let cool on a rack for one hour. Turn the bread out of the pan and let cool completely before serving.

Make sure all your ingredients are gluten free, and investigate the oat issue and the source of the oats and ask your medical professional for their advice regarding this topic before eating oats.

Bread, Breakfast, Christmas, Dairy Free, Dessert, Fall, Holidays, Recipes, Thanksgiving, Winter

The Gravy Problem

0 · Nov 22, 2005 · Leave a Comment

2010 Update –

The immersion blender is the modern GF cooks best friend!  When your gluten free gravy lumps up, as it may, take out that immersion blender that someone gave you at the holidays, and follow the directions carefully.  Following the directions, you can blend the gravy without splattering the whole kitchen!

If all you have in the cupboard is some mochiko (sweet rice) flour for thickening, take heart.  Go ahead and follow an old favorite recipe for gravy, using equal parts of butter and mochiko. For example, you might melt 3 Tablespoons of butter and stir in 3 Tablespoons of mochiko.  Then, you start adding your stock, stirring slowly.  Suddenly, the whole thing goes lumpy and you fear disaster!  No worries! Here’s where you transfer the mess to a deep bowl, use the immersion blender (magic occurs), then transfer the mixture back to the cooking pot and continue whisking in stock. Presto, the mixture is a nice smooth gravy.  You can use the same trick when making macaroni and cheese, by the way.

—and now, the original article from 2005:

The annual holiday dilemma is – how do you make a gluten free gravy that is not reminiscent of glue, or perhaps paste?

There are several methods that work well, and Gf-Zing! has tested several options for the gluten free community.

First, let’s talk about the gourmet version. Here, you add a reduction or a ‘gastrique’ to the stock, and thicken the gravy with arrowroot. It is more of a sauce than a gravy, but will be delicious. You may want to increase the quantities to produce more gravy!

Degrease the pan juices from the roast bird. To the remaining juices, add 2 cups of hard cider (or 1/2 cup white wine) and reduce by heating – reduce it down to just 1/4 cup or a few tablespoons. Add 1 1/2 cups of stock, and reduce this mixture down by one third.

Mix 1 Tablespoon of arrowroot or cornstarch with a little stock and add it to this remaining sauce gradually, stirring constantly. Heat until thickened. Add salt and pepper as needed, and strain the sauce before serving. You may add currant jelly, as well, a few tablespoons, and a few tablespoons of fresh butter, to enrich the sauce.

You can make a similar sauce using a french ‘gastrique.” For this, you cook 1/4 cup of white sugar with 1/4 cup of red wine vinegar in a 2-quart saucepan until it caramelizes into a brown syrup – this will be thick, and you don’t want it to burn so watch carefully. Next, add 1 1/2 cups of rich stock and a little wine if you like, while being careful not to be burned by spattering syrup! The caramelized vinegar and sugar is the gastrique that will make your gravy taste really good. Thicken as before, adding a mixture of 1 Tablespoon arrowroot mixed with enough water to make a soupy mixture, and cook until thickened. Refresh this gravy with a little butter, and add some salt and pepper as needed.

For a more standard gravy, use a gravy flour mix as follows:

2 Tablespoons brown rice flour
3/4 Tablespoon sweet rice flour (mochiko)
1 1/2 teaspoons tapioca starch
1/3 teaspoon of xantham gum

Mix these ingredients together thoroughly, and then use it in place of flour in your regular gravy recipe.  Give the gravy a zap with the immersion blender and you will have a typical gravy, maybe even better than a wheat-based gravy.

Make sure all your ingredients are gluten free!

Ask Gf-Zing! - Responses, Condiments and Sauces, Holidays, Recipes, Thanksgiving

Pumpkin Pie – dairy and gluten free

0 · Nov 15, 2005 · 7 Comments

This recipe has been developed and tested for the gluten free community by Gf-Zing!

A one-crust unbaked gluten free pie shell (9-inch deep-dish glass pie plate is perfect)

Filling:

1 can pure pumpkin (1 pound size – the “one-pie” size)
4 large eggs
2/3 cup sugar
1/2 teaspoon salt
1 1/2 teaspoons cinnamon
1/2 teaspoon ground ginger
1/2 teaspoon freshly grated nutmeg
1/4 teaspoon allspice
1/4 teaspoon ground cloves
1 1/2 cups almond milk

For a standard pumpkin pie, made with evaporated milk or heavy cream, the recipe would use fewer eggs. For this pie, which uses almond milk instead, more eggs are required to set the filling. This pie also includes less sugar than standard recipes.

Mix all the ingredients for the pie filling together with a whisk, electric mixer or food processor until thorouhly mixed. You can mix the pie filling in the same food processor that you mixed the pie crust in, and any left-over crust ingredients will just get mixed in to the filling with no ill effects on the pie.

Anyway, after the filling is thoroughly mixed, pour it in to the unbaked pie shell set in a glass pie plate. The filling will be quite thick and there will be enough for a deep dish pie. Bake in a preheated 425 degree oven for 10 minutes, then reduce the heat to 350 and bake for another 35 minutes or more, until the filling is set. If the pie is 9-inches and deep dish, it may take as much as an additional 20 minutes before the filling is set. To test the pie, dip a clean, dry, knife-blade in to the center of the pie. The knife should come out nearly clean, but little bits of filling clinging to the knife are ok. The top of the pie will start to crack.

Remove the pie from the oven. Cool completely. Pumpkin pie is an egg-based custard pie, so it should be kept chilled when not being served, and then brought to serving temperature.

If you prefer, you can use a one-pie can of squash, or 1 1/2 cups of home-cooked, mashed, drained pumpkin or winter squash (butternut, buttercup etc.). To use winter squash or sugar pumpkin, halve them and seed them, then bake or microwave until tender.  Finally, remove it from the skin, allow it to sit overnight, then strain it thoroughly to remove excess liquid.

If you don’t care about using dairy but want to use less fat, you can substitute 1 2/3 cups of 1% skim milk or gluten-free fat-free evaporated milk for the almond milk, and use 2 eggs plus 1/2 cup of gluten-free eggbeaters product for the eggs. Make sure the product is gluten free.
Make sure all the ingredients, including the spices, are guaranteed gluten free by the manufacturer. Certain manufacturers guarantee the gluten-free quality and accurate labeling of their spices. Read the internet gluten-free lists to find out which manufacturers are currently maintaining this level of quality.

The original concept of this recipe is from the Victory Garden Cookbook by Morash.  There, the recipe was a an old-fashioned winter squash pie, and called for milk or cream.

*Most Popular Recipes*, Breakfast, Dairy Free, Dessert, Fall, Holidays, Pie, Recipes, Thanksgiving, Winter

Crab Cakes with Coconut

0 · Nov 13, 2005 ·

These appetizer sized crab cakes are delicious and rich! People consume quite a lot of them. That’s why the recipe uses 2 pounds of crab meat. This recipe has been adapted for the gluten free community by Gf-Zing!

2 pounds fresh or canned gluten free crab meat (drained in a strainer) – about 1 quart
1 pound frozen grated fresh coconut (Asian grocery stores carry this product) – one package
7-8 cloves garlic, finely grated
3 Tablespoons gluten free Fish Sauce (check the label for wheat)
3 Tablespoons gluten free Oyster Sauce (choy sum)
4 eggs
freshly ground black pepper
cornstarch if necessary

Glutino brand corn and rice bread, made in to crumbs (for rolling the cakes in before frying)

Mix the crab meat, coconut meat, garlic, sauces and pepper, and eggs together. Do not break up the crab too much – leave some whole chunks in there. Make a mixture that can be formed in to small cakes. If the mixture is too wet, add up to 2 Tablespoons of cornstarch and some of the bread crumbs, until the mixture will form cakes.

Make bite-sized cakes from the mixture, – about 1 – 1 1/2 inches across, and roll them in the breadcrumbs and place them on waxed paper, ready for frying.

Heat some frying oil in a large pan until quite hot – 400 degrees, or prepare a deep-fryer. Be careful not to burn yourself! If you are making this dish for gluten-free guests, and you have used your deep-fryer oil for frying something else, change the oil before preparing this dish for your gluten-free guests. Don’t be shy about telling them that you used new oil – they will appreciate your care and concern!

Fry the cakes a few at a time until they are golden. Drain the cakes on paper towels to absorb excess frying oil.

Notes: Be careful to read the label on Thai or Vienamese Fish Sauce – some brands contain wheat. For oyster sauce, check the internet lists or your local store for the brands that assert that they are gluten-free.

Serve these cakes with Thai Sweet Chili Sauce (gluten free).

Make sure that all your ingredients are gluten-free!

Appetizers, Christmas, Dairy Free, Fish and Seafood, Holidays, Recipes, Thanksgiving

Spice Rub for Turkey

0 · Nov 12, 2005 · Leave a Comment

1 teaspoon dried thyme
1 teaspoon dried marjoram
1 teaspoon paprika
1 teaspoon gluten free prepared mustard
salt
freshly ground pepper

For every 7-8 pounds of bird, mix up the above amount of herb mixture. Rub this mixture on the bird, and roast as usual. The herbs will season the drippings in the pan, and make for a more interesting gravy.

The paprika contributes to the attractive coloration of the roast. You can use this mixture for chicken and cornish game hens also.

The mixture comes from a recipe by one of our favorite cookbook authors, Perla Meyers. The original recipe, which includes a butternut squash and lingonberry sauce, is called Roast Turkey in Lingonberry Sauce, and can be found in the From Market to Kitchen Cookbook, 1979.

Make sure all your ingredients, including herbs and spices, are gluten free!

Condiments and Sauces, Dairy Free, Fall, Holidays, Recipes, Thanksgiving, Winter

Sweet Potatoes with Apricots

0 · Nov 11, 2005 ·

4 sweet potatoes or red garnet yams, cleaned, baked and peeled
1 Tablespoon gluten free frozen orange juice concentrate
1 Tablespoon dark brown sugar
salt
freshly ground pepper
1 egg
a very small amount of freshly grated nutmeg
1/2 cup dried apricots, diced and soaked in warm water for 1 hour and drained (discard the soaking liquid and keep the apricots)

Mash the sweet potatoes or yams. Add the rest of the ingredients.

Transfer the mixture to a buttered or greased casserole, (a shallow one is best so the mixture is not too thick and will heat quickly.) Bake for 25 minutes at 350, until slightly browned on top.

You can substitute other dried fruits for the apricots – cranberries, raisin, pears etc. or a combination.

This is based on a recipe in Casserole Cookery Complete, a cookbook from the mid and late-1950s.

Make sure all your ingredients are gluten free!

Dairy Free, Fall, Holidays, Potatoes, Recipes, Thanksgiving, Vegetables, Winter

Sweet Potatoes with Pineapple and Cinnamon

0 · Nov 11, 2005 · Leave a Comment

4 sweet potatoes or red garnet yams, cleaned and baked until soft
Gluten free crushed pineapple, drained
brown sugar to taste
salt
pepper
cinnamon to sprinkle on top

The amount of pineapple should be 1/2 the volume of cooked yams, approximately.

Peel and mash the sweet potatoes (if you can obtain canned sweet potatoes that do not have gluten, you can use them, but why not use fresh?) Add the crushed pineapple and as much brown sugar as you feel is appropriate. Add a little salt and pepper.

Place the mixture in a buttered or greased casserole, sprinkle gently with cinnamon.

Bake at 350 until heated through – if you use 4 yams, you would need to heat this casserole for 30-45 minutes, depending on the depth of the mixture in the dish.

Make sure that your spices are gluten free!

Dairy Free, Fall, Holidays, Potatoes, Recipes, Thanksgiving, Vegetables, Winter

Gluten Free or GF Pie Crust

1 · Nov 10, 2005 · 2 Comments

We tried mixes, and recipes, and had almost given up on ever having a decent pie again, when we discovered this method for making gluten free pie crust. Let’s just mention that pie was one of the most important foods in our repertoire, and we used to be very proud of our pie crust, and then we entered the parallel universe of gluten free cooking, for medical reasons. We went in to pie withdrawal – depression, cold shakes, somber mood…..after all, what were we going to have for breakfast, if we couldn’t eat left-over pie?

Well, the news is good – you can have your pie and eat it too!

Use the Dream Pastry Recipe from Bette Hagman’s More From the Gluten-Free Gourmet. A very similar recipe is also called “Donna Jo’s pie crust” and is available on the internet. (Be careful about the recipes on the internet, which are sometimes missing key ingredients in the list of flours, such as the sweet rice flour, for example!) Of course, we don’t exactly follow the recipe anyway, so we have printed here the method we are using at the moment…..

We prefer the flavor of lemon juice to the flavor of vinegar, so we use fresh lemon juice in the recipe. Also, we use one stick of gluten free margarine and one of butter (we don’t like Crisco so much). Lastly, we sprinkle the top of a two crust fruit pie liberally with sugar.

To save time and aggravation when hand-mixing the pie dough, we use a large cheese grater to grate the butter into the dry ingredients. This makes it much easier to get the “lima bean” sized pieces of butter called for in the recipe. We have also used a Braun food processor to make this crust, and it was acceptable, you just have to be careful not to overmix the butter.

Here are the ingredients for one two-crust pie shell:

Dry ingredients:

1/2 cup tapioca flour (tapioca starch) – make sure this is the flavorless kind, not the fermented find
1/2 cup cornstarch
1/4 cup potato starch (katakuriko in Japanese stores – this is NOT the same as potato flour)
1 cup sweet rice flour (mochiko flour – not the same as white rice flour)
1 teaspoon xanthan gum
1/2 tsp salt
1/2 teaspoon sugar

Shortening:
1/2 cup gluten free margarine or butter
1/2 cup butter

(we use all butter)

Liquid ingredients:

1 egg
1 Tablespoon fresh lemon juice
1 Tablespoon ice water

wax paper
sweet rice flour to sprinkle on the wax paper
lots of sugar for sprinkling on the top of the pie

Put the dry ingredients in a bowl and mix them thoroughly with a fork. If you own a sifter, you could sift them together, but it is not necessary. Grate in the butter and margarine using a large cheese grater. Mix the dry ingredients and the shortenings up with a fork until the pieces of butter are distributed evenly – you don’t need to get the pieces of butter as small as they would be in a wheat crust. The size of “lima beans” may be a little large, but don’t go smaller than kidney beans! Anyway, mix up the liquid ingredients until well combined, then pour them in to the dry ingredients and mix together. Squish the dough into a ball and wrap it up to store in the refrigerator for one hour. (For the record, we have made this crust in the winter and gone straight to rolling it out, without refrigerating it. You wouldn’t do this when the air is warm in the summer, but it is ok to do this in the winter when it is cold.)

Divide the dough in half.

To roll out this crust, spread out a piece of wax paper, dust it with sweet rice flour or GF flour mix, or whatever comes handy, put one piece of the dough on top, sprinkle with more flour, spread another piece of wax paper on top of the dough, and roll out with a rolling pin. * The dough is now contained between two sheets of wax paper. Peel off the top piece of wax paper, flip the crust on top of the pie plate, adjust it to fit the dish and remove the other piece of wax paper. Your counter is clean, and your pie crust did not fall to pieces when you tried to put it in the pie dish! You rock!

Fill your pie, then repeat the pie crust rolling maneuver for the top crust. Cut pretty holes in the top crust before transferring it to the pie, if you wish. After putting the top crust on the pie, sprinkle the top crust liberally with sugar – maybe 2 – 4 Tablespoons! Cut steam vent holes in the crust, if you forgot to do it before, and then bake the pie. This crust gets nice and brown and crispy, and it has a delicious buttery flavor! You bake it as you would any other pie crust (about 50 minutes at 400 degrees, for a filled two-crust fruit pie.)

*Note about the rolling pin: We use a piece of dowel from the hardware store – makes a perfect rolling pin, and costs very little. The piece we purchased was being sold as “closet pole” and is 1″ in diameter and 18 inches long.

Some Pies to Try:

  • Blueberry Pie Sweetened with Maple Syrup
  • Gluten Free Quiche
  • Key Lime Pie – Gluten and Dairy Free
  • Pumpkin Pie – Gluten and Dairy Free
  • New England Apple Pie
  • Coconut Cream Pie – no cream!
  • Pumpkin Pie with Coconut Milk
  • Plum Pie

See this post for yet more thoughts on gluten free pie crust: Click here.

Make sure to use all gluten free ingredients!

*Most Popular Recipes*, Breakfast, Dessert, Fall, Holidays, Pie, Recipes, Spring, Summer, Thanksgiving, Winter dessert, pastry, pie, pie crust

Turkey Stuffing with Prairie Bread

0 · Nov 5, 2005 · Leave a Comment

For a half a loaf of gluten free Prairie Bread from Whole Foods Market, these are the amounts of other ingredients:

1 large onion, minced
4 stalks of celery, minced
6 cloves of garlic, minced
4 tablespoons butter
1 cup minced fresh Italian parsley
1 teaspoon dried sage, or sage and thyme
1/2 teaspoon freshly ground pepper
salt to taste
1 cup of chicken or turkey stock
1 egg

Fry the onion, celery and garlic gently in butter. Add the parsley, sage, pepper and salt and stir all together. Dice the gluten free bread up in 1/2 inch pieces. Add the bread to the vegetables in the pan. Mix the stock and egg in a bowl and add it to the pan. Stir gently just to mix, without breaking up the bread too much.

Grease a 2 quart ceramic or pyrex dish. Put the stuffing in the dish – it should fill the dish about halfway – not deeper. Put a cover on the dish. Bake at 400 degrees for 45 minutes until the top is starting to brown. Remove the top and bake for 15 minutes more. If you pack the stuffing too deep, it will turn to a sort of pudding, without distinct bread cubes, and be kind of mushy. If you want the separate cube look and feel, then make sure it is not packed too deep in the pan. You could use an even shallower dish, if you like, and cook it accordingly.

You can make this recipe using cinnamon raisin bread, but reduce the garlic to 3 cloves.

Update for 2010: You can also use Against the Grain rolls for making any normal stuffing recipe.  If you like, you can use a mixture of half Udi’s Bread and half Against the Grain Rolls.  Cut the rolls, or the rolls and bread, in to large cubes and toast in the oven for 20 minutes at 325.  The Against the Grain rolls will maintain their structural integrity and stand up to the liquids in the dressing, while the Udi’s bread will disintegrate somewhat.  The combination of the two textures works well together.

Make sure all your ingredients are gluten free.

Fall, Holidays, Recipes, Thanksgiving, Winter

New England Apple Pie

0 · Nov 5, 2005 · 1 Comment

Use the Dream Pastry Recipe from Bette Hagman’s More From the Gluten-Free Gourmet. We use one stick of gluten free margarine and one of butter. We use 1 Tablespoon lemon juice in place of the vinegar, for the flavor.

2-crust unbaked pie shell

8 apples – Use a mix of varieties like Northern Spy, a few Russet, Baldwin, Golden Delicious, a few Granny Smith and peel, core and slice them. Don’t use MacIntosh or Macoun varieties unless you use maybe only one of each – they don’t hold their shape when cooked and are better for making apple sauce.

1/2 cup dark brown sugar
1/2 cup white sugar
2 Tablespoons tapioca starch (available at health food or asian groceries)
1/2 teaspoon gluten free ground cinnamon

Line a glass pie dish with one piece of the pastry. Mix the apples with all the other ingredients until thoroughly mixed. Load up the pie shell with the apple mixture. Put the other crust on top, and cut several steam holes in the top crust.

Now, sprinkle the top crust with at least 2 Tablespoons of additional white sugar. Preheat the oven to 400 degrees. Place a cookie sheet as a drip tray in the oven to catch any overflowing juices.

Place the pie in the oven, above the drip tray. Bake for 50 minutes, and then check to see if the top is getting golden. The pie is done when the crust is becoming golden and the juices are starting to bubble up in a thickened sort of way. Some of the juices may be dripping over on the drip tray, and that is at is should be.

You can serve a slice of apple pie with cheddar cheese on the side, or melted on the top. That is always good. Also, you can serve pie for breakfast and it will be better for you than a sugary breakfast cereal – also, you will be happier.

Breakfast, Dessert, Fall, Holidays, Pie, Recipes, Thanksgiving

Cranberry Sauce, with Orange

0 · Nov 5, 2005 ·

1 bag of fresh cranberries
1 cup white sugar
1 cup water
2 strips (1/2 inch x 3 inches) orange zest (just the orange part of the peel, without the white stuff)

Pick over the cranberries, wash them and put them in a saucepan together with the sugar, water and orange zest. Bring to a boil and simmer for 10 minutes, stirring from time to time.

Skim off any strange white foam, remove orange strips and transfer the cranberry sauce to a nice bowl. Refrigerate.

Emergency Cranberry Sauce: Should you find yourself in a big hurry, make the sauce as above, then put the hot sauce in a metal bowl, and place this bowl over ice water. Stir the cranberry sauce to cool it down, without allowing the melting ice and surrounding water to creep into the sauce. You are basically using the ice water bath to cool down the outside of the bowl that your sauce is sitting in, and stirring it to make sure all of the sauce gets cooled quickly. Using this method, you can go from a hot sauce to the table in under a quarter of an hour.

Condiments and Sauces, Dairy Free, Holidays, Recipes, Thanksgiving

Coconut Cream Pie – gluten free, with no cream!

0 · Nov 1, 2005 · Leave a Comment

9″ pie gluten free shell – baked

Coconut Filling:
1 cup gluten free coconut milk (canned, reconstituted or frozen)
2 cups gluten free almond milk
1/2 cup sugar
1 Tablespoon butter or margarine
pinch of salt
1/4 cup fresh grated or sweetened dried coconut
5 Tablespoons cornstarch and enough water to make a thin mixture
4 egg yolks
1/2 teaspoon gluten free vanilla

Meringue Topping:
4 egg whites
1/8 teaspoon cream of tartar
1/4 teaspoon salt
1/4 cup sugar
1/2 teaspoon gluten free vanilla

To make the filling:

Mix the coconut and almond milks, sugar, butter, salt and coconut in the top of a double-boiler over hot water. Stir constantly until the mixture is very hot. Mix the cornstarch with enough water just to thin it to pouring consistency, then add this to the hot mixture, stirring constantly and continue to stir until thickened.

Beat the egg yolks in a bowl just until mixed. Stir a little of the hot mixture into the egg yolks, beating constantly so as not to cook the egg yolks. Add the rest of the hot mixture and the vanilla, again stirring constantly. Put the mixture back over the hot water (double boiler) and cook for 2 more minutes and don’t forget to keep stirring! Cool this coconut custard, and then pour it into the prepared pie shell. Set it aside while you make the meringue.

To make the meringue:

Beat the egg whites, cream of tartar and salt tuntil they form soft peaks. Beat in the sugar and beat until the meringue makes smooth peaks. Add vanilla and spread the meringue on the filling in the pie shell.

Bake the pie at 400 degrees for 10 minutes, until the meringue is nicely browned. Chill the pie completely before serving.

Make sure all your ingredients are gluten free!

*Most Popular Recipes*, Dairy Free, Dessert, Holidays, Pie, Recipes, Thanksgiving coconut, gluten free, pie

Thanksgiving Stuffing – from French Fries!

0 · Nov 1, 2005 · Leave a Comment

It’s a dilemma we all face – the complications of gluten free cooking to top off the already complicated holiday season. Traditional holiday meals can be challenging, and the centerpiece of the Thanksgiving challenge is surely the stuffing and the gravy.

We have learned that it is possible to make quite an acceptable stuffing by using gluten free focaccia in place of wheat bread. Basically any of the bread recipes that contain eggs will be superior to the ones that don’t, as they hold together better. Also, and here is a really exciting possibility that just might cross over into the non gluten-free world, – you can use chopped up gluten free french fries in place of the bread.

Here are proportions to use if you would like to try:

For every cup of diced frozen gluten free french fries, you will need:
1 Tablespoon of butter or margarine
1 Tablespoon of extra virgin olive oil
1/2 cup diced spanish onion (you could use scallions or leeks if you prefer)
1 clove garlic, minced
1/4 teaspoon of ground coriander (optional)
1/2-3/4 cup diced celery (include the leaves)
2 Tablespoons (1/8 cup) minced fresh Italian parsley
2 Tablespoons (1/8 cup) minced fresh thyme (or 1 Tablespoon dried thyme)
1 1/2-3 Tablespoons of chicken stock
Vietnamese hot sauce (make sure it is gluten free)
salt and pepper

If you are using gluten free bread cubes, toast them on a cookie sheet in a 350 degree oven for 7-10 minutes to dry them out. If you are using french fries, you just cut them in stuffing sized pieces!

Fry the onion in the butter and oil for a couple of minutes. Add the celery and garlic and cook for another minute. Mix with the remaining ingredients. If you are using GF bread cubes, you will need to moisten the mixture with 3 Tablespoons of chicken stock mixed with a few drops of hot sauce, but if you are using french fries then less moistening is needed – a Tablespoon and a half fo the chicken stock per cup of french fries should do the trick! Season to taste – use lots of pepper.

Place the stuffing in a buttered covered casserole and bake alongside your turkey – only a half hour of cooking is needed.

Make sure all your ingredients are gluten free, including the spices!

*Most Popular Recipes*, Dairy Free, Holidays, Recipes, Thanksgiving

Cinnamon Honey Ice Cream with Rum Raisins

0 · Oct 31, 2005 · Leave a Comment

For the ice cream:

2 cups heavy cream
2 cups light cream
2 eggs
2 egg yolks
3/4 cup sugar
1/2 cup local honey
1 Tablespoon cinnamon
2 teaspoons powdered ginger
1/2 teaspoon freshly grated nutmeg
1 1/2 teaspoons powdered GF vanilla
1/4 teaspoon salt
An ice cream freezer with instructions

For the raisins:
1 cup mixed raisins
1/3 cup sugar
2/3 cup water

For the ice cream:

Scald the heavy cream and light cream with 1/2 cup of sugar in a saucepan. Transfer to the top of a double boiler over hot water.

In a bowl, beat the eggs and egg yolks with the remaining 1/4 cup sugar until the mixture forms thick pale yellow ribbons dripping from the beater.

Gradually add a little of the cream mixture to the egg mixture, a half cup at a time, beating constantly until you have added about half the cream to the egg mixture. Then add the resulting mixture to the remaining cream mixture in the double boiler. Stirring gently and constantly, heat the custard mixture until it thickens and coats the back of a spoon. Remove the double boiler from the heat, and stir in the spices and the honey.

Pour the mixture into a shallow pan and chill in the refrigerator for 3 hours until cold. Transfer the mixture to the ice cream freezer and freeze. Serve with rum raisins.

For the raisins:

Boil the raisins, sugar and water for about 4 minutes until slightly thickened. Transfer the raisins to a Mason jar and add an equal quantity of GF rum. Let stand until the raisins are fattened – a few hours. Serve the raisins with the ice cream, but not to minors.

Make sure all your ingredients are gluten free!

Dessert, Fall, Holidays, Recipes, Thanksgiving

Cornbread – without gluten or dairy

0 · Oct 31, 2005 ·

Mixture A:
1 cup almond milk
1 egg
1 /4 cup vegetable oil
1/4 teaspoon GF vinegar

Mixture B:
1/3 cup potato starch (this is not the same as potato flour)
1/2 cup cornstarch
1 teaspoon salt (or less depending on your taste)
1/4 teaspoon baking soda
3 teaspoons GF baking powder
3/4 cup cornmeal
1/2 cup sugar
1/2 teaspoon xantham gum (available at health food stores)

Oven: 375 degrees. Grease an 8-inch square baking pan.

Combine Mixture A with Mixture B. Mix with a whisk to remove lumps. Pour batter into the prepared pan. Bake for 3o minutes (roughly) until a cake tester tests clean.

Allow to cool for 10 minutes at least, but serve while it is still hot.

Make sure all your ingredients are gluten-free!

Bread, Breakfast, Dairy Free, Holidays, Recipes, Thanksgiving

Pumpkin Pie with Coconut Milk

0 · Oct 24, 2005 · 2 Comments

The recipe is adapted from one at www.Celiac.com. Here, the pie has additional spices and coconut milk instead of cream.

Make an uncooked one-crust gluten-free pie crust and use it to line a glass pie dish.

Bottom of pie:
1/3 cup finely chopped pecans
1/3 cup dark brown sugar
3 Tablespoons gluten free margarine (for dairy, use butter)

Filling:

3 large eggs, stirred
1/3 cup dark brown sugar
1/3 cup white or turbinado sugar
2 Tablespoons cornstarch
1 1/2 teaspoons GF cinnamon
1/2 teaspoon GF ginger
1/2 teaspoon freshly grated nutmeg
1/4 teaspoon GF allspice
1/4 teaspoon GF cloves
1/2 teaspoon salt
16 ounces GF canned pumpkin, or freshly cooked pumpkin, blended and strained to remove excess water
1 cup coconut milk

Mix pecans, sugar and butter and distribute in the bottom of the uncooked pie shell. Prick the part of the pie shell that goes up the side of the pie plate with a fork in several places so it won’t balloon out while cooking. Bake at 450 for 10 minutes and then allow to cool for another 5 minutes.

Mix the filling ingredients in a food processor or blender. Pour the mixture into the partially cooked pie shell, on top of the nut layer. Bake for 45-50 minutes at 350 degrees. A knife inserted into the center of the pie should come out nearly clean. Cool completely before cutting, although we often end up eating pie when it is warm because we can’t wait.

This is a custard pie, and should be refrigerated because of the eggs.

Try this pie for breakfast – it is sure to be more healthy than any breakfast cereal!

Make sure all of your ingredients, including the spices, are gluten free.

*Most Popular Recipes*, Breakfast, Dairy Free, Dessert, Holidays, Pie, Recipes, Thanksgiving coconut, pie, pumpkin

Primary Sidebar

Check out our Coupon Collection

Click Here to go directly to the Coupon page

Read more at The Rambling Epicure:

Click Here: The Rambling Epicure

QR code for your phone

qrcode for gfzing
NFCA logo

Blogroll

  • Aloha World Ono Recipes
  • Book of Yum
  • Dulce Cocina sin Gluten
  • Gluten Free Beer Association
  • Glutenfreie Rezepte | kaMehl
  • Hawai'ian Electric
  • Laylita's – Ecuador
  • Nombudsman
  • Papilles et Pupilles
  • Sea Salt with Food
  • The Rambling Epicure The Rambling Epicure is a daily international food chronicle, and the first online newspaper to follow global food trends and news.
  • Triumph Dining

Monthly Archive

Proud member of FoodBlogs

Load up on new recipes, exclusive goodies, + more!

Get the exclusive content you crave straight to your inbox.

Things to Read

Find by keyword

bacon baked baking beans beef berries blueberry cake cheese chicken chocolate coconut cooking curry dessert DIY dried beans easy fish food fruit GF ghee gluten free gourmet homemade lamb maple syrup meat microwave New England Hard Cider pie pork pumpkin recipe recipes rice salad sauce soup stewed strawberries sweet potato thai red curry vegetarian

Copyright © 2023 GF-Zing! on the Cravings Pro Theme