• Skip to primary navigation
  • Skip to main content
  • Skip to primary sidebar
  • Skip to footer

GF-Zing! logo

  • Home
  • Coupon Collection
  • GF Foods & Groups
  • Ask Gf-Zing!
    • About the Author
    • About Gf-Zing!
  • Nav Social Menu

    • Email
    • Facebook

*Most Popular Recipes*

Oyster Sauce and Hoisin Sauce

0 · Feb 23, 2011 · 2 Comments

Gf-Zing! received a request to find a gluten free Oyster Sauce and Hoisin Sauce in March 2006.  We have updated the links for 2011, and we remind our readers that we don’t verify the gluten free status of products.

For Hoisin, you might consider the Premier Japan brand of Wheat-Free Hoisin Sauce.  It is not the same texture as wheat-based hoisin sauces, and it is neither as thick nor as dark. See the Edwards & Sons Trading Company website regarding this product. We rely on the manufacturer to state the content. Please be sure to verify that any products you consume are safe for your situation. Gf-Zing! does not verify the gluten free status of products.

http://www.edwardandsons.com/specialdiets_celiac.itml (link updated 2011 Feb 23)

For the Oyster Sauce: You might consider the Lee Kum Kee brand for oyster sauce but  NOT for their hoisin sauce (see their website.)

Assuming you don’t want either 5 or 55 gallon drums of oyster sauce, then the Lee Kum Kee’s Choy Sun oyster sauce (yellow label) and the Panda Brand green label are the most likely candidates on their website (they make other kinds too, so it is important to check the bottle at the store.) Things change often in the food world, so you have to keep checking to see if they change their ingredients. Gf-Zing! does not verify the gluten free status of products.

http://us.lkk.com/faq (link updated 2011 Feb 23)

Note: Here at Gf-Zing! we do not verify the gluten-free status of any product. We rely on the manufacturers to declare the status of their products. It is up to the reader to check labels, and to verify that the products they consume are safe for them to use.

*Most Popular Recipes*, Ask Gf-Zing! - Responses, Condiments and Sauces, Recipes chinese, gluten free, hoisin, products, sauce

How to make gluten free beer

0 · Nov 5, 2010 · 8 Comments

gfzing.com gluten free beer At gfzing.com we have tried all the commercially available gluten free beers.  Our favorites were those made by Green’s – there are three that are imported in to the U.S., and in our area they generally sell for a mind-boggling $7/bottle.  This was the motivating factor behind a successful attempt at home brewing gluten free beer, the techniques of which are outlined here. A reasonable glass of gluten free beer (in the weissbier or weiss beer style), can be made for less than a dollar a bottle after start-up costs.  The beer is similar to the St. Peter’s Sorgham Beer from Suffolk England.

The major difference between most  fine artisanal beers and gluten free beer is that the ordinary beer is made with malted barley and wheat, and the gluten free beer cannot contain either barley or wheat.   Therefore, the gluten free brewer must rely on other malted grains. The ingredients for gluten free beer are available from home brewing shops.  The two tricky items to locate are the sorghum syrup, which lately we have had to purchase online from morebeer.com, and the gluten free brewing yeast.  The actual link for purchasing the syrup is here.

To make home brewed beer, you should first read some of the fine homebrewing websites and chats on the net, and learn the basic technique.  You are going to make a sort of soup called wort, and then ferment this soup with yeast in a large container with an airlock.  When it has finished fermenting, it gets bottled with a little “priming sugar” added to each bottle to cause another fermentation in the bottle – this produces the carbonation.  An excellent discussion with photos is available at WikiHow.

These instructions are provided here for use by adults of legal brewing age.

Recipe from gfzing.com for about 48 twelve ounce bottles of gluten-free beer requiring 2-3 hours of cooking time and about 7 weeks from starting the process to pouring:

Ingredients:
Malt Base – 6lb Sorghum Extract

Specialty Grain –

  • 1lb Flaked Maize
  • 1/2lb Whole Sorghum (for toasting)
  • 1/2lb gluten free Oats (for toasting) – optional

Specialty Sugar – 1/4lb Belgian Dark Candi Syrup (this is a product that is worth the trouble of obtaining – it can be ordered online)

Hops –

  • 1 oz UK Northern Brewer Leaf hops (bittering)
  • 1oz Cascade hops (aroma)

Yeast- Notthingham Yeast (check for gluten free status on the package)
Other-

  • 1/4 tsp Irish Moss
  • 3/4 oz Coriander Seeds
  • 3/4 oz. Bitter Orange Peel (in the event of a beer emergency, you can use the zest of one fresh orange)
  • 8oz Malto-dextrin (a weird, nearly flavorless material that makes a smooth “mouth-feel”)
  • 15 black peppercorns

Other: Priming sugar (about 1 cup for five gallons) dissolved in a couple of cups of water

Instructions:
Toast Whole Sorghum & gluten free Oats in the oven for 20 minutes @ 375 F.

Grind toasted Sorghum & Oats using a grain mill that is only used for gluten free grains, and then combine these with flaked maize.
Maize, Oats and sorghum go in a muslin bag in one and a half gallons cold well water in a large pot – large enough to hold at least 3 gallons.
Heat to 160F, hold at this temperature for 10 minutes.
Remove grains (the muslin bag full of grain will have swelled considerably) and discard.
Add Sorghum extract & Belgian Dark Candi syrup to the grainy water, stir to dissolve. If you have no Belgian Dark Candi syrup you may be tempted to use molasses.  Our advice – don’t use molasses because it will impart a distinctive molasses flavor to the finished beer.  If you must substitute for the Dark Candi syrup, try dark brown sugar or panela.
Bring to boil. ALERT: at this point, there are 60 minutes left in the cooking process. All the times listed next to the ingredients below are the total cooking time for that ingredient. When we say “set the timer” that is to indicate the time between steps.

Start proofing yeast in a cup of water – Nottingham yeast (marked gluten free).
While grainy water and sugars boil, add the following for the minutes indicated (this is a standard beer recipe convention, and you have to study on how beer is made so that this series of instructions will make sense):

  • 1 oz. Northern Brewer Hops (60 min)
  • Set Timer for 45 minutes

When timer goes off, start adding the following ingredients and cook them for the amount of time indicated:

  • 1 ounce Cascade hops (15 minutes)
  • Set timer for 5min, when timer goes off, add
  • 1/4  tsp Irish Moss (10 minutes)
  • Set Timer for 5min, when timer goes off, add
  • 1/2 lb. Malto-dextrin mix with cold water first (5 minutes)
  • 3/4 oz coriander seeds (5 minutes)
  • 3/4 oz bitter orange (5 minutes)
  • 15 black peppercorns(5 minutes)
  • After 5 more minutes, all the cooking is done.

The total cooking time, from the time an ingredient is added to the end of the cooking is show in parentheses next to each ingredient. This is how beer-making recipes are generally written. The instructions about “set the timer for X minutes” are our own addition and show the time between steps. So, the Northern Brewer hops go in, then you wait 45 minutes and add the Cascade Hops, then wait 5 minutes, then add the Irish Moss etc. The last 4 ingredients all go in at once, and they only cook for the last 5 minutes of the boil.

Pour wort through a fine strainer  in to 2 gallons of cold water in a sterilized 6 gallon fermenter.

Add cold water to increase to 5 gallons total volume in the fermenter (it helps to mark the fermenter at the five-gallon level so you know when you have added enough water).
Cool to 72 degrees F.
Measure the starting specific gravity and record.  It should be around 1.040.
Add  the  proofed yeast, give a stir, cover the fermenter and add an airlock.  This mixture should ferment for two or more weeks. This beer will not bubble as vigorously as a barley or wheat beer – it is a gentle fermentation and does best at around 70 degrees.
After the primary fermentation, rack off the beer in to another vessel, add the dissolved priming sugar, give the mixture a vigorous mixing, and bottle in sterilized bottles. Cap the bottles with new caps (you cannot re-use caps).  The beer will be ready to drink in about 3 weeks.

*Most Popular Recipes*, Ask Gf-Zing! - Responses, Drinks, Recipes, Vegetarian beer, gluten free, gourmet, homemade, recipe, vegetarian

Making Your Own Homemade Curry Powder

3 · Oct 15, 2010 · 7 Comments

Homemade Curry Powder

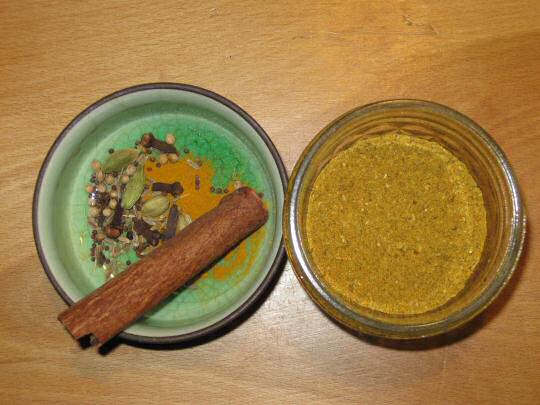
It is as easy to make homemade gluten free curry powder as it is to grind coffee!

With a little trial and error you can create your own signature gluten free curry powder!  We use a 30 year old coffee grinder to make ours from whole spices.  Once you make your own, you won’t be able to go back to using store-bought curry powder. Also, your friends will want your recipe.

The Spices:

Make sure that whatever spices you add to your curry powder are gluten free. And, the fresher the spices, the better the flavor.

The Coffee Grinder:

Some recipes will advise you to buy a separate coffee grinder for making spice mixtures like curry powder, but we use one coffee grinder for everything – we have been doing it for decades. After using the coffee grinder for grinding spices, you can clean the coffee grinder using a toothbrush to loosen up ground spices and wipe the grinder clean.  If your coffee grinder is white plastic, the turmeric may turn the plastic yellow, but when you then revert to grinding coffee in the grinder the flavor of your coffee will not be altered.

What amounts to use?

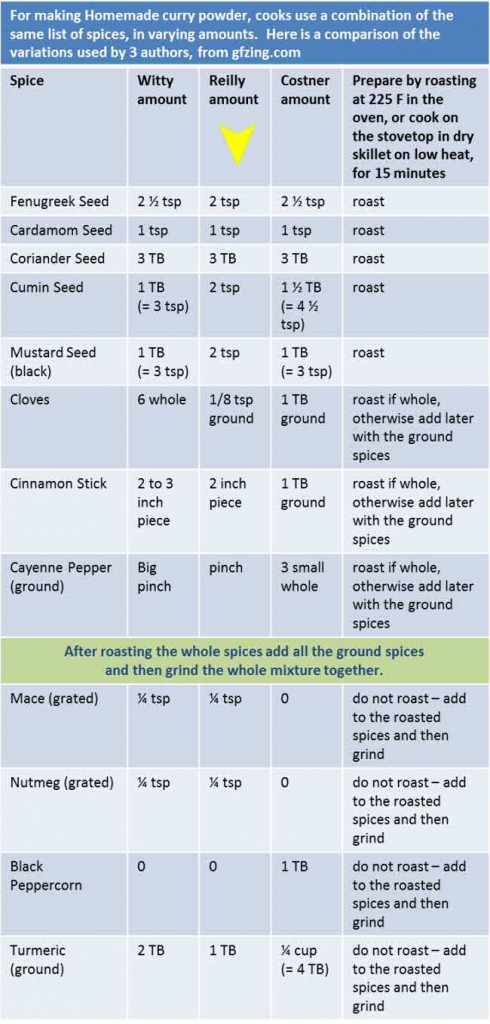
At gfzing.com, we have analyzed a few recipes for homemade curry powder and provide the following table of formulas from some of our favorite cookbooks.  Note that the biggest variation occurs with the turmeric and the pepper.  Turmeric has a surprisingly strong taste, so experiment with it a little to decide how much to use.

Our favorite curry powder recipe comes from Robin Reilly’s excellent book Gluten-Free Baking. We add a whole dried cayenne pepper to her mixture because we like our curry powder spicy. Robin Reilly uses a combination of roasted coriander seed, fenugreek seed, cumin seed, black mustard seed, cardamom seed, cinnamon stick, with added ground turmeric, ground mace, nutmeg, and cloves.  We add a whole dried cayenne pepper to her recipe, then grind it in two batches in the 30 year old coffee grinder.  After grinding the two batches, we mix the stuff together thoroughly and store it in a half pint Mason jar.

Another similar curry powder formula is to be found in Better Than Store-Bought by Witty and Colchie, originally published in 1979.  This is a unique cookbook which shows how to make a large variety of items from scratch.

A third example of homemade curry powder lives in another excellent do-it-yourself cookbook called Gifts of Food, by Susan Costner, published by Consumer Reports in 1984. Again, the list of spices is pretty much the same – varying amounts are used.

In this table, we compare these 3 recipes, demonstrating that indeed, the list of spices is pretty much the same but the amounts differ.  Fiddle with these spices and develop your own signature gluten free curry powder! Package it up nicely, and give it as a gift!

Homemade Curry Powder comparisons
Homemade Curry Powder - comparisons from Gfzing.com

Try the curry powder in these recipes:

Chicken Sticky Rice

Curried Cream of Root Vegetable Soup

Curried Tofu Meatballs

Creamy Lentil Soup with Curry and Chipotles

Rich Lamb and Cornish Game Hen Curry

Pineapple Fried Rice

*Most Popular Recipes*, Condiments and Sauces, Cookbooks, Meat-eater, Recipes, Vegetarian curry powder, DIY, gluten free, homemade, recipes, vegetarian

Mujaddara – a Lebanese lentil dish

1 · Jun 10, 2009 · Leave a Comment

Inspired by a wonderful Mujaddara from a Lebanese restaurant in Troy, New York, we set out to find out how to make the dish at home.  Luckily, we found a good recipe in the interesting Arab Cooking on a Saskatchewan Homestead, by Habeeb Salloum (published by the University of Regina, 2005).  The secret to this terrific dish for lentil lovers is the enormous quantity of fried onions.  We have found that adding a cup of turnip gratin to the finished dish makes it even better!

Here is the revised recipe:

Wash one cup of regular lentils (the inexpensive kind found in any grocery store), and put them in a pan with 5 cups of water.  Bring to a boil, cover and cook over medium heat of 15 minutes, then add 1/4 cup white rice , cover and cook another 20 minutes until both the lentils and the rice are cooked.

Melt 2 Tablespoons of ghee (or butter), but ghee is better, in a frying pan and fry 3 thinly sliced big spanish onions for 10 minutes, stirring, until they are golden brown. (The original recipe called for an alarming 6 Tablespoons of butter for this process.)  Do not use vidalia or sweet onions for this – they do not break down or brown in the same way as spanish onions.

Stir the fried onions in to the cooked lentils, then add 1 teaspoon salt, 1/2 teaspoon fresh ground pepper, 1/2 teaspoon ground cumin, and 1/4 teaspoon hot New Mexico chili powder.  If you have an extra cup of turnip gratin, add that as well.

Stir everything well, and serve hot with yogurt (add a clove of grated garlic to make a sauce) and salad.

Make sure all your ingredients are gluten free.

*Most Popular Recipes*, Fall, Recipes, Spring, Summer, Vegetables, Winter cooking, easy, food, garlic, gluten free, gourmet, lebanese, lentils, recipe, stewed, vegetarian

White Hakurei Turnip Gratin

0 · Jun 6, 2009 · 6 Comments

The first turnips of the spring have arrived, courtesy of a local CSA.  We have learned to love the strong umami of white hakurei turnip prepared with cream and seasonings.  In many recently issued cookbooks there is a complete dearth of recipes for turnip, but if you turn to the older books, notably the 1961 New York Times Cookbook by Craig Claiborne, or the stellar 1979  From Market to Kitchen Cookbook by Perla Meyers, you will find many recipes for this neglected vegetable.  The well-cooked turnip will take you on a time-travel journey back to the days when real vegetables, packed with flavor, made people grateful for every meal.

An excellent recipe for a gratin of white turnip appeared in Gourmet magazine 2007 but that recipe called for a whole cup of heavy cream and a matching cup of grated parmesan.  It was hard on the arteries and on the wallet, and required both top of the stove and oven baking. So, Gf-Zing! has modified it slightly for recession and health reasons.  Serve the turnips with a small steak, and a salad.  You will want to obtain more fresh spring turnips, once you try them this way.

Melt 1 Tablespoon butter in a non-stick 12 inch skillet (make sure you have a top to fit the pan.)

Wash one bunch of white hakurei turnips well, top and tail them, and slice them in 1/4 inch slices.  Save the turnip greens for another recipe. You don’t need to peel the turnips.  Layer the slices in the pan.  Sprinkle the sliced turnips with 1 teaspoon dry thyme, 3/4 teaspoon salt, 1/4 tsp. freshly ground pepper, and 1/8- 1/4 teaspoon cayenne pepper.

Cook for 3 minutes over medium heat, then pour 1/2 cup heavy cream and 1/2 cup gluten-free chicken stock over the top.  Cover and cook the turnips over medium heat for 20 minutes.  The turnips will be completely cooked through, but there will be considerable liquid left in the pan.  Remove the cover and cook to reduce the liquid.  When most of the liquid has reduced (about 5-10 minutes), and the sauce is thickened, grate finely 1/2 cup of fresh parmesan cheese evenly over the top.  Watch closely as the cheese melts and make sure that the liquid does not entirely cook away. Recipe credit: www.gfzing.com

Serve the turnips hot.  The recipe is supposed to serve 6, but maybe realistically it would only serve 4, once they discover that they love turnips!

If you should happen to have a cup or so of the finished dish left over, by all means add it to a lentil dish like Mujaddara.

Make sure all your ingredients, including the spices, are gluten-free.

*Most Popular Recipes*, Recipes, Spring, Vegetables cheese, cooking, food, GF, gluten free, gourmet, hakurei turnip, recipe

Applesauce Muffins – gluten free

0 · Jan 15, 2007 · Leave a Comment

These yummy muffins were developed for the Gf-Zing! website. The large amount of cinnamon balances the blandness of rice-based flours.
Use a 12-muffin pan, and line with aluminum foil liners.

In a large bowl, mix:

1/2 cup vegetable oil

1 cup sugar

1 egg or 1/4 cup egg substitute

1 cup unsweetened applesauce *

1 teaspoon baking soda

1/2 teaspoon salt

2 teaspoons cinnamon

1 teaspoon allspice

1/4 teaspoon cloves

1 1/2 teaspoons xantham gum

Mix throroughly, then stir in 2 cups Bette’s Featherlight Rice Flour Blend (Authentic Foods makes a pre-mixed bag of this flour blend, or you can mix your own using the directions in one of Bette Hagman’s books.)

Next, stir in 1 cup dried cranberries, and 1/2 cup broken or chopped pecans. Stir to blend thoroughly.
Spoon the batter in to the muffin liners, then bake at 350 for 20-25 minutes until a toothpick comes out clean.

* If by chance you do not have any ready-made applesauce, you can make your own with a couple of apples. Poke several holes in the apples with a fork.  Microwave the apples on the setting you use for baking potatoes, until they are cooked through. Cool them so that you can peel them without burning yourself.  Remove the soft apple from the peel, discard the seeds and core, and mash away.  That’s it!

Make sure all your ingredients, including the spices, are gluten free.

Other muffins you might like:

Gluten Free Pumpkin Muffins

Coconut Almond Muffins

Bev Lieven’s Donut Muffins

Donut Muffins (lower refined sugar recipe)

Banana Maple-Pecan Muffins

*Most Popular Recipes*, Bread, Breakfast, Dairy Free, Fall, Recipes, Winter

Rice Pudding in the Zojirushi Rice Cooker

41 · Nov 6, 2006 · 1 Comment

This nice rice pudding from Gf-Zing! has large grains of rice and tart cherries to offset the sugar. The recipe is not cloyingly sweet, and is quite attractive because of the large grains of rice.

In the rice cooker, put 3/4 cup of Arborio rice, 4 cups of non-fat milk, 1/2 cup of sugar, 1/4 teaspoon of salt, 1/4 cup of dried cherries and 2 Tablespoons of slivered almonds. Set the menu to Porridge, close the top and turn on the cooker.

When the cooker switches to “keep warm,” beat 1 egg, 1 teaspoon of almond extract and 1/4 teaspoon of lemon extract in a large bowl. Add the hot, cooked rice mixture to the egg mixture, about a soup spoon at a time, and beat well with a large spoon after each addition. The reason for adding a little of the hot rice at a time is so that the egg will not cook suddenly – if it did, it would make a sort of rice pudding with hard-boiled egg bits in it – Yuck! If you add the rice a bit at a time and stir vigorously after each addition, then you will get a nice creamy rice pudding.

After this mixture cools, serve it in small bowls with heavy cream to pour over each serving. You may have to do a little counter-top clean up, if the milk comes out through the vent holes in the top of the cooker during the cooking process. We had to clean up this milky mess, but we didn’t mind because the rice pudding was so tasty!

Make sure all your ingredients are gluten free!

*Most Popular Recipes*, Breakfast, Dessert, Recipes, Rice, Winter arborio, pudding, rice, rice cooker, Zojirushi

Gluten Free Turkey Dressing (stuffing)

0 · Oct 14, 2006 · Leave a Comment

A few thoughts on gluten free Thanksgiving dining…the first year, we felt obligated to pursue some type of exact replica of glutenated turkey dressing – and were disappointed by many expensive and wasteful batches of dressing with the consistency of wet kitty litter.  We eventually made something good – but –  the second GF year, a relative made an excellent wild rice and mushroom dressing – better than good. A new pathway for gluten free Thanksgiving dining!  And, with the wild rice being native to North America it seemed very fitting somehow.
To find the recipe for Wild Rice Stuffing with Wild Mushrooms, buy some dried pears and seek the recipe here:

http://www.epicurious.com/recipes/recipe_views/views/105886

That dressing turned our minds around, and this year we will consider using a butternut squash risotto, along the lines of the one in the Bistro Cooking at Home by Hamersley.  Hamersley’s butternut squash ristotto is made with maple syrup, rosemary, sherry and sherry wine vinegar, along with cubes of butternut squash. We sometimes use shallots, and sometimes onions and garlic. The flavors are nicely balanced, with plenty of “umami” or fifth taste flavor as well, even if you cut the amount of butter in half.

We heartily recommend using a rice dressing (or stuffing) for the gluten free turkey dinner, and making it in a separate dish rather than stuffing it in to the bird.

Update for 2010: You can also use Against the Grain rolls for making any normal stuffing recipe.  If you like, you can use a mixture of half Udi’s Bread and half Against the Grain Rolls.  Cut the rolls, or the rolls and bread, in to large cubes and toast in the oven for 20 minutes at 325.  The Against the Grain rolls will maintain their structural integrity and stand up to the liquids in the dressing, while the Udi’s bread will disintegrate somewhat.  The combination of the two textures works well together.

*Most Popular Recipes*, Fall, Holidays, Recipes, Rice, Thanksgiving

Gluten Free Empanadas

0 · Apr 29, 2006 · Leave a Comment

Empanadas are delicious! And, for Gf-zing! they are one of the holy grails of gluten free cooking – we seek to make a dough that will encase the meat filling and be dry but intriguing, and not quite like pie crust. We have found a way to do this by using the Breads from Anna mix (without the yeast), and the traditional white wine and olive oil that make the interesting and tasty-flavored crust. The recipe was developed by Gf-Zing! , which celebrates flavor in the gluten free world.

The many ingredients and spicy flavors of empanadas are delightful, and the empanadas can be carried like a sandwich, for lunch, backpacking or picnics. We find that our friends always want the recipe but are sometimes appalled by the list of ingredients – raisins, cheese, allspice, cayenne pepper, meat – it is a medieval list of ingredients, but SOOOOO good!

Dough:

3 1/2 cups Breads From Anna mix (Soy and Rice free kind), but don’t include the yeast packet
1/2 Tablespoon baking powder
1/2 teaspoon salt
1/4 cup milk
1/4 cup dry white wine
1/4 cup olive oil
1 egg

Mix the dry ingredients in a bowl. You will have a little bread mix left in the bag, which you should save for the filling and rolling. In a second bowl, mix the milk, white wine, oil and egg, then add to the dry ingredients. Knead (yes, knead) the dough until it is like pie crust in texture. Cover the bowl until you are ready to fill the empanadas, as this dough dries out quickly. As you work with the dough, you may need to add extra white wine, a teaspoon at a time, if the dough starts to dry out.

Filling:

Fry the following ingredients in a non-stick skillet, just until the meat is cooked:

1 Tablespoon olive oil
1/2 pound ground beef, chicken or gluten free turkey
1/2 of a green bell pepper, minced
2 Tablespoons garlic, minced

Then add and stir-fry briefly:

1/3 cup golden or brown raisins
1/4 cup chopped olives (green ones stuffed with pimientos, or black ones in brine but not oil-cured)
1 1/2 Tablespoons red wine vinegar
1 Tablespoon Breads from Anna mix (see dough, above)
1 3/4 teaspoons ground allspice
1 teaspoon ground cinnamon
1 teaspoon ground cumin
1/4 teaspoon ground cayenne pepper
1/2 teaspoon salt
1/4 teaspoon ground black pepper

Take the pan off the heat, and add:

1 cup packed grated Jack or cheddar cheese
1/3 cup chopped fresh cilantro (we wash it and snip with scissors)

The mixture will be damp but not soupy. Set aside.

To make the empanadas:

Preheat the oven to 350-375 degrees

Take a walnut sized piece of dough and squish it in your hands to compact it. Put a piece of waxed paper on the table, sprinkle with leftover Breads from Anna mix, and put the walnut-sized ball of dough there. Top with another sheet of waxed paper, then use a rolling pin to roll the ball of dough into a circle of 4″ diameter. Take off the top sheet of paper. (This method of rolling the dough yields very little mess to clean up!)

Place 1 Tablespoon of filling on the bottom half of the circle of dough, then fold the top half down to cover the filling, and squish the edges together to form a half-moon shaped turnover, completely encasing the filling. Place the filled empanada on a Silpat lined baking sheet. Repeat this process 23 more times or so – the recipe will make approximately 24 empanadas. Leave an inch between the empanadas, as they expand some while baking.

Once you have a sheet full of empanadas, bake them for 12-20 minutes. Take a look at them after 12 minutes, and let bake for additional time if needed. We prefer them slightly browned.

Serve warm, or put them in the refrigerator and use them for packing a lunch box or going backpacking.

Make sure all your ingredients, including the spices, are gluten free!

*Most Popular Recipes*, Appetizers, Fall, Meat Dishes, Meat-eater, Recipes, Spring, Summer, Winter

Batter Fried Fish – gluten free!

0 · Mar 2, 2006 · 2 Comments

One of the most popular postings on the Gf-Zing! website is this method of making batter for frying fish.  It originally comes from Julie Sahni’s Classic Indian Cooking book. She uses cornstarch and chickpea flour, which yields a much nicer fried fish than any wheat flour will do. The batter is excellent for hake, cod, scallops etc. Cut larger firm-fleshed fish filets (skinless) in to 2 x 1 inch pieces. The recipe for the batter can be halved.

You marinate the fish in seasoning to flavor it, then dip it in batter, then fry and serve.

Seasoning for 2 pounds fish or scallops (marinate in this mixture for 2 hours):

1 teaspoon minced garlic
1 Tablespoon grated fresh ginger
1-2 jalapenos, minced (omit if you don’t like spicy food)
1/2 teaspoon coarse salt (or 1/4 teaspoon table salt)
pepper
juice of 1/4 lemon

Alternative seasoning:

Sprinkle the fish liberally with a few teaspoons of a spice mixture of your choice, for example (the following makes a lot of extra spice mixture):

1 teaspoon of gluten free cayenne pepper
1 Tablespoon of fresh ground black pepper
1 Tablespoon gluten free paprika
1 1/2 teaspoons dried EACH thyme and oregano
1 Tablespoons gluten free garlic powder
2 Tablespoons kosher or sea salt

The batter:

3/4 cup corn starch
3 Tablespoons chick pea flour (store this in the freezer)
1/4 teaspoon cayenne pepper or other seasoning
1 teaspoon coarse salt (or 1/2 teaspoon table salt)
1 Tablespoon gluten free baking powder
3 Tablespoons peanut oil
2 large eggs
3 Tablespoons cold water

Mix the dry ingredients together, then add the wet ingredients and stir until smooth. Dip pieces of seasoned hake, cod or whole scallops in the batter and fry in very hot oil (2″ deep) until golden brown. If you use a deep fryer, the result will be superior.

Make sure all your ingredients are gluten free.

*Most Popular Recipes*, Dairy Free, Fall, Fish and Seafood, Recipes, Spring, Summer, Winter battered, ceci bean, chickpea flour, cooking, deep fried, fish, fish batter, food, fried, garbanzo bean flour, gluten free, gourmet, recipe

Key Lime Pie – gluten free and dairy free

0 · Jan 18, 2006 · 5 Comments

This recipe was developed by Gf-Zing! , which celebrates flavor in the gluten free world.

Make a 9 inch gluten free pie crust, and pre-bake it at 350 degrees for 20 minutes or until it is as brown as you like it. Set the pie shell aside to cool.

Filling:

1 cup sugar
1/4 cup gluten free gravy flour (see below)
3 Tablespoons cornstarch
1/4 teaspoon salt
2 cups water
4 egg yolks, beaten
1 tablespoon butter or gluten free vegan margarine
1/4 cup fresh squeezed key lime juice (requires 8-10 tiny key limes or 4 regular limes)
1 teaspoon finely grated lime zest


Meringue:

4 egg whites
1/4 teaspoon cream of tartar (to stabilize the meringue)
6 teaspoons sugar
1 teaspoon vanilla

Combine the sugar, gluten free gravy flour, cornstarch and salt in a 2-quart saucepan. Gradually stir in the 2 cups of water. Cook at medium heat, stirring constantly with a whisk, until thickened. At this point, it will taste bland. Don’t taste it now.

Stir a small amount of the hot mixture in to the egg yolks, then a little more, then a little more, until half the hot mixture has been added to the yolks. Combine the yolk mixture with the rest of the mixture in the saucepan, whisking constantly and cooking for two minutes. Whisk in the butter or margarine. The aim of this process is to mix everything without getting lumps of hard-boiled egg yolk. Stir in the key lime juice and zest. Cool slightly, then pour in to the cooked pie shell.

Preheat the oven to 350 degrees. Beat the egg whites and cream of tartar for the meringue using a hand beater or an electric beater until the whites form soft peaks that hold their shape. Gradually beat in the sugar and the vanilla until the meringue is glossy and holds well. Spread the meringue carefully all over the pie to cover the pie completely. Bake the pie for 6 minutes, or slightly longer, to brown the top of the meringue. Cool the pie completely before serving.


Gluten Free Gravy Flour:

Mix these ingredients together and use what you need:

6 Tablespoons brown rice flour
2 1/4 Tablespoons sweet rice flour (mochiko)
4 1/2 teaspoons tapioca starch
1 teaspoon of xantham gum

Use all gluten-free ingredients!

*Most Popular Recipes*, Dairy Free, Dessert, Pie, Recipes

Pumpkin Pie – dairy and gluten free

0 · Nov 15, 2005 · 7 Comments

This recipe has been developed and tested for the gluten free community by Gf-Zing!

A one-crust unbaked gluten free pie shell (9-inch deep-dish glass pie plate is perfect)

Filling:

1 can pure pumpkin (1 pound size – the “one-pie” size)
4 large eggs
2/3 cup sugar
1/2 teaspoon salt
1 1/2 teaspoons cinnamon
1/2 teaspoon ground ginger
1/2 teaspoon freshly grated nutmeg
1/4 teaspoon allspice
1/4 teaspoon ground cloves
1 1/2 cups almond milk

For a standard pumpkin pie, made with evaporated milk or heavy cream, the recipe would use fewer eggs. For this pie, which uses almond milk instead, more eggs are required to set the filling. This pie also includes less sugar than standard recipes.

Mix all the ingredients for the pie filling together with a whisk, electric mixer or food processor until thorouhly mixed. You can mix the pie filling in the same food processor that you mixed the pie crust in, and any left-over crust ingredients will just get mixed in to the filling with no ill effects on the pie.

Anyway, after the filling is thoroughly mixed, pour it in to the unbaked pie shell set in a glass pie plate. The filling will be quite thick and there will be enough for a deep dish pie. Bake in a preheated 425 degree oven for 10 minutes, then reduce the heat to 350 and bake for another 35 minutes or more, until the filling is set. If the pie is 9-inches and deep dish, it may take as much as an additional 20 minutes before the filling is set. To test the pie, dip a clean, dry, knife-blade in to the center of the pie. The knife should come out nearly clean, but little bits of filling clinging to the knife are ok. The top of the pie will start to crack.

Remove the pie from the oven. Cool completely. Pumpkin pie is an egg-based custard pie, so it should be kept chilled when not being served, and then brought to serving temperature.

If you prefer, you can use a one-pie can of squash, or 1 1/2 cups of home-cooked, mashed, drained pumpkin or winter squash (butternut, buttercup etc.). To use winter squash or sugar pumpkin, halve them and seed them, then bake or microwave until tender.  Finally, remove it from the skin, allow it to sit overnight, then strain it thoroughly to remove excess liquid.

If you don’t care about using dairy but want to use less fat, you can substitute 1 2/3 cups of 1% skim milk or gluten-free fat-free evaporated milk for the almond milk, and use 2 eggs plus 1/2 cup of gluten-free eggbeaters product for the eggs. Make sure the product is gluten free.
Make sure all the ingredients, including the spices, are guaranteed gluten free by the manufacturer. Certain manufacturers guarantee the gluten-free quality and accurate labeling of their spices. Read the internet gluten-free lists to find out which manufacturers are currently maintaining this level of quality.

The original concept of this recipe is from the Victory Garden Cookbook by Morash.  There, the recipe was a an old-fashioned winter squash pie, and called for milk or cream.

*Most Popular Recipes*, Breakfast, Dairy Free, Dessert, Fall, Holidays, Pie, Recipes, Thanksgiving, Winter

Gluten Free or GF Pie Crust

1 · Nov 10, 2005 · 2 Comments

We tried mixes, and recipes, and had almost given up on ever having a decent pie again, when we discovered this method for making gluten free pie crust. Let’s just mention that pie was one of the most important foods in our repertoire, and we used to be very proud of our pie crust, and then we entered the parallel universe of gluten free cooking, for medical reasons. We went in to pie withdrawal – depression, cold shakes, somber mood…..after all, what were we going to have for breakfast, if we couldn’t eat left-over pie?

Well, the news is good – you can have your pie and eat it too!

Use the Dream Pastry Recipe from Bette Hagman’s More From the Gluten-Free Gourmet. A very similar recipe is also called “Donna Jo’s pie crust” and is available on the internet. (Be careful about the recipes on the internet, which are sometimes missing key ingredients in the list of flours, such as the sweet rice flour, for example!) Of course, we don’t exactly follow the recipe anyway, so we have printed here the method we are using at the moment…..

We prefer the flavor of lemon juice to the flavor of vinegar, so we use fresh lemon juice in the recipe. Also, we use one stick of gluten free margarine and one of butter (we don’t like Crisco so much). Lastly, we sprinkle the top of a two crust fruit pie liberally with sugar.

To save time and aggravation when hand-mixing the pie dough, we use a large cheese grater to grate the butter into the dry ingredients. This makes it much easier to get the “lima bean” sized pieces of butter called for in the recipe. We have also used a Braun food processor to make this crust, and it was acceptable, you just have to be careful not to overmix the butter.

Here are the ingredients for one two-crust pie shell:

Dry ingredients:

1/2 cup tapioca flour (tapioca starch) – make sure this is the flavorless kind, not the fermented find
1/2 cup cornstarch
1/4 cup potato starch (katakuriko in Japanese stores – this is NOT the same as potato flour)
1 cup sweet rice flour (mochiko flour – not the same as white rice flour)
1 teaspoon xanthan gum
1/2 tsp salt
1/2 teaspoon sugar

Shortening:
1/2 cup gluten free margarine or butter
1/2 cup butter

(we use all butter)

Liquid ingredients:

1 egg
1 Tablespoon fresh lemon juice
1 Tablespoon ice water

wax paper
sweet rice flour to sprinkle on the wax paper
lots of sugar for sprinkling on the top of the pie

Put the dry ingredients in a bowl and mix them thoroughly with a fork. If you own a sifter, you could sift them together, but it is not necessary. Grate in the butter and margarine using a large cheese grater. Mix the dry ingredients and the shortenings up with a fork until the pieces of butter are distributed evenly – you don’t need to get the pieces of butter as small as they would be in a wheat crust. The size of “lima beans” may be a little large, but don’t go smaller than kidney beans! Anyway, mix up the liquid ingredients until well combined, then pour them in to the dry ingredients and mix together. Squish the dough into a ball and wrap it up to store in the refrigerator for one hour. (For the record, we have made this crust in the winter and gone straight to rolling it out, without refrigerating it. You wouldn’t do this when the air is warm in the summer, but it is ok to do this in the winter when it is cold.)

Divide the dough in half.

To roll out this crust, spread out a piece of wax paper, dust it with sweet rice flour or GF flour mix, or whatever comes handy, put one piece of the dough on top, sprinkle with more flour, spread another piece of wax paper on top of the dough, and roll out with a rolling pin. * The dough is now contained between two sheets of wax paper. Peel off the top piece of wax paper, flip the crust on top of the pie plate, adjust it to fit the dish and remove the other piece of wax paper. Your counter is clean, and your pie crust did not fall to pieces when you tried to put it in the pie dish! You rock!

Fill your pie, then repeat the pie crust rolling maneuver for the top crust. Cut pretty holes in the top crust before transferring it to the pie, if you wish. After putting the top crust on the pie, sprinkle the top crust liberally with sugar – maybe 2 – 4 Tablespoons! Cut steam vent holes in the crust, if you forgot to do it before, and then bake the pie. This crust gets nice and brown and crispy, and it has a delicious buttery flavor! You bake it as you would any other pie crust (about 50 minutes at 400 degrees, for a filled two-crust fruit pie.)

*Note about the rolling pin: We use a piece of dowel from the hardware store – makes a perfect rolling pin, and costs very little. The piece we purchased was being sold as “closet pole” and is 1″ in diameter and 18 inches long.

Some Pies to Try:

  • Blueberry Pie Sweetened with Maple Syrup
  • Gluten Free Quiche
  • Key Lime Pie – Gluten and Dairy Free
  • Pumpkin Pie – Gluten and Dairy Free
  • New England Apple Pie
  • Coconut Cream Pie – no cream!
  • Pumpkin Pie with Coconut Milk
  • Plum Pie

See this post for yet more thoughts on gluten free pie crust: Click here.

Make sure to use all gluten free ingredients!

*Most Popular Recipes*, Breakfast, Dessert, Fall, Holidays, Pie, Recipes, Spring, Summer, Thanksgiving, Winter dessert, pastry, pie, pie crust

Chipotles in Adobo – homemade

0 · Nov 7, 2005 · Leave a Comment

Many modern American recipes call for Chipotle Chiles in Adobo sauce – a tablespoon or two. Some of the best fusion cooking recipes include this flavoring. Unfortunately for the gluten free community, the canned chipotles readily available in supermarkets often contain wheat flour (weirdly, because there is no wheat flour in original Mexican recipes for this sauce.) Gf-Zing! has developed this good, gluten free recipe for this smoky, extremely spicy sauce, based on a number of recipes including some translated from Mexican websites.

The recipe presented here is a combination of the “best of” recipes for quick-cooking chipotles in adobo (adobados) from around the web. The original recipes can be time-consuming, calling for soaking the chilies in vinegar for four days, reducing large quantities of vinegar by boiling, or they may give instructions for a half pound of chiles! The following recipe will make a modest amount of sauce, enough for a small family. Store it in small containers in the freezer – we use 8 little take-out containers and put a couple of tablespoons of the sauce in each one.

1 ounce dried chipotles (this could be 8-12 peppers)
1/3 cup onion, chopped
5 Tablespoons gluten free cider vinegar
2 cloves garlic, sliced
4 Tablespoons gluten free ketchup
2 Tablespoons chopped roasted green chilies (canned)
1/8 teaspoon ground cumin
1/4 teaspoon dried oregano
1/4 teaspoon salt
1 peppercorn
3 cups water

Soak the chiles in boiling water to cover for one hour, to soften them up. Using the point of a small, sharp knife, make a slit in the side of each chipotle chili and remove the seeds and the hard stem end out of the chili. Be very careful, as you trim the chili peppers, not touch your face with your hands – these chilies are very spicy and the chemicals that cause the spice of the peppers (capsaicinoids) can burn mucous membranes. You may notice that breathing the vapors from the chilies may make you cough as well – so use good ventilation.

Put the chilies and all the other ingredients in a 2 quart saucepan and bring to a boil. Cover, reduce the heat to a simmer, and cook for 1 or 1 1/2 hours until the chilies are soft like overcooked peas. Keep an eye on things so the sauce doesn’t boil down too much. The total quantity of sauce, at the end, will be 2 cups. Put all of the sauce and chiles in the blender and puree completely. You may want to add another 1/4 teaspoon of salt and a pinch of sugar to adjust the flavors.

Store in small containers in the freezer.

If you take an interest in the huge variety of Mexican sauces, and you can read Spanish, try this website.

Make sure that all the ingredients, including spices, are gluten free!

*Most Popular Recipes*, Condiments and Sauces, Dairy Free, Recipes adobo, chipotle, chipotles, cooking, DIY, gluten free, pepper, recipe, sauce

Coconut Cream Pie – gluten free, with no cream!

0 · Nov 1, 2005 · Leave a Comment

9″ pie gluten free shell – baked

Coconut Filling:
1 cup gluten free coconut milk (canned, reconstituted or frozen)
2 cups gluten free almond milk
1/2 cup sugar
1 Tablespoon butter or margarine
pinch of salt
1/4 cup fresh grated or sweetened dried coconut
5 Tablespoons cornstarch and enough water to make a thin mixture
4 egg yolks
1/2 teaspoon gluten free vanilla

Meringue Topping:
4 egg whites
1/8 teaspoon cream of tartar
1/4 teaspoon salt
1/4 cup sugar
1/2 teaspoon gluten free vanilla

To make the filling:

Mix the coconut and almond milks, sugar, butter, salt and coconut in the top of a double-boiler over hot water. Stir constantly until the mixture is very hot. Mix the cornstarch with enough water just to thin it to pouring consistency, then add this to the hot mixture, stirring constantly and continue to stir until thickened.

Beat the egg yolks in a bowl just until mixed. Stir a little of the hot mixture into the egg yolks, beating constantly so as not to cook the egg yolks. Add the rest of the hot mixture and the vanilla, again stirring constantly. Put the mixture back over the hot water (double boiler) and cook for 2 more minutes and don’t forget to keep stirring! Cool this coconut custard, and then pour it into the prepared pie shell. Set it aside while you make the meringue.

To make the meringue:

Beat the egg whites, cream of tartar and salt tuntil they form soft peaks. Beat in the sugar and beat until the meringue makes smooth peaks. Add vanilla and spread the meringue on the filling in the pie shell.

Bake the pie at 400 degrees for 10 minutes, until the meringue is nicely browned. Chill the pie completely before serving.

Make sure all your ingredients are gluten free!

*Most Popular Recipes*, Dairy Free, Dessert, Holidays, Pie, Recipes, Thanksgiving coconut, gluten free, pie

Thanksgiving Stuffing – from French Fries!

0 · Nov 1, 2005 · Leave a Comment

It’s a dilemma we all face – the complications of gluten free cooking to top off the already complicated holiday season. Traditional holiday meals can be challenging, and the centerpiece of the Thanksgiving challenge is surely the stuffing and the gravy.

We have learned that it is possible to make quite an acceptable stuffing by using gluten free focaccia in place of wheat bread. Basically any of the bread recipes that contain eggs will be superior to the ones that don’t, as they hold together better. Also, and here is a really exciting possibility that just might cross over into the non gluten-free world, – you can use chopped up gluten free french fries in place of the bread.

Here are proportions to use if you would like to try:

For every cup of diced frozen gluten free french fries, you will need:
1 Tablespoon of butter or margarine
1 Tablespoon of extra virgin olive oil
1/2 cup diced spanish onion (you could use scallions or leeks if you prefer)
1 clove garlic, minced
1/4 teaspoon of ground coriander (optional)
1/2-3/4 cup diced celery (include the leaves)
2 Tablespoons (1/8 cup) minced fresh Italian parsley
2 Tablespoons (1/8 cup) minced fresh thyme (or 1 Tablespoon dried thyme)
1 1/2-3 Tablespoons of chicken stock
Vietnamese hot sauce (make sure it is gluten free)
salt and pepper

If you are using gluten free bread cubes, toast them on a cookie sheet in a 350 degree oven for 7-10 minutes to dry them out. If you are using french fries, you just cut them in stuffing sized pieces!

Fry the onion in the butter and oil for a couple of minutes. Add the celery and garlic and cook for another minute. Mix with the remaining ingredients. If you are using GF bread cubes, you will need to moisten the mixture with 3 Tablespoons of chicken stock mixed with a few drops of hot sauce, but if you are using french fries then less moistening is needed – a Tablespoon and a half fo the chicken stock per cup of french fries should do the trick! Season to taste – use lots of pepper.

Place the stuffing in a buttered covered casserole and bake alongside your turkey – only a half hour of cooking is needed.

Make sure all your ingredients are gluten free, including the spices!

*Most Popular Recipes*, Dairy Free, Holidays, Recipes, Thanksgiving

Pumpkin Pie with Coconut Milk

0 · Oct 24, 2005 · 2 Comments

The recipe is adapted from one at www.Celiac.com. Here, the pie has additional spices and coconut milk instead of cream.

Make an uncooked one-crust gluten-free pie crust and use it to line a glass pie dish.

Bottom of pie:
1/3 cup finely chopped pecans
1/3 cup dark brown sugar
3 Tablespoons gluten free margarine (for dairy, use butter)

Filling:

3 large eggs, stirred
1/3 cup dark brown sugar
1/3 cup white or turbinado sugar
2 Tablespoons cornstarch
1 1/2 teaspoons GF cinnamon
1/2 teaspoon GF ginger
1/2 teaspoon freshly grated nutmeg
1/4 teaspoon GF allspice
1/4 teaspoon GF cloves
1/2 teaspoon salt
16 ounces GF canned pumpkin, or freshly cooked pumpkin, blended and strained to remove excess water
1 cup coconut milk

Mix pecans, sugar and butter and distribute in the bottom of the uncooked pie shell. Prick the part of the pie shell that goes up the side of the pie plate with a fork in several places so it won’t balloon out while cooking. Bake at 450 for 10 minutes and then allow to cool for another 5 minutes.

Mix the filling ingredients in a food processor or blender. Pour the mixture into the partially cooked pie shell, on top of the nut layer. Bake for 45-50 minutes at 350 degrees. A knife inserted into the center of the pie should come out nearly clean. Cool completely before cutting, although we often end up eating pie when it is warm because we can’t wait.

This is a custard pie, and should be refrigerated because of the eggs.

Try this pie for breakfast – it is sure to be more healthy than any breakfast cereal!

Make sure all of your ingredients, including the spices, are gluten free.

*Most Popular Recipes*, Breakfast, Dairy Free, Dessert, Holidays, Pie, Recipes, Thanksgiving coconut, pie, pumpkin

Primary Sidebar

Check out our Coupon Collection

Click Here to go directly to the Coupon page

Read more at The Rambling Epicure:

Click Here: The Rambling Epicure

QR code for your phone

qrcode for gfzing
NFCA logo

Blogroll

  • Aloha World Ono Recipes
  • Book of Yum
  • Dulce Cocina sin Gluten
  • Gluten Free Beer Association
  • Glutenfreie Rezepte | kaMehl
  • Hawai'ian Electric
  • Laylita's – Ecuador
  • Nombudsman
  • Papilles et Pupilles
  • Sea Salt with Food
  • The Rambling Epicure The Rambling Epicure is a daily international food chronicle, and the first online newspaper to follow global food trends and news.
  • Triumph Dining

Monthly Archive

Proud member of FoodBlogs

Load up on new recipes, exclusive goodies, + more!

Get the exclusive content you crave straight to your inbox.

Things to Read

Find by keyword

bacon baked baking beans beef berries blueberry cake cheese chicken chocolate coconut cooking curry dessert DIY dried beans easy fish food fruit GF ghee gluten free gourmet homemade lamb maple syrup meat microwave New England Hard Cider pie pork pumpkin recipe recipes rice salad sauce soup stewed strawberries sweet potato thai red curry vegetarian

Copyright © 2023 GF-Zing! on the Cravings Pro Theme