• Skip to primary navigation
  • Skip to main content
  • Skip to primary sidebar
  • Skip to footer

GF-Zing! logo

  • Home
  • Coupon Collection
  • GF Foods & Groups
  • Ask Gf-Zing!
    • About the Author
    • About Gf-Zing!
  • Nav Social Menu

    • Email
    • Facebook

Pickles and Preserves

Say Cheese! – making homemade cheese

0 · Dec 9, 2011 · 1 Comment

By Alice DeLuca


Many years ago, on a train traveling slowly through the French countryside – I don’t remember exactly where and I refuse to invent a location for the sake of a story – I met a man whose job it was to sell cheese mold.  This friendly man was sitting in the same compartment with me.  I was naturally apprehensive when he started to speak. Sometimes men traveling on trains want to share stories and sometimes they want to show young women other things whether the women are interested or not, but that is another story.


The suited gentleman had a tidy briefcase which he offered to open so that I could see his wares.  It was a great relief to find that he was a genuine gentleman, and that what he wanted to display was an assortment of tiny envelopes containing samples of unique cheese molds that were required in the production of famous French cheeses such as Camembert and Brie.  Perhaps interpreting my relief at his desire to talk about cheese as an ardent interest in learning about his profession, he explained the whole process by which these molds would be sprayed on the cheeses during the manufacturing process.  The uniform, paint-white rind of fresh Brie, with its mushroomy aroma, had mystified me until that moment when I learned that the rind was a fungus just like the kind of thing that produces mushrooms and that this fungus was sprayed on to the cheeses; an aerosol mushroom.  I had wrongly pictured the right molds, living in the area, just meandering in on a fresh lavender-scented breeze from the French countryside and settled conveniently on each cheese, creating a uniform coating.


In fact, a mushroom is the fruiting body of an underground fungus, poking up through the forest floor.  The Brie cheese rind is seeded with the spores of a particular fungus that does not make those pop-up fruiting bodies.  So, fine cheese and mushrooms are related, which makes sense when you think about it, and I got the first inkling of this knowledge on a rumbling train.


It was also news to me at the time that cheeses were mass-produced rather than made individually the way we had tried to do at home.  Unlike our lonesome artisanal cheeses that cured with the native spores traveling through the air at our house, there were whole rooms full of camembert, just sitting around waiting to be sprayed with precisely engineered mold. I pictured in my mind whole rooms full of cheeses just sitting there, waiting.


Our few attempts at making homemade cheese had been laborious.  One particular cheese required a few gallons of whole, unpasteurized milk and some rennet, a funky smelling material derived from the stomach of a cow. You could obtain rennet at almost any grocery store by purchasing a package of “junket” mix – this is actually rennet that can be added to milk to make a sort of custardy dessert that has now fallen out of favor – or you could purchase rennet tablets specifically intended for cheesemaking, in a small cylindrical vial.[i] We used the rennet tablets and our homemade cheese had a pleasant flavor.  We coated the cheese with wax that we tinted turquoise with candle-dye, to make our cheese stand out from those endearing goudas encased in the bright red wax that children love to play with at the table, annoying the grownups.  Our wax was too hard and did not have the elasticity of the red cheese wax, so there were occasional holes and leaks in our coating which we patched horribly with little globs of additional wax.  As amateurs we had lots of enthusiasm, but we didn’t have all the skills and equipment of the professionals.


There are so many diverse careers out there in the world.  Here was a man who traveled around on trains with a suitcase full of mold.  He provided a vital service to one of France’s major food industries, and he obviously enjoyed the work, the travel and the conversations along the way. He was not a Willy Loman character[ii] suffering from depression and despair, ruining his home life with his philandering ways.  He was a proud, friendly gentleman who happily went about selling cheese mold to the heroes of French cuisine.  I did not get his name, and by now he must be a very old man, but if I could I would thank him and ask him so many more questions.


I encountered another great member of the world of cheese professionals on Arthur Avenue in the Bronx, New York, in the 1980s. My memory is of a small shop where a lumberjack-sized man with large handlebar mustaches created mozzarella cheese with his bare hands.  He made it look easy, as he kneaded the white curds in nearly boiling water until the cheese stretched like taffy.  The process of creating hot ropes of cheese from milk turned out to be much trickier at home, especially since my hands were not used to being immersed in very hot water for extended periods. My hands turned red as they cooked, and I did not have the strength of this giant professional.


This video demonstration evokes the gentleness and patience of the true process similar to what I recall from watching the fellow making mozzarella in the Bronx in 1982: http://www.youtube.com/watch?v=Z_48-nGlxaw&feature=related[iii]


I have recently learned that it is possible to make homemade mozzarella using a microwave oven.  People swear by this method and some claim to make cheese every week, almost ritually. This development could revolutionize many home kitchens, whether or not the cook adopts an obsessive-compulsive cheese-making habit.  Following are links to a pictorial instruction on how this microwave mozzarella is made.  The thing that is missing though is the slow, steady stirring; the brilliant efficiency of the strainer sinking in to the whey to separate the curds; the loving kindness of the great artisanal food artist at work.


Homemade microwave mozzarella: http://www.cheesemaking.com/store/pg/21.html

http://www.youtube.com/watch?v=RPUortoNUWo&feature=fvwrel


[i] Junket mix is still available today, and there are recipes for using it to make cheese here.

[ii] Miller, Arthur. Death of a Salesman.

[iii] This demonstration gives an idea of the same process done by cheese professionals: http://www.youtube.com/watch?v=2o-55_Hhjek&feature=related

Condiments and Sauces, Pickles and Preserves, Recipes, Vegetarian cheese, DIY, homemade, vegetarian

Homemade Vinegar

0 · Feb 3, 2011 · 1 Comment

Homemade vinegar is easy to make – it kind of makes itself under the right conditions – and we have been making our own for 25 years.  The vinegar you buy in the grocery store (white, cider, wine) is sharp tasting and thin in flavor compared to the rich complexity of a homemade vinegar.  Make your own vinegar and you will become a fan!  Also, with your own homemade vinegar there is no need to read labels looking for gluten-containing items. The test of a delicious vinegar is this: sip up a teaspoon of the vinegar and you should want more! You will not want to waste this homemade vinegar making those baking soda and vinegar volcanoes that are so popular in elementary and middle school classes.

You will need:

  • Leftover Wine diluted with unchlorinated water
  • Vinegar culture (a bacterial culture, check with the manufacturer and do NOT use malt vinegar culture)
  • a wide-mouthed glass or stoneware container
  • Cheesecloth to keep fruit flies out of the vinegar while allowing air to enter the container
  • Room temperature (68-96 degrees)
  • surgical hemostat clamp (a ten dollar item) for easily removing old vinegar mother

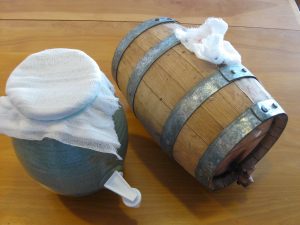
If you really get in to making homemade vinegar, you may want to invest in a handy vinegar crock with a spigot, or an oak vinegar barrel.  Bear in mind that it is not safe to use homemade vinegar in home canning or pickling,  unless you are a talented chemist who can accurately test the acidity of your finished product.  For pickling, you need 5% acidity.

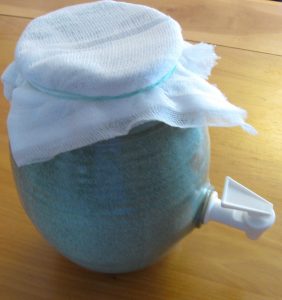
Coyote Vinegar Crock gfzing.com square
Gfzing.com uses a vinegar crock with spigot - made by Clay Coyote Gallery

To make Vinegar:

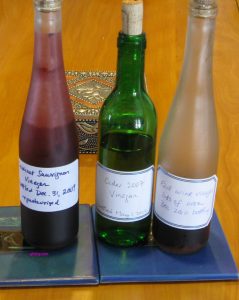
Choose what kind of vinegar you are making: red, white, cider.  Dilute leftover wine or hard cider with unchlorinated water, about 2 parts of wine to one part of water.  Put about a quart of diluted wine in to a cleaned large mouth jar or bowl, or vinegar crock.  We use C-brite to clean the container.  Add the starter culture. Stir with a clean spoon; cover the container with cheesecloth secured with a rubber band (keeps out fruit flies while allowing air to enter).  Store the crock at the back of the counter in your kitchen, where the vinegar will remain largely in the dark and at 68-96 degrees.  In about 4 weeks the first vinegar should be ready to use in salad dressings and sauces. Pour off some of the vinegar,  taste it and dilute it with additional water if it tastes too strong, then bottle it in sterilized bottles and cork the bottles.

Now add more diluted wine to your crock – this is called “feeding” your vinegar and let it go.    Each time you get ready to bottle some vinegar, taste the finished product to see if it is ready for bottling, and add water if the flavor is too strong.  Since this is a trial-and-error, imprecise method for achieving the final product, you will not know the final Ph of the homemade vinegar and cannot use this vinegar to make pickles or preserves that are not refrigerated.

Vinegar Culture:

To make vinegar, you add a starter culture of acetic acid bacteria to an alcohol base (like wine or hard cider).  For the starter culture, you can use some vinegar from a friend’s vinegar crock, or you can buy a culture. For gluten free vinegar, do not use malt vinegar culture.

Vinegar Mother:

Vinegar mother is a thick cellulose material created by the vinegar bacteria.  People who have never handled vinegar mother call it “slimy” but that is not a good description.  The material is strong, thick and fibrous, stretchy, slippery and somewhat leathery – like the covering on a papaya seed, or a sort of fibrous jelly. It can break cleanly in to clumps when you pull on it. The mother accumulates in your crock or barrel, and eventually some of it needs to be removed to make room for more wine.  The mother is not necessary to the formation of new vinegar – what you need is the bacteria.  So, if you have a friend who makes good vinegar and does not pasteurize it, ask for a sample of their vinegar and you are ready to go.

Vinegar Barrels:

A word about vinegar barrels – the oak vinegar barrel adds a strong oak flavor to a red wine vinegar, and we use one for this purpose.  However, the home vinegar maker should be forewarned about a couple of things. 1) The vinegar barrel should be soaked before using, to prevent leaking.  2) Unless the barrel has a large opening at one end, removing old vinegar mother from your vinegar barrel requires two people, because most of these barrels only have small holes through which to remove the mother.  One person holds the barrel so that a hole is facing downwards (the largest hole is the air hole at the top) and the other person uses a surgical hemostat clamp to grab bits of the mother and pull them through the hole. This is a messy process.

Vinegar Crock and Barrel from GFZINGdotcom
Gfzing.com uses the Vinegar Crock for cider vinegar and an Oak Vinegar Barrel for red wine vinegar

Bottling:

We bottle the vinegar without pasteurizing it.

Homemade Vinegar and Pickling:

  • Do not use homemade vinegar for making pickles. Vinegar used in pickling must be of a certain Ph, or you can have spoilage and dangerous bacteria can grow in the pickles.

More Instructions:

Further instructions for making your own vinegar are available here: http://www.claycoyote.com/blog//SunsetMagazine_Vinegar.pdf

homemade vinegar gfzing dotcom

Condiments and Sauces, Dairy Free, Pickles and Preserves, Recipes, Vegetarian DIY, gluten free, homemade, vegetarian, vinegar

Thai Cucumber Salad Dressing

1 · Feb 3, 2011 · Leave a Comment

Salad is the BFF (best friend forever) of seasoned gluten free eaters. Here is another simple, inexpensive gluten free dressing that can be used on many different kinds of fresh vegetable.  In this case, we used English cucumbers – those long, long cucumbers that are often sold mysteriously laminated but have the advantage of holding few seeds.

To make attractive edges on the cucumber, increase the fiber in the finished dish, and avoid peeling, we use a fork to deeply score a cucumber from end to end, on all sides.  Scoring the cucumber in this way breaks up the peel so the diner does not have to masticate like a herbivore.  Then we cut the cucumber in half lengthwise, then sliced it crosswise into moon shapes. If you use a standard American cucumber, after halving it remove the seeds by scooping them out with a spoon.

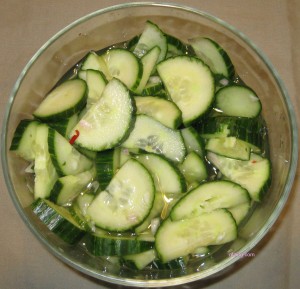
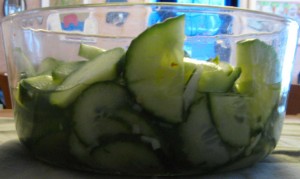
Put the cucumber slices (or grated carrot, daikon radish or whatever vegetable you want to lightly pickle) in to a glass bowl.  A fancy bowl is not required – any glass bowl will do.

Thai Cucumber Salad gfzing.com birdseyeview

Mix up the following dressing, pour it over the cucumber slices, stir and chill:

  • 1/2 cup cider vinegar (homemade is best)
  • 1/4 cup sugar
  • 1/4 water
  • 1 teaspoon salt
  • 1 medium shallot, peeled and minced
  • 1 dried cayenne pepper, minced (or 1/4 – 1/2 teaspoon red pepper flakes)
  • fresh ground black pepper (optional)

You can add more cucumbers to the leftover dressing and serve the same salad again the next day.

A note for the wheat-eater who is serving a gluten free diner: be cautious with the sugar container.  Sometimes a tired baker scoops up some flour from the flour container and then uses the same measuring cup to scoop up some sugar.  If that’s something you tend to do, use a fresh container of sugar to make this dressing for your gluten free friend.

Thai Cucumber Salad gfzing.com web

Condiments and Sauces, Dairy Free, Pickles and Preserves, Recipes, Salads and Dressings, Vegetables, Vegetarian cucumber, dressing, gluten free, salad, vegetarian

Preserving Fresh Ginger

0 · May 11, 2010 · Leave a Comment

It is easy to keep fresh ginger available at all times.  Get some really nice looking fresh ginger, peel it, cut it in chunks, and put the chunks in a nice jar that can be closed tightly.  Pour in some vodka to cover the ginger completely.  This ginger will keep for a very long time and you can take it out of the vodka as needed, chop it up and use it in curries or stir-fries.

Condiments and Sauces, Pickles and Preserves, Recipes GF, ginger, gluten free, preserves

Primary Sidebar

Check out our Coupon Collection

Click Here to go directly to the Coupon page

Read more at The Rambling Epicure:

Click Here: The Rambling Epicure

QR code for your phone

qrcode for gfzing
NFCA logo

Blogroll

  • Aloha World Ono Recipes
  • Book of Yum
  • Dulce Cocina sin Gluten
  • Gluten Free Beer Association
  • Glutenfreie Rezepte | kaMehl
  • Hawai'ian Electric
  • Laylita's – Ecuador
  • Nombudsman
  • Papilles et Pupilles
  • Sea Salt with Food
  • The Rambling Epicure The Rambling Epicure is a daily international food chronicle, and the first online newspaper to follow global food trends and news.
  • Triumph Dining

Monthly Archive

Proud member of FoodBlogs

Load up on new recipes, exclusive goodies, + more!

Get the exclusive content you crave straight to your inbox.

Things to Read

Find by keyword

baking banana blueberry cake cardamom carrot cheese chicken chocolate cinnamon coconut cookies cooking curry custard dairy free dessert DIY dressing fish food fruit GF ghee gluten free gourmet homemade kids maple syrup meat microwave pie pork potato pumpkin recipe recipes rice salad sauce sausage soup sourdough sweet potato vegetarian

Copyright © 2025 GF-Zing! on the Cravings Pro Theme