• Skip to primary navigation
  • Skip to main content
  • Skip to primary sidebar
  • Skip to footer

GF-Zing! logo

  • Home
  • Coupon Collection
  • GF Foods & Groups
  • Ask Gf-Zing!
    • About the Author
    • About Gf-Zing!
  • Nav Social Menu

    • Email
    • Facebook

Breakfast

Gourmet Gluten Free Brownies

0 · Mar 18, 2011 · Leave a Comment

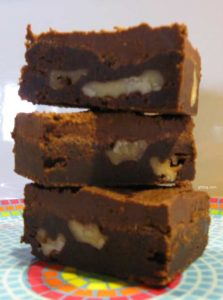
Gourmet Gluten Free Brownies from gfzing dot com

A gourmet gluten free brownie that is just like the best wheat brownie you ever had.

Use the absolute best quality gluten free chocolate you can obtain.  It is worth doing the website and company research to find the richest, darkest gluten free chocolate that is available.

For the brownies:

Melt the following in a small pot, then set aside to cool briefly:

  • 1 1/2 sticks (12 ounces) unsalted butter
  • 7 ounces bittersweet gluten free chocolate
  • 3 ounces gluten free unsweetened chocolate

Place the following in a large bowl:

  • 1 1/2 cups sugar
  • 1 1/2 teaspoons vanilla or 1/2 teaspoon of Authentic Foods gluten free powdered vanilla
  • 1/4 teaspoon salt
  • 4 eggs

Beat the sugar/egg mixture with a spoon, then stir in the melted chocolate/butter mixture.

In a small bowl, combine

  • 1 cup Authentic Foods GF traditional flour blend
  • 1/2 teaspoon xantham gum

Mix the GF flour mixture in to the chocolate batter.  Stir just to combine well.

Stir in:

  • 1 cup walnut pieces, sized according to your preference.

Line a 9 x 13″ pan with parchment paper leaving quite a bit up paper going up the sides (so that you can grab the paper later and pull the whole brownie unit out of the pan.  Pour and spread the batter in to the paper-lined pan and ease the batter out to the edges and corners of the pan.  Bake at 350 F degrees for 30 minutes.  Remove from the oven and cool completely before frosting.     Don’t remove the brownies from the pan yet – frost first!

Frosting:

Melt in a microwavable glass dish:

  • 6 ounces unsalted butter
  • 4 Tablespoons milk (can be non-fat milk if you want)

Add:

  • 4 Tablespoons (1/4 Cup) best quality gluten free cocoa powder
  • 1 teaspoon vanilla
  • 2 2/3 cups gluten free confectioner’s sugar

Stir together with a kitchen spoon until completely smooth.  Because the butter is melted, the frosting can still be a bit loose or runny when you spread it, because the frosting will stiffen up later, as the butter cools and hardens. Spread the frosting on the brownies, then transfer the pan to the refrigerator to chill until firm.

To remove brownies from pan, just grab the edges of the parchment paper and lift. Transfer the paper of brownies to a cutting board and proceed to cut them.

Cut the brownies with a sharp knife.  To make clean cuts, occasionally run the knife blade under hot water then wipe dry with a clean towel.  Using a heated, clean knife will ensure a clean cut with no crumbs.

Make sure to use all gluten-free ingredients.  If you are using a wheatavore kitchen, ensure that the sugar container is not contaminated with flour by wheatavore cooking adventures.

Christmas, Cookies, Dessert, Holidays, Recipes, Spring, Summer, Vegetarian, Winter brownie, chocolate, cookie, dessert, gluten free, vegetarian

Potato Salad with Eggs and Carrots

0 · Mar 17, 2011 · Leave a Comment

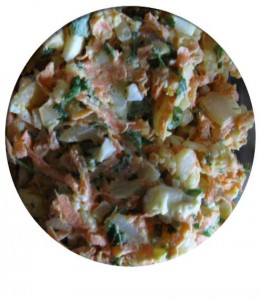
Potato Salad with Eggs and CarrotsA tasty gluten free potato salad with hard-boiled eggs, carrots and onion.  The cooking is done in the microwave to cut down on the heat in the kitchen.

This is based on the potato salad shown at this webpage: http://www.sachikocooking.com/english/en0106prt.htm, altered to use less mayonnaise and much less sugar.

  • 3 red bliss potatoes – if they are about the size of a tennis ball, the three potatoes together will weigh about a pound.
  • 3 large carrots, grated on the large holes of a box grater
  • 1 cup very thinly sliced onion
  • 1/2 teaspoon table salt
  • 2 eggs
  • 1/4 cup coarsely chopped flat-leaf parsley


Sauce:

  • 1/4 cup gluten free mayonnaise
  • 1 teaspoon gluten free ballpark mustard
  • 1/4 teaspoon freshly ground pepper
  • 1/2-1 teaspoon sugar
  • 1 teaspoon fresh lime juice


Mix the shredded carrots, sliced onion and salt thoroughly and set aside.  Let this rest while you do all the other preparation, so that the salt can draw water out of these veggies.

Clean the potatoes, pierce each one and remove the eyes, microwave them using the potato setting on your microwave.  Set aside to cool, then peel and chop.

“Hard-boil” the eggs in the microwave, adding 1 teaspoon water per egg.  We use a device called a “Micro Egg” for cooking eggs in the microwave.  With this device, it took slightly longer than 1 minute at 100 power to cook the two eggs in one Micro Egg. Set the eggs aside to cool, then dice.

Squeeze the water out of the salted carrot/onion mixture by putting these salted veggies  in a kitchen towel and squeezing firmly.

Put the squeezed carrots and onion in a bowl. Add the chopped cooked potatoes, diced eggs, parsley.  Mix the sauce ingredients in a separate bowl, then fold the sauce in to the carrot-onion-potato-egg-parsley.  Adjust the flavors, chill and serve.


Lunch, Microwave Cooking, Potatoes, Recipes, Salads and Dressings, Spring, Summer, Vegetables, Vegetarian mayonnaise, microwave, potato, salad, vegetarian

Salmon with Curry Dry Rub and Dressed Vegetables

0 · Feb 25, 2011 · Leave a Comment

This outstanding gluten free recipe is revised from one which appeared in Bon Appetit magazine nearly a decade ago.  There are 3 components:  the rice, the vegetables and dressing, and the salmon.

Prepare the Rice first:

Fry 1 Tablespoon homemade ghee or butter, then add:

  • 1 cup rinsed basmati or long grain rice

Stir fry for a minute or so, so that all the grains of rice are coated with the ghee or butter

Add:

  • 1 cup water
  • 2/3 cup coconut milk
  • 3/4 teaspoon salt

Bring to a boil, turn down the heat, cover and cook until the rice is done. Season with pepper.  Set aside, covered, to stay warm.

Prepare the vegetables :

Fry the following aromatics in 1 Tablespoon toasted sesame oil for one minute:

  • 2 teaspoons minced fresh ginger
  • 1 clove garlic, minced

Add sliced vegetables and stir fry for just a couple of minutes, then set aside:

  • 1 red bell pepper, sliced
  • Sliced shitake mushrooms, stems removed
  • 1 bunch of bok choy, sliced
  • Other options include carrots, scallions, celery, spinach, baby spinach, watercress, zucchini, bean sprouts with the ends removed etc.

Set the vegetables aside.

Make the dressing for the vegetables:

  • 6 Tablespoons rice vinegar or homemade cider vinegar
  • 3 Tablespoons gluten free soy sauce
  • 2 Tablespoons toasted sesame oil
  • 2-4 Tablespoons chopped fresh cilantro
  • 1 Tablespoon minced fresh ginger
  • 1 teaspoon sugar

Set the dressing aside.

Prepare the serving plates: You will need 4-6 dinner plates ready to go.

Prepare the fish:

Choose very fresh salmon fillets, with the evenest possible thickness for uniform cooking.  Instructions assume that there is a “skin” side, but if there is no skin side just proceed anyway.

Make a dry rub of  one teaspoon of each of the following spices:

  • gluten free chili powder
  • gluten free curry powder (make your own – that’s the best way)
  • gluten free ground cumin
  • gluten free ground coriander
  • gluten free mustard powder (difficult to find – if you can’t find gluten free, leave this out)
  • salt
  • sugar

Sprinkle each of 4-6 6-ounce salmon fillets (the flesh side of the fish, not the skin side) with a teaspoon or more of the spice mixture.  If you want to do something ahead, you could set the spiced fish aside, wrapped, in the refrigerator for 2-3 hours at this point, but we don’t bother – we proceed immediately with the cooking:

Heat a Tablespoon of vegetable oil in a non-stick pan over medium-high heat.  For 6 fillets, you might need 2 pans. When hot, add the salmon filets, skin side down, and fry for 3-4 minutes.  Flip the fish, spice side down now, and finish the cooking – another 3-4 minutes on this side. The fish should flake easily when done.

To Serve:

On each plate, arrange a serving of rice, a serving of vegetables, and a piece of salmon.  Drizzle the vegetables with a little of the dressing (a tablespoon or so).

Can be served with a rose wine, a dry red wine such as Tohu Pinot Noir from New Zealand, or a New England Hard Cider.  The dish is surprisingly well paired with a dry pinot noir, just for the record.


Condiments and Sauces, Fall, Fish and Seafood, Recipes, Salads and Dressings, Spring, Summer, Vegetables, Winter, with New England Hard Cider curry, fish, rice, salmon

Gluten Free Deep Dish Pizza

0 · Jan 7, 2011 · Leave a Comment

We were addicted to the deep dish pizza made by Edwardo’s on the South Side of Chicago in the 1980s, and after leaving that part of the country we went to great lengths to learn how to make deep dish pizza at home.  We even purchased an enormous specialized pan purposed for making stuffed pizzas. Fast forward a few decades and sadly a gluten free deep dish pizza seemed like an impossible dream.  But continue on, dear reader, because you can have a reasonable deep-dish pizza, gluten free, if you have a cast iron or Le Creuset skillet available to you.  The crust will be little chewy, somewhat denser than an ideal crust, but flavorful because of the potato flour in the dough.  It will have unique characteristics which make it worth eating, even though it is gf.

Crust:

Cut a 12″ diameter circle of parchment paper to line a 10 inch heavy cast iron skillet (ours is the enameled Le Creuset designed for use in a hot oven – some of the Le Creuset skillets are not meant for very hot ovens, so make sure yours is – the enamel on the inside of the pan should be black). A flat circle must be creased a few times to line a 3 dimensional pan, so flatten the paper against the bottom of the pan, and pleate and crease it up the sides to make it “fit”.  Make one recipe of the pizza base dough from Darina Allen and Rosemary Kearney’s Healthy Gluten-Free Cooking.  This is a rice flour, potato flour and tapioca flour dough that contains dried milk and an egg as well – but no bean flour. Note that the recipe calls for potato flour, not potato starch.  Weigh the ingredients using a kitchen scale because the book is written using Irish measurement units. I encourage you to purchase the cookbooks mentioned in my articles, to support the work of fellow recipe writers in the hope that they will produce more useful books for us!

Preheat your oven to 400 degrees.  When the oven is hot, roll out the dough between two sheets of waxed paper dusted with sweet rice flour (mochiko), and line the pan with the dough (the entire recipe’s worth of dough). Prick the dough all over with a fork and bake it (unfilled) for 10 minutes, remove the very heavy pan from the oven using two hands and oven mitts to grab the handle and edge of the pan.  Set the hot pan aside and prepare the filling.  I always leave an oven mitt on the handle to remind me that the handle of the pan is hot, hot, hot! That handle is 400 degrees, and you don’t want to grab it without an oven mitt!

Filling:

1/2 pound of mushrooms

1/2 pound gluten free italian sausage – spicy is nice – omit for vegetarians

1 large spanish onion, sliced (don’t use “sweet onions” as they don’t brown nicely)

1-2 bell peppers, sliced

6 cloves garlic, minced

Fry the mushrooms in olive oil for 4 minutes without stirring.  Remove the mushrooms from pan and set aside. Season with salt and pepper.

To the same pan, add the gluten free sausage, onions, peppers and garlic and fry for 10-12 minutes until cooked through.

Mix the sausage mixture with the mushrooms and add a 1/2 pound of full-fat mozzarella, hand grated, a half cup of canned diced tomatoes (fresh if you have them), 1/2 cup of chopped basil or 1-2 Tablespoons of gluten free homemade pesto sauce.  Test the filling to see if it needs additional salt and pepper.

Spread the filling in the prepared pre-baked crust, Sprinkle with another 1/2 pound of grated mozzarella, sprinkle with grated parmesan cheese, raise the temperature of the oven to 450 and bake the pizza for 30-35 minutes. Remove the very very hot pan from the oven using oven mitts. Serve immediately or cool slightly first.

Make sure all your ingredients are gluten free!

The filling is based on one in the October 2005 issue of Cuisine at Home.  Ham and pepperoni have been eliminated, and the option of using prepared pesto in place of basil is added. You can tinker infinitely with the ingredients in the filling.  Use what you have available – spinach, other types of cheese, omit the peppers and double the onions, whatever you like!

Ask Gf-Zing! - Responses, Bread, Fall, Lunch, Meat Dishes, Meat-eater, Pie, Recipes, Spring, Summer, Vegetarian, Winter gluten free, pizza

Plantain empanadas (empanadas de platano)

0 · Sep 20, 2010 · Leave a Comment

Plantains are  large, very sturdy-looking banana-like fruits one sees in the grocery store produce section.  They can be cooked when yellowish (called green) or when totally black (sweet).  Gf-Zing! finds plantains to be a wonderful, wonderful gluten free starch.

Empanadas are similar to a turnover, either baked or fried.  The dough can be made from flours or from plantains, using one plantain to make two empanadas.

The easiest way to make plantain empanadas is to buy some yellow-green plantains and a piece of mozzarella cheese, then follow the simple directions on this excellent video: http://how2heroes.com/videos/international/plantain-empanadas from the great Mexican restaurant Tu y Yo.  If your plantains are too green, you will have to wait a few days for them to ripen somewhat.  Plantains sweeten and soften as they darken.

The video demonstration shows the plantains being boiled for one hour. If you are pressed for time, instead of boiling the plantains you can use the microwave.  Wash the plantains, then cut off the ends of the plantains. Make a slit in the skin all the way down one side, the long way.  Wrap each plantain in a paper towel and put them in the microwave on the rotating platter, in one layer.  Cook the plantains on the same setting your microwave suggests for “baked potato.”  When cooked, the plantains will be extremely hot. When they are done, use a potholder to place them on the counter and wait until they cool a bit, then unwrap, peel and proceed with mashing (using a potato masher if you don’t have a molcajete), stuffing and frying as demonstrated in the video by the chef from Tu y Yo.

Fall, Recipes, Summer, Vegetables, Vegetarian, Winter cooking, empanadas, food, GF, gluten free, microwave, plantain, platano, vegetarian

  • « Go to Previous Page
  • Go to page 1
  • Go to page 2
  • Go to page 3
  • Go to page 4
  • Go to page 5
  • Interim pages omitted …
  • Go to page 11
  • Go to Next Page »

Primary Sidebar

Check out our Coupon Collection

Click Here to go directly to the Coupon page

Read more at The Rambling Epicure:

Click Here: The Rambling Epicure

QR code for your phone

qrcode for gfzing
NFCA logo

Blogroll

  • Aloha World Ono Recipes
  • Book of Yum
  • Dulce Cocina sin Gluten
  • Gluten Free Beer Association
  • Glutenfreie Rezepte | kaMehl
  • Hawai'ian Electric
  • Laylita's – Ecuador
  • Nombudsman
  • Papilles et Pupilles
  • Sea Salt with Food
  • The Rambling Epicure The Rambling Epicure is a daily international food chronicle, and the first online newspaper to follow global food trends and news.
  • Triumph Dining

Monthly Archive

Proud member of FoodBlogs

Load up on new recipes, exclusive goodies, + more!

Get the exclusive content you crave straight to your inbox.

Things to Read

Find by keyword

baking banana blueberry cake cardamom carrot cheese chicken chocolate cinnamon coconut cookies cooking curry custard dairy free dessert DIY dressing fish food fruit GF ghee gluten free gourmet homemade kids maple syrup meat microwave pie pork potato pumpkin recipe recipes rice salad sauce sausage soup sourdough sweet potato vegetarian

Copyright © 2025 GF-Zing! on the Cravings Pro Theme