• Skip to primary navigation
  • Skip to main content
  • Skip to primary sidebar
  • Skip to footer

GF-Zing! logo

  • Home
  • Coupon Collection
  • GF Foods & Groups
  • Ask Gf-Zing!
    • About the Author
    • About Gf-Zing!
  • Nav Social Menu

    • Email
    • Facebook

Appetizers

Sesame-Crusted Tofu with Quick Microwave Curried Carrot Soup

0 · May 14, 2012 · 1 Comment

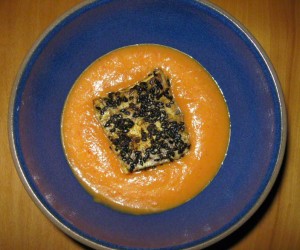
Curried Carrot Soup with Sesame Crusted Tofu - Alice DeLuca 2012 digimarc
Curried Carrot Soup with Sesame Crusted Tofu in a blue Heathware bowl

The inspiration for this dish from www.gfzing.com was a trip to the Garden Grille in Providence, Rhode Island.  They make truly delish vegetarian food, much of which they will also prepare gluten free.  This is recipe is NOT one of theirs, it is just inspired by their cooking.  I did not have a chance to try their sesame-crusted tofu, unfortunately.

The soup here is done in the microwave oven, for quick, efficient dinner preparation.

It is easily adapted for vegetarians and vegans – just omit the fish sauce and adjust the salt.

For the Soup:

5 ounces peeled Spanish onion, diced

1/2 ounce (2 cloves) garlic, peeled and diced

1 TB olive oil

3 ounces red bell pepper, diced

3 carrots (about 6 ounces), peeled and chunked

3/4 cup rich coconut milk

1 cup water

2-3 teaspoons gluten free fish sauce (omit for vegetarians)

2 teaspoons gluten free Thai Red Curry paste

1 TB currant jelly

salt to taste (1/4-1/2 teaspoon)

To Fry the Tofu:

1 package of extra-firm tofu, drained and slice the short way in to four slices, then cut the other way to make 8 squares about 3/4 inch thick.

1 teaspoon homemade curry powder (see recipe on this site)

2 TB black sesame seeds

2 TB peanut oil

1 teaspoon sesame oil

To make the soup:

In a 1 1/2-2 quart microwavable casserole dish (such as Corningware), place the chopped onions, chopped garlic and 1 TB of oil. Cover and microwave on high for 5 minutes.  Allow to cool for a few minutes before removing the cover (to avoid steam burns).

To the cooked onions and garlic in the casserole dish add the rest of the soup ingredients from the red bell pepper through the currant jelly.  Cover and microwave until the carrots are tender, about 10 minutes.  Allow to rest a few minutes before you remove the cover, to avoid steam burns.

Use a stick or immersion blender to puree the soup. Season with just a little bit of salt to taste. Adjust the sweetness. Set aside.

For the Tofu:

Mix the curry powder and sesame seeds and pat the mixture on to one side of each of the squares of tofu.  Heat the oil and sesame oil in a large, heavy frying pan.  When hot, add the tofu squares, seed side up. Fry over medium heat, undisturbed for 4 minutes.  Salt the tofu squares.  Use a spatula to turn the tofu squares and fry the other side undisturbed for 3 minutes. Salt the other side.  The frying will crisp the tofu, rendering it golden brown.

Remove the fried tofu from the pan.

To Serve:

Reheat the soup briefly and serve 2 squares of fried tofu, seed side up, on each serving of the hot soup.
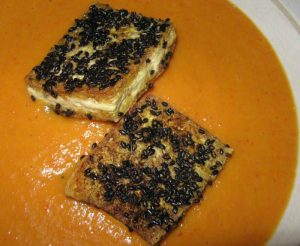
Curried Carrot Soup with Sesame Crusted Tofu in a Heathware bowl - Alice DeLuca 2012 digimarc
Curried Carrot Soup with Sesame Crusted Tofu in a white Heathware bowl

Serve with lime wedges, and a salad made from chopped arugula, fresh mint, orange juice, olive oil, gluten-free mustard, salt and pepper.



Appetizers, Dairy Free, Fall, Lunch, Meat-eater, Microwave Cooking, Recipes, Soups, Spring, Summer, Vegetables, Vegetarian, Winter carrots, curry, gluten free, microwave, soup

Leek, Potato and Cauliflower Potage

0 · Jan 26, 2012 · Leave a Comment


This is an easy, vegetarian gluten free soup from the website gfzing.com to serve as a first course or as a main course with an accompaniment of gluten free toast or scones.

It is delicious!

In a large pot, place 3 leeks, cleaned, trimmed and chopped, 5 Red Bliss potatoes, peeled and cut in half, and about a third of a head of cauliflower, cleaned and cut in to flowerets.

Pour in water to cover (6-8 cups), add 2 teaspoons of salt and bring to a boil, turn down to a simmer and cook until the potatoes and cauliflower are tender, about 20 minutes.  Add 2 tablespoons of ghee (clarified browned butter) and a 1/2 teaspoon of freshly ground pepper, then puree the soup carefully using an immersion blender stick until it is velvety.  If you do not have an immersion blender, use a regular blender or food processor, being careful not to burn yourself with the hot soup.

Note:  If you are a wheatavore serving a gluten-free diner, make sure to use plain fresh water to make this soup. Don’t use water that was just used for cooking pasta, for example.

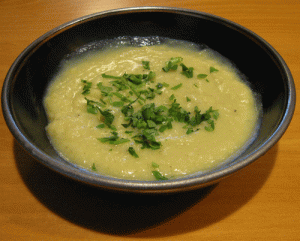
Test the soup for salt and balanced flavors, then serve sprinkled with a little chopped parsley if you have some.

It would be fine to substitute other vegetables for the cauliflower – for example: carrot,s sweet potato, broccoli, peas, spinach etc.

Make sure all the ingredients are gluten free.

Appetizers, Fall, Lunch, Potatoes, Recipes, Soups, Vegetables, Vegetarian, Winter cauliflower, gluten free, leek, potato, soup, vegetarian

Day of the Un-Dead

0 · Oct 28, 2011 · Leave a Comment

The Day of the Dead and Halloween are nearly upon us and I am frantically digging for recipes that can protect the living against the Un-dead.  Books and papers fly as I paw through shelves and piles, seeking something to ward off the Zombies, Vampires and Werewolves that may be lurking outside the door, or that may invade my kitchen at any moment. They all have highly specialized dentition designed to make swift work of the main course – me!

I’m calling on restaurateurs –  please, this time of the year, an “amuse bouche” for the living might be just the thing to calm the customer’s nerves. Could chefs please get a little creative, and instead of offering me a puddle of olive oil, or herbed olive oil, or olives in a lake of olive oil with obligatory bread (that I don’t eat anyway), could they provide something that will protect our table from monsters? Let’s get our priorities straight please; safety comes first!

You can’t ward off zombies per se, with garlic or crosses, but you can put something on the table that won’t attract them to your establishment in the first place.   How about some complimentary zombie-immune starters along these lines:

  • Vegetable Pakoras with  a little yogurt sauce or a cilantro chutney on the side
  • Lightly pickled Carrot sticks and Dilly Beans, seasoned with garlic of course
  • A homemade cheddar-garbanzo bean cracker with a pear chutney
  • An endive boat with a vegetarian Banh Mi style filling
  • A black lentil salad with plantain chips
  • Yucca Fries with a sprinkling of salt and various peppers, and fresh limes

And chefs, if all the customers start moaning after the salad course, don’t assume narcissistically that they are in ecstasy over the fabulous new pâté de foie.  Admit it, you were just making the pâté as a cost-recovery measure to use up chicken livers. It’s time to think on your feet – could the moaning coming from the dining room be a sign of zombie behavior spectrum disorder [i]? If so, take appropriate action immediately.  If you are a fan of the zombie movie genre, you will know that you cannot necessarily trust anyone at this point, not even your sous-chef.  Especially take  note of this if you happen to be in Nashville, Tennessee this weekend where the Zombie Buffet 5K will be happening.

For the Vampire problem, everyone already knows to wear a garlic necklace, and frankly a random grouping of bulbs of garlic would fit right in with the giant globular necklace trends this season.  Help us out please!  Let’s see some velvety aioli, or the Greek skorthalia, or perhaps a beautiful green broccoli-garlic spread for gluten-free crositni or crackers – so easy to make, so garlicky and so green and lively that no zombie or vampire will come near the eater.

Broccoli spread:

  • · For each ½ pound of broccoli florets, 2 cloves garlic – peeled, 2-3 tablespoons olive oil, salt, pepper
  • · Bring water to a full rolling boil.  Add the broccoli and cook until tender in boiling water, about 5-10 minutes, uncovered.  Drain, dry and put into the food processor with the raw garlic.  Process until smooth,   adding the oil as needed.  Season with salt and pepper. Serve at room temperature on gluten-free crostini or crackers.

One caveat about the drinks menu – The brilliant Zombie movie  Ahhh! Zombies, a tale told from the perspective of the unfortunate zombies themselves, clearly demonstrates that to keep from attracting zombies you must absolutely avoid brain milkshakes, so there is no need for chefs to develop grizzly new martinis on the brain theme, thank you very mush.

For the werewolves, you need only serve the broccoli appetizer on a silver platter, and your diners’ problems with werewolves will be over.  No matter who comes through the front door, the customers will be able to survive until the dessert course.


[i] The Zombie Attack Disaster Preparedness Plan from the University of Florida http://www.astro.ufl.edu/~jybarra/zombieplan.pdf


Appetizers, Fall, Holidays, Recipes, Restaurants, Vegetarian gluten free, halloween, humor, vegetarian

Pasta con Alici – gluten free

1 · Dec 20, 2010 · Leave a Comment

Pasta con Alici is pasta with anchovies – for garlic and anchovy lovers only!

Melt 1/4 cup butter and 1/2 cup olive oil in a small pan.

Add:

  • 6 cloves garlic, peeled and sliced paper thin
  • 2 ounces top quality anchovies (the kind that come in a glass jar and taste good), drained, and thoroughly rinsed
  • freshly ground black pepper

Mix and mash the anchovies in to the oil until completely dissolved but do NOT let the garlic brown.

Serve over 1 pound of gluten free spaghetti – normally you would use angel hair pasta, but there is not currently a gluten free angel hair pasta available, so use the Bionaturae brand of gluten free spaghetti cooked al dente, mix with the sauce, and serve immediately. Do not add any salt as there is residual salt in the anchovies, even after rinsing.

The sauce can be made a few hours before serving.

Appetizers, Christmas, Fish and Seafood, Holidays, Recipes anchovy, gluten free, pasta

Gluten Free Feast of the Seven Fishes

7 · Dec 20, 2010 · Leave a Comment

Some Italian-American families celebrate Christmas Eve with a dinner of many fish dishes.  This is a wonderful holiday tradition that has evolved, in our family, to honor the  many ethnic groups and food preferences of the extended family.

If you have a large guest list and a small table without enough chairs, try hosting a Hawai’ian-style “heavy pupus” (hot and substantial appetizers) Feast of the Seven Fishes.  You can make this meal entirely gluten free without bothering any of the guests!

Get together an eclectic play list of music, including some hits from the year and some holiday music.  When “Who let the dogs out?” or “The Macarena” were popular, we included them along with the Jingle Bells. It is nice to have variety instead of an endless train of Joy, Joy, Joy, since everyone has  challenges as well as happiness during the holidays. It is nice to include some favorite music and foods of people who used to celebrate with you but have passed away, to include them in the party even though they are not corporeally present.

Traditional Dishes:

  • Baccalà (hot dish)
  • Baccalà (cold salad)
  • Mare Salad
  • Pasta con alici (make with GF spaghetti)

Fusion Feast of the Seven Fishes Dishes:

  • Crab Cakes
  • Shrimp Sushi
  • Mini Lobster Rolls
  • Filipino Lumpia
  • Fried Fish
  • Jonah Crab Claws with Cocktail Sauce
  • Oysters Rockefeller
  • Fish Cakes
  • Codfish with Orange Sauce
  • Crab Dip with plantain chips
  • Gravlax
  • Spanish tapas – Shrimp with garlic
  • Mare Salad
  • Fish cakes with Wasabi Ginger Tarter Sauce (must be heavily adapted to gluten free)

Appetizers, Christmas, Fish and Seafood, Holidays, Recipes, Winter christmas, fish, gluten free, italian

Mare Salad (Italian Seafood Salad)

3 · Dec 20, 2010 · Leave a Comment

This is a delicious Italian seafood salad with chickpeas. Divine!

  • 1/2 pound of fresh, small scallops, parboiled for a very short time – just until done – in a 50/50 mixture of white wine and
    water – use Cape or bay scallops if you can get them.  If using the large sea scallops you will have to slice them in halves or quarters.
  • 1 dozen pitted Kalamata olives, diced
  • 3 stalks celery, diced
  • 15 ounce can of chickpeas, drained, rinsed (peel the tough
    skins off, or cook from scratch instead of using canned)
  • 1 medium red onion, diced (be sure not to use too much – the red onions are pretty gigantic in the supermarket these days)
  • 2 Tb. flat italian parsley, diced
  • 2 Tb. olive oil
  • 2 Tablespoons red vinegar
  • 2 Tablespoons white vinegar
  • salt and pepper

Mix it together and let marinate overnight.

Notes:

  • You can add 1/2 pound sliced cooked squid. Only parboil the squid for 30 seconds or it will become tough and rubbery.
  • Do not use any “imitation seafood” or “seafood legs” or any of those fake crab products – they are often made with wheat.

Appetizers, Christmas, Dairy Free, Fish and Seafood, Holidays, Recipes, Salads and Dressings gluten free, salad, seafood

Steamer Clams with Instant Polenta or Cornmeal

0 · Aug 9, 2010 · Leave a Comment

If you can get your hands on a few dozen steamer clams from Maine, and 3 gallons of sea water, and a package of gluten free instant polenta – the kind that cooks in 3 minutes because it is really “pre-cooked,” then you can make a really special treat.

If you are buying the clams, insist that the fishmonger provide live clams – do not accept any clams that are open and will not close. Scrub the clams, discarding any that are dead.  Pour the cold, fresh sea water in a large pot, sprinkle with about 1/4 pound of instant polenta and stir.  Add the live clams – they must be completely covered with the sea water.  Let sit for about 8 hours.  You will notice that as they are left undisturbed the clams will extend their neck-like parts and start spitting out sand and grit, replacing the sand and grit in their stomachs with instant polenta!  That means that when you cook them they will have an automatic polenta stuffing.

For a lesser clam, such as the Mahogany clam, you will notice that the apparatus the clam extends is not long and thin but more triangular.  The polenta (corn meal) treatment is absolutely essential for the Mahogany clam, in our opinion, as it causes the Mahogany clam to purge itself of sand.  Scrub the Mahogany clams really well, and steam for about 5 minutes.  Discard the clams that do not open.

Steam the clams using a very small amount of tap water in the bottom of a large covered pot.  Heat them on high until they are fully cooked – 10 to 20 minutes.  They should all be opened up.  Serve with melted butter with a little fresh garlic grated in to it for flavor.


Note: If no seawater is available, you can use cold tap water (no chlorine!) with added Kosher salt (no iodine).  You add enough salt to bring the specific gravity to 1.021 or thereabouts, then add the instant polenta.  To measure the specific gravity, a hydrometer is required.  In the absense of a hydrometer, you could add about 1/2 cup Kosher salt to 1 1/2 gallons of cold water.


To make an excellent Sauce with Clams: heat

3 Tablespoons of olive oil in a large pan, add

one chopped onion

3 cloves chopped garlic

Stir for a minute, then add about

a dozen cleaned, prepared clams.  Let cook for a minute, then add

1/2 cup New England Hard Cider

1/2 cup chopped fresh flat Italian parsley

1 dried cayenne pepper – chopped

6 shreds of saffron

the juice of a quarter of a lemon

Stir and cover.  Cook for 5 minutes until the clams open.  Add

2 Tablespoons butter

Serve on top of cooked gluten free pasta, or, with gluten free bread sticks or gluten free rolls to sop up the sauce.

Appetizers, Fish and Seafood, Recipes, Summer clams, cooking, gluten free, recipes

Microwave Chicken Wings

3 · Jun 12, 2010 · Leave a Comment

We acquired a new microwave oven and have been playing around with it – a new way to save energy resources while cooking.

For 1.5-2 pounds of chicken wings, mix the following sauce in a large bowl:

1/4 cup gluten free orange marmalade

1 tablespoon honey

1 clove of garlic, minced

1/4 cup gluten free soy sauce

1 1/2 tablespoons fresh lime juice (about 1/2 of a lime)

black pepper

Remove the wing tips from the wings, and cut each wing in to two pieces at the joint. Mix the sauce with the chicken wings.  Place the wings and sauce in a glass pie plate (in a single layer) and cover loosely with plastic wrap.  Microwave for 10 minutes. Remove plastic wrap and microwave for 5-10 more minutes, until cooked through.  Preheat a broiler and broil the wings for 4-5 minutes to crisp up the skin.

If your microwave has an automatic sensor, follow the instructions for cooking chicken parts, remove the plastic wrap half way through the cooking time.  When the wings are done, broil as above.

Use all gluten-free ingredients!

Appetizers, Dairy Free, Fall, Meat Dishes, Meat-eater, Microwave Cooking, Recipes, Spring, Summer, Winter chicken, chicken wings, cooking, food, GF, gluten free, marmalade, microwave, recipe

Gluten Free Empanadas

0 · Apr 29, 2006 · Leave a Comment

Empanadas are delicious! And, for Gf-zing! they are one of the holy grails of gluten free cooking – we seek to make a dough that will encase the meat filling and be dry but intriguing, and not quite like pie crust. We have found a way to do this by using the Breads from Anna mix (without the yeast), and the traditional white wine and olive oil that make the interesting and tasty-flavored crust. The recipe was developed by Gf-Zing! , which celebrates flavor in the gluten free world.

The many ingredients and spicy flavors of empanadas are delightful, and the empanadas can be carried like a sandwich, for lunch, backpacking or picnics. We find that our friends always want the recipe but are sometimes appalled by the list of ingredients – raisins, cheese, allspice, cayenne pepper, meat – it is a medieval list of ingredients, but SOOOOO good!

Dough:

3 1/2 cups Breads From Anna mix (Soy and Rice free kind), but don’t include the yeast packet
1/2 Tablespoon baking powder
1/2 teaspoon salt
1/4 cup milk
1/4 cup dry white wine
1/4 cup olive oil
1 egg

Mix the dry ingredients in a bowl. You will have a little bread mix left in the bag, which you should save for the filling and rolling. In a second bowl, mix the milk, white wine, oil and egg, then add to the dry ingredients. Knead (yes, knead) the dough until it is like pie crust in texture. Cover the bowl until you are ready to fill the empanadas, as this dough dries out quickly. As you work with the dough, you may need to add extra white wine, a teaspoon at a time, if the dough starts to dry out.

Filling:

Fry the following ingredients in a non-stick skillet, just until the meat is cooked:

1 Tablespoon olive oil
1/2 pound ground beef, chicken or gluten free turkey
1/2 of a green bell pepper, minced
2 Tablespoons garlic, minced

Then add and stir-fry briefly:

1/3 cup golden or brown raisins
1/4 cup chopped olives (green ones stuffed with pimientos, or black ones in brine but not oil-cured)
1 1/2 Tablespoons red wine vinegar
1 Tablespoon Breads from Anna mix (see dough, above)
1 3/4 teaspoons ground allspice
1 teaspoon ground cinnamon
1 teaspoon ground cumin
1/4 teaspoon ground cayenne pepper
1/2 teaspoon salt
1/4 teaspoon ground black pepper

Take the pan off the heat, and add:

1 cup packed grated Jack or cheddar cheese
1/3 cup chopped fresh cilantro (we wash it and snip with scissors)

The mixture will be damp but not soupy. Set aside.

To make the empanadas:

Preheat the oven to 350-375 degrees

Take a walnut sized piece of dough and squish it in your hands to compact it. Put a piece of waxed paper on the table, sprinkle with leftover Breads from Anna mix, and put the walnut-sized ball of dough there. Top with another sheet of waxed paper, then use a rolling pin to roll the ball of dough into a circle of 4″ diameter. Take off the top sheet of paper. (This method of rolling the dough yields very little mess to clean up!)

Place 1 Tablespoon of filling on the bottom half of the circle of dough, then fold the top half down to cover the filling, and squish the edges together to form a half-moon shaped turnover, completely encasing the filling. Place the filled empanada on a Silpat lined baking sheet. Repeat this process 23 more times or so – the recipe will make approximately 24 empanadas. Leave an inch between the empanadas, as they expand some while baking.

Once you have a sheet full of empanadas, bake them for 12-20 minutes. Take a look at them after 12 minutes, and let bake for additional time if needed. We prefer them slightly browned.

Serve warm, or put them in the refrigerator and use them for packing a lunch box or going backpacking.

Make sure all your ingredients, including the spices, are gluten free!

*Most Popular Recipes*, Appetizers, Fall, Meat Dishes, Meat-eater, Recipes, Spring, Summer, Winter

Sushi, Musubi

3 · Dec 10, 2005 ·

Mix up a batch of gluten free sushi rice, and you are ready to make a Hawai’ian specialty called “musubi.” In Hawai’i Musubi is often topped with Spam, but no matter, it is a great method of making a sandwich-like concoction that is perfectly sized for lunch. This recipe is presented here by Gf-Zing!, celebrating flavor and excitement in the gluten free world.

You will need a plastic musubi mold or a Spam can to make this recipe. You are going to make a sort of brick of seasoned rice wrapped in seaweed, with fillings in the middle. Spam musubi would have the Spam on the top, rather than in the middle, but that is no matter.

You can cook sushi rice on top of the stove or in your rice cooker. Use about 2 to 1 ratio of water to dry, medium grain Japanese or sushi rice (Kokuho Rose or Nishiki are two common brands.)

Rinse 2 units of rice well. Cook it in 4 units of water, or use the sushi rice line on your rice cooker insert to measure the water. Turn on the cooker and wait until it is done.

When it is just finished cooking, place the rice in a large bowl. Have ready some gluten free seasoned rice vinegar, a rice paddle, and a piece of paper or a small hand-held fan.

While fanning the rice with one hand, stir the rice (using the rice paddle) with the other hand. Sprinkle a bit of seasoned rice vinegar on the rice and continue stirring and fanning. Continue to do this, adding more seasoned rice vinegar, until the rice has a pleasant sweet-sour-salty taste and has gotten cool. The rice is ready. For two cups of dry rice (5-6 cups cooked), you would use about 7 tablespoons or so of the vinegar.

Cut a piece of sushi nori (that is a dark sheet of edible seaweed that looks like shiny green-black paper) to fit the bottom and up the sides of the musubi mold. It should extend out the top of the mold on both long edges by an inch and a half. Typically, this requires half a sheet of sushi nori. Keeping the edges of sushi nori going up the sides of the mold, put some of the prepared rice in the bottom, on top of the nori. On top of this, you can add small amounts of any of the following fillings, as you like:

Cooked fish or shellfish
avocado slices coated in lemon juice (so they don’t get brown)
slivered cooked carrots
gluten free smoked fish
cucumber slivers
Japanese seasoning peppers (gluten free)
gluten free ham, sliced very thin

Fill the rest of the mold up to the top with seasoned rice. Press down on the rice with your rice paddle firmly. Fold the ends of the nori down over the top, then use the presser that comes with the mold to tightly compress the entire thing by pressing down on the top of the folded nori. You will have a dense brick of rice and pretty colored foods all contained in a portable form. Wrap this brick in tin foil (aluminum foil) and you have a nice complete lunch. Depending on the ingredients you used for filling, you may not need to refrigerate this musubi, making it very convenient for camping or work places without refrigeration.

Important Notes: Unfortunately, currently the gluten free community must avoid wasabi paste, which often contains wheat. Soy sauce also often contains wheat, so read labels before trying to dip your musubi in soy sauce. Be careful also to make sure that the seasoned rice vinegar is gluten free. Some are not. Also, imitation seafood products are often made with wheat and should be avoided.

A picture of spam musubi (with the spam on top) is available at the following page:
Wikipedia article

Always use gluten free ingredients.

Appetizers, Dairy Free, Fall, Fish and Seafood, Recipes, Rice, Spring, Summer, Winter

Eggplant Caviar

0 · Dec 2, 2005 ·

When this recipe first came to our attention, in the 1970s, the instructions called for cooking the mixture for two hours in a covered pan over very low heat. Over the course of time, the hybridization of eggplants and the introduction of hotter stove burners have necessitated some changes. The recipe is presented here in its original form, with recommendations for modern cooking methods. The recipe has been tested for the gluten free community by Gf-Zing!

1 medium eggplant, peeled and chopped in 1/4″ cubes
1/4 cup olive oil
1 large onion, finely chopped
2 cloves garlic, minced
1 can gluten free stewed tomatoes (14 ounce size)
2 Tablespoons gluten free tomato paste (optional)
1 Tablespoon sugar
1/2 teaspoon salt
freshly ground black pepper
the juice of a half or a whole lemon

Fry the eggplant in the olive oil in a heavy-bottomed non-stick frying pan (12″) until soft, about ten minutes. Mash with a potato masher, then add the rest of the ingredients except for the lemon juice. Do not add the lemon juice yet.

Add the rest of the ingredients and cover the pan. Reduce the heat to the lowest possible setting and cook for 2 hours, watching carefully so it doesn’t burn. A heavy pan is necessary. When it is just starting to stick to the bottom of the pan, it is done cooking. Add the juice of 1/2-1 lemon, to taste. It should be somewhat tart.

This mixture is typically spread on “black bread” or Westphalian pumpernickel. For the gluten free community, try to find “Genuine Bavarian Gluten-Free Toast Bread” which is distributed by R & R Export-Import Specialties, PO Box 7667, Nashua NH 03060. (800)-818-7729.

Notes for modern cooks: If you have a stove that has hot burners, you can stir-fry the mixture for about 20 minutes, stirring constantly, until it starts to stick to the pan. The flavor will not be quite as intense as the old-fashioned low-heat method achieves, but it will be perfectly acceptable. If the eggplant seems to become soft and mushy quickly during the initial frying, this should be a clue that you need to cook the mixture for less time than two hours. Thirty years ago, the eggplant cubes could stand up to quite a bit of cooking and maintain their structural integrity but somehow the modern hybrids seem to disintegrate quickly.

Appetizers, Dairy Free, Fall, Recipes, Vegetables

Crab Cakes with Coconut

0 · Nov 13, 2005 ·

These appetizer sized crab cakes are delicious and rich! People consume quite a lot of them. That’s why the recipe uses 2 pounds of crab meat. This recipe has been adapted for the gluten free community by Gf-Zing!

2 pounds fresh or canned gluten free crab meat (drained in a strainer) – about 1 quart
1 pound frozen grated fresh coconut (Asian grocery stores carry this product) – one package
7-8 cloves garlic, finely grated
3 Tablespoons gluten free Fish Sauce (check the label for wheat)
3 Tablespoons gluten free Oyster Sauce (choy sum)
4 eggs
freshly ground black pepper
cornstarch if necessary

Glutino brand corn and rice bread, made in to crumbs (for rolling the cakes in before frying)

Mix the crab meat, coconut meat, garlic, sauces and pepper, and eggs together. Do not break up the crab too much – leave some whole chunks in there. Make a mixture that can be formed in to small cakes. If the mixture is too wet, add up to 2 Tablespoons of cornstarch and some of the bread crumbs, until the mixture will form cakes.

Make bite-sized cakes from the mixture, – about 1 – 1 1/2 inches across, and roll them in the breadcrumbs and place them on waxed paper, ready for frying.

Heat some frying oil in a large pan until quite hot – 400 degrees, or prepare a deep-fryer. Be careful not to burn yourself! If you are making this dish for gluten-free guests, and you have used your deep-fryer oil for frying something else, change the oil before preparing this dish for your gluten-free guests. Don’t be shy about telling them that you used new oil – they will appreciate your care and concern!

Fry the cakes a few at a time until they are golden. Drain the cakes on paper towels to absorb excess frying oil.

Notes: Be careful to read the label on Thai or Vienamese Fish Sauce – some brands contain wheat. For oyster sauce, check the internet lists or your local store for the brands that assert that they are gluten-free.

Serve these cakes with Thai Sweet Chili Sauce (gluten free).

Make sure that all your ingredients are gluten-free!

Appetizers, Christmas, Dairy Free, Fish and Seafood, Holidays, Recipes, Thanksgiving

Primary Sidebar

Check out our Coupon Collection

Click Here to go directly to the Coupon page

Read more at The Rambling Epicure:

Click Here: The Rambling Epicure

QR code for your phone

qrcode for gfzing
NFCA logo

Blogroll

  • Aloha World Ono Recipes
  • Book of Yum
  • Dulce Cocina sin Gluten
  • Gluten Free Beer Association
  • Glutenfreie Rezepte | kaMehl
  • Hawai'ian Electric
  • Laylita's – Ecuador
  • Nombudsman
  • Papilles et Pupilles
  • Sea Salt with Food
  • The Rambling Epicure The Rambling Epicure is a daily international food chronicle, and the first online newspaper to follow global food trends and news.
  • Triumph Dining

Monthly Archive

Proud member of FoodBlogs

Load up on new recipes, exclusive goodies, + more!

Get the exclusive content you crave straight to your inbox.

Things to Read

Find by keyword

baking banana blueberry cake cardamom carrot cheese chicken chocolate cinnamon coconut cookies cooking curry custard dairy free dessert DIY dressing fish food fruit GF ghee gluten free gourmet homemade kids maple syrup meat microwave pie pork potato pumpkin recipe recipes rice salad sauce sausage soup sourdough sweet potato vegetarian

Copyright © 2025 GF-Zing! on the Cravings Pro Theme