• Skip to primary navigation
  • Skip to main content
  • Skip to primary sidebar
  • Skip to footer

GF-Zing! logo

  • Home
  • Coupon Collection
  • GF Foods & Groups
  • Ask Gf-Zing!
    • About the Author
    • About Gf-Zing!
  • Nav Social Menu

    • Email
    • Facebook

gluten free

Gluten Free Cookbooks for gift givers

0 · Dec 6, 2010 · Leave a Comment

A reader says:
I love your recipes.  …  I am looking for a  GF cookbook for a relative who needs fairly easy recipes, doesn’t spend a lot of time in the kitchen and too much time in the restaurants. Do you have one?  Or can you recommend one?

Answer: Absolutely.  We can recommend cookbooks (and are hard at work on a Gf-zing! cookbook, seeking a publisher)!

GF friendly cookbooksMaking the switch to gluten free cooking is initially annoying and feels like deprivation, but your relative will eventually find that journeying to the parallel universe of gluten-free cooking presents an opportunity in disguise.  She will find that the complex flavors and textures of gluten free cooking are often superior to “wheatavore” cooking.  She will also see that the produce and meat sections of the grocery store are her favorite areas, and that there is very little reason to travel in to the cereal or bread aisles.

For simple GF baking, we like: Great Gluten-Free Baking by Louise Baker.  This British book relies on simple brown rice flour for many of the recipes. The superfine brown rice flour from Authentic Foods is the one we like best.  To use this book, your relative will need a kitchen scale – another excellent Christmas present for the home cook.  She should try baking the Victoria Sandwich Cake on p 124; the Lemon Drizzle Loaf on p. 54 , and the Cherry Crumble Muffins on p. 27.

For a general cookbook, Gluten Free and Easy by Robyn Russell is a good choice. Your relative could try the Quinoa Tabouleh on p. 30;  the Quinoa, Eggplant and Chickpea Salad on p. 32; the Pesto, Lamb and Sweet Potato Salad on p. 98; the San Choy Bau on p. 106; the Pistachio and Apple Cake on p. 150 (add some vanilla and salt); the Lemon Tea Cake with Lemon Butter on  p. 153.

Another fine general cookbook: Healthy Gluten-Free Cooking by Darina Allen and Rosemary Kearney. Your relative might like the Buttermilk Pancakes on p. 41 (make sure she gets flavorless tapioca flour – we like the one from Authentic Foods); the Fish Cakes with Parsley or Garlic Butter on p. 95; The Fruit Scones on p. 123 (grate cold butter in to the dry ingredients and mix by hand); the Pizza Base on p. 149 is excellent for deep dish pizzas.  Use it in a cast iron skillet.

And a third general book that uses no grains at all: Healing Foods: Cooking for Celiacs, Colitis, Crohn’s and IBS by Sandra Ramacher might also fit the bill. Your relative could try the Mini Chicken Satays with Peanut Sauce on p. 43; and the Apple and Blueberry Crumble on p. 165 (it uses almond flour for the crumble). No grains, no gluten, no refined sugar and no lactose in this book.

Also, although The Sultan’s Kitchen by Ozcan Ozan does contain recipes with gluten, most of the recipes are gluten-free. A few favorites include: Rice Pilaf with Chickpeas, Green Lentils and Caramelized Onions, (we used lentil orzo), Sea Bass Poached with Herbs and Raki in Parchment, (we used ouzo instead of raki, and your relative would need to make sure whatever licorice liqueur she used was gluten free), Stewed Lamb Kebab with Creamy Garlic Mashed Potatoes.

And finally, although Eating Stella Style by George Stella is pitched to low-carb dieters trying to lose weight, it has many, many excellent recipes that are gluten-free.  Your relative will need to be sure that the spices and meat products she uses are gluten-free, and she doesn’t have to substitute Splenda for sugar.  This cookbook is a find for the gluten-free community.  (The picture on the front of the book is a little goofy, and it is geared to weight loss.)

Thanks for inquiring, and there will be a Gf-Zing! cookbook coming, but not in time for Christmas 2010.

Ask Gf-Zing! - Responses, Cookbooks cookbook, GF, gluten free

Crustless Custard Apple Pie

1 · Dec 5, 2010 · Leave a Comment

In the mood for pie, but don’t want to roll out a crust?  You can use the new gluten free Bisquick to make a pie that creates its own crust.  This pie is like a gluten free French Clafoutis, but more economical because it uses cranberries instead of cherries.  The large amount of cinnamon and vanilla balances out the deeply flavorless gluten free Bisquick.

Fruit mixture ingredients:

3 large flavorful apples that hold their shape (use types like Northern Spy, Winter Banana and Roxbury Russet – do not use Macintosh) – pared, cored and cut in to pie-type slices

1/2 cup (or more) gluten free dried sweetened cranberries

1 Tablespoon fresh lemon juice

2 Tablespoons gluten free Bisquick (and you will need more later)

Custard Ingredients:

14 ounces fat-free gluten free sweetened condensed milk

1 1/2 cups water

3 large eggs

1/2 cup gluten free Bisquick

4 Tablespoons butter, melted

2 teaspoons vanilla

1 teaspoon cinnamon

1/2 teaspoon grated nutmeg

In a large deep bowl, mix the apples, cranberries and lemon juice and then stir in the 2 tablespoons of gluten free Bisquick to coat the fruit.

Preheat the oven to 350 F.

Butter a glass pie plate (10 inches, or marked 25 cm on the bottom), then spread the apple-cranberry mixture evenly in the dish.

In the now-empty bowl, mix the rest of the ingredients: condensed milk, water, eggs, 1/2 cup gluten free Bisquick, butter, vanilla, cinnamon and nutmeg. Use an immersion blender to mix these custard ingredients until smooth – about 3 minutes.  Pour this custard mixture over the apples and cranberries in the pie plate.  The dish will be very full, so take care not to spill.

Bake for45-50 minutes until the custard is cooked through and the top is browning a little.  Remove from the oven, set aside to cool. Serve cool or cold.

There will be a kind of crust that has settled out on the bottom of the pie – the texture of the “crust” will be the texture of a mochi, slightly chewy and quite intriguing.

Be sure to use all gluten free ingredients.

Breakfast, Dessert, Fall, Pie, Vegetarian apple, custard, dessert, gluten free, pie, vegetarian

Thanksgiving Recovery Salad

0 · Nov 29, 2010 · Leave a Comment

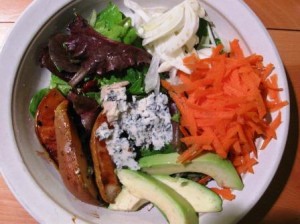
After three days of recovery from the delicious Thanksgiving feast, we want a GF salad!  This one from www.gfzing.com has lots of vegetables and fruits, with a little cheese and nuts.

Thanksgiving Recovery Salad gfzing.com
Thanksgiving Recovery Salad from gfzing.com

A composed salad of the following ingredients fits the bill exactly:

  • 2 Roasted Pears (recipe is below)
  • 1/2 Avocado, peeled, pitted and sliced
  • 1/2 bunch Fennel, sliced or shaved
  • 2 ounces Goat Cheese or gluten free blue cheese, chunked (optional)
  • 2 TB sweetened dried cranberries or raisins (gluten free)
  • 1/3 cup Candied Nuts
  • 6 cups Salad Greens, washed
  • 1 Carrot, grated
  • 1 recipe Tangerine Dressing

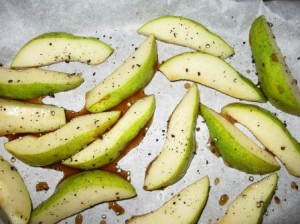
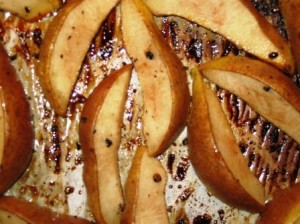
Roasted Pears: wash 2 unripe (hard) Bartlett pears, remove the cores and cut them in to 8 pieces, stem-to-blossom end.  No need to peel them. In a small bowl, mix 1/4 cup pure Grade B maple syrup (or Grade A Dark Amber) and 1 TB minced fresh ginger (optional).  Combine the pear slices with this syrup mixture, then spread the pear slices on a foil or parchment paper-lined baking sheet.  Sprinkle with salt and pepper.  Bake at 500 degrees for 15 minutes.  Turn the slices over and bake an additional 5 minutes if desired.  You cannot use a silpat lined pan for this process because the oven temperature exceeds the heat tolerance of silpat.

Roasted Pears gfzing.com before baking
Roasted Pears before baking
Roasted Pears after baking
Roasted Pears after baking gfzing.com

Avocado: Peel, pit and slice 1 ripe avocado, then mix the slices with the juice of a lemon or tangerine.  The citric acid in the fruit juice will keep the avocado from turning brown.

Candied Nuts: Mix walnut meats, pecans or almonds with 2 TB granulated sugar.  Place in a small frying pan and fry over medium heat for about 5-10 minutes, stirring constantly, until the sugar melts and begins to caramelize, sticking to the nuts.  Remove the nuts from the pan at this point and place on a parchment paper-lined plate to cool.  Separate the nuts so they don’t form one big nut mass.

Assemble the salad – Gfzing.com recommends that the greens, fennel, grated carrot, and cranberries or raisins can be tossed with the dressing.  On each individual salad plate, gently arrange the avocado slices, pear slices, candied nuts and optional cheese on top of the dressed greens.  Don’t try to toss avocado slices with the salad – disaster that way lies!

Fall, Recipes, Salads and Dressings, Thanksgiving, Vegetarian gluten free, pears, salad, tangerine dressing, vegetarian

Homemade Poultry Seasoning

0 · Nov 23, 2010 · Leave a Comment

herbs drying gfzing.com

Once again, Gfzing.com cracked the binding on a bunch of cookbooks to find a tasty gluten free poultry seasoning for the Thanksgiving turkey stuffing.  We looked through the usual suspects, those older books that included formulas for standard seasonings and came up empty! Then, on an old bottle marked “poultry seasoning,” we found a typed list, taped to the bottle.  The ingredients are listed below.

The herbs and spices for poultry seasoning are similar in all  formulations, it is just the proportions that change. The sage and thyme should predominate.  Some poultry seasoning recipes include nutmeg, and some include celery seed.

We dried the herbs from our garden, at the end of the fall, by hanging them upside down in the kitchen to dry.  If you don’t have home-dried herbs, you can use bottled herbs.

  • 2 parts dried sage
  • 3/4  part dried rosemary
  • 1 part dried marjoram
  • 1/2 part ground black pepper
  • 1/2 part grated nutmeg
  • 1  1/2 parts dried thyme

These ingredients are listed in “parts” – you can substitute teaspoon or Tablespoon for “part” in the recipe, depending on how much poultry seasoning you want to make.  You can assemble all of these in a large, stone mortar and pestle and grind them quickly to a fluffy powder. It is the sage that adds the fluffiness to this preparation.

Condiments and Sauces, Fall, Meat Dishes, Meat-eater, Recipes, Thanksgiving gluten free, homemade, recipe, seasoning, spice mixture

More thoughts on Gluten Free Pie

1 · Nov 18, 2010 · Leave a Comment

Some of the most popular posts on this website have to do with pie!

How to make gluten free pie crust (see this link for the recipe)  is a key interest for the gluten free community.  It turns out that the type of flour you use for pie crust really does matter, so here is some advice on finding good gluten free flours:

Where to find those flours for the pie crust mix? We buy them from Authentic Foods (you can use Amazon.com.)  Not even a trip to the grocery store is required;  they grind the flour really fine (so it does not have that gritty quality, sticking in your back teeth like dental amalgam ), and their tapioca flour does not taste like boiled lobster.

When you do buy the flours, consider storing them in the freezer – those pantry moths like to eat gluten free too, but they don’t seem to be able to squirm in to the freezer yet.

I’ll sign out with some lyrics from the great Bob Dylan song, “Country Pie”:

“Raspberry, strawberry, lemon and lime
What do I care ?
Blueberry, apple, cherry, pumpkin and plum
Call me for dinner, honey, I’ll be there.
…Oh me, oh my
Love that country pie.”

Gf-Zing! does not guarantee the gluten-free status of products;  we rely on the manufacturer to do that.  Check the labels, and make sure all your ingredients are gluten free!

Food products, Pie, Product Reviews, Recipes baking, crust, food, gluten free, pie, recipes

Bento box lunch

0 · Nov 18, 2010 · Leave a Comment

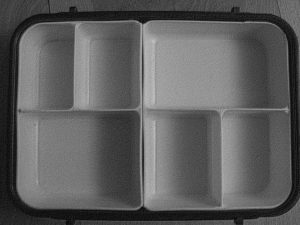
A bento box is a lidded Japanese lunch box with many sections.  Making a bento box lunch is a snap for the gluten free community.  By filling each little section of the bento with a different food, you can make an attractive, well-balanced meal without a great deal of extra work.  You can keep your bento simple or go wild!  The choice is yours.

6-section bento
6-section bento, about 10 years old

Provide both a fun lunch and a lovely reminder of home for every member of the family – line up several bento boxes on the counter, fill them up assembly-line fashion, and you’re done!  Don’t forget to make one for yourself as well, and take proper precautions for food safety, sending along an icepack if necessary.

A gluten free bento box could include:

Fresh, Pickled or Dried Vegetables & Fruits: carrot sticks, green peppers, cherry tomatoes, cucumbers, celery, steamed veggies, dilly beans or pickles (drained and patted dry), apples, grapes, banana (a thick slice with the peel still on so it doesn’t turn brown), melon, mango, pineapple, kiwi, oranges, berries, fruit salad, raisins, dried fruit, nuts etc.

Protein:

Grilled GF meats or poultry sliced on the diagonal, a deviled egg, cheese cubes, a couple of pieces of homemade sushi, the possibilities are endless and can include meatballs, fish cakes, smoked fish, seasoned tofu etc.

Attractive tea sandwiches cut to fill the space in your bento box – Choose gluten free bread and savory fillings such as GF tuna, chicken or egg salad, cheese, GF deli meat or peanut butter and jelly or honey.  You may have to trim the corners of the sandwich to fit it in to a bento box section – you can nibble on these corners while packing the box!

Starch:

GF Crackers, rice, fried rice, and seasoned rice formed in to a cake, roasted root vegetable (potato, sweet potato etc.)

A GF sweet: A cookie (cut to fit), brownie, cake or muffin, gummy bears, gorp, a miniature candy bar – any of these sweets can go in one small section of the box.

Supplies:

Bento boxes are available at various Asian grocery stores, kitchen supply stores, and Amazon.com.

Turn any box in to a bento, dividing a larger section up by adding aluminum foil or silicone reusable cupcake liners.

More ideas for bento construction:  www.justbento.com , www.lunchinabox.net and www.cookingcute.com/recipes

This bento article is from Gf-Zing! (www.gfzing.com), celebrating flavor in the gluten free world!

Lunch, Recipes bento, gluten free, kids, school lunch

Thanksgiving Turkey – why does it seem to take forever to cook?

8 · Nov 14, 2010 · 2 Comments

Almost a decade ago, we enlisted the kids’ help to keep careful tabs on the temperature of the Thanksgiving turkey as it was roasting. We roasted a 24 pound, unstuffed turkey from a local farm (all natural, no “solutions” injected in to it, and minimally processed) at a constant temperature of “325” F – that is what the oven dial was set to, at any rate. We used a thermometer with a probe connected to a digital display – this type of thermometer allows you to run this experiment while making only one puncture in the turkey.  The turkey started cooking at 40 degrees.

As you can see from this graph, it took about 6 hours to bring the roast from 40 degrees to 175.  The temperature rose quite quickly for the first 4 hours, then the change in temperature slowed down considerably.

turkey roasting graph from gfzing.com
The temperature of a roasting turkey, over time (gfzing.com)

This experiment, and subsequent discussions with scientists, gave us a greater understanding of the Thanksgiving paradox: as the turkey gets closer and closer to being done it never seems to be done. After several hours, as the house fills with the good smell of roast turkey, the recalcitrant turkey sits there with the thermometer showing clearly that it is not yet cooked. We always start to wonder if the oven has gone out or if the oven thermostat has ceased working. We shake the drumstick, we poke the turkey, we open the oven way too many times, putting a hand in to see if it still feels hot etc.  Why do we do this, year after year – with the Thanksgiving turkey, a Christmas roast beef, and any other large piece of roasting meat?

I spoke with a well-known astrophysicist, to try to get some answers. He says people tend to view trends as linear processes, so they will see the temperature rising quickly at the beginning,  assume that this quick trend will continue at the same rate, and feel that the turkey should be done much earlier than it really will be.  He says in fact “the plot above is a solution of a well-known heat diffusion equation* which applies to all cooking processes with the exception of microwaves.” The steepness of the line in the curve is a measure of the heating rate of the turkey.  The heating rate (the change in temperature in a particular time) is proportional to the change in temperature between the turkey and the oven. The temperature of the turkey will approach, but never reach, the temperature of the oven. As the turkey gets warmer, the temperature change in an hour decreases (it goes up, but less quickly).

The astrophysicist, who likes to simplify problems so they can be solved, says you can “view the turkey as a solid,” “assume a spherical turkey” and “assume a non-spherical turkey.”  He then considered the problem of cooking stuffed turkeys vs. unstuffed turkeys, the stuffed turkey being closer to a spherical turkey and the unstuffed turkey having an empty cavity which reduces the thickness of the material to be cooked and effectively reduces the size of the turkey.  The concept of a spherical turkey provoked a lot of laughs, but in the real world, there are no spherical turkeys. Real turkeys have wings and drumsticks.

He provided a helpful reference to The Science of Cooking, by Peter Barham, which notes “… the cooking time is always proportional to the square of the size of the food, rather than its weight.”   You can understand this if you consider that the same weight of turkey, cut in to pieces, will cook in much less time than the same exact turkey cooked whole.

This is why chefs will tell you to cut the turkey up in pieces,  roasting the light meat and dark meat for different amounts of time so that the light meat does not become dry and the dark meat gets more time in the oven.  However, the “dissected turkey” method of cooking the Thanksgiving turkey is impractical for those cooks who want to present a Norman Rockwell turkey (visually appealing whole turkey on a platter) at the table.  The Norman Rockwell turkey requires compromises, and more time than you may think.

*the solution of the heat diffusion equation is an exponential process, if you extrapolate a line from the early cooking temperature data you will expect the turkey to be cooked many hours sooner than when it is actually cooked.

Christmas, Holidays, Meat Dishes, Meat-eater, Recipes, Thanksgiving gluten free, recipe, roasting, turkey

How to make gluten free beer

0 · Nov 5, 2010 · 8 Comments

gfzing.com gluten free beer At gfzing.com we have tried all the commercially available gluten free beers.  Our favorites were those made by Green’s – there are three that are imported in to the U.S., and in our area they generally sell for a mind-boggling $7/bottle.  This was the motivating factor behind a successful attempt at home brewing gluten free beer, the techniques of which are outlined here. A reasonable glass of gluten free beer (in the weissbier or weiss beer style), can be made for less than a dollar a bottle after start-up costs.  The beer is similar to the St. Peter’s Sorgham Beer from Suffolk England.

The major difference between most  fine artisanal beers and gluten free beer is that the ordinary beer is made with malted barley and wheat, and the gluten free beer cannot contain either barley or wheat.   Therefore, the gluten free brewer must rely on other malted grains. The ingredients for gluten free beer are available from home brewing shops.  The two tricky items to locate are the sorghum syrup, which lately we have had to purchase online from morebeer.com, and the gluten free brewing yeast.  The actual link for purchasing the syrup is here.

To make home brewed beer, you should first read some of the fine homebrewing websites and chats on the net, and learn the basic technique.  You are going to make a sort of soup called wort, and then ferment this soup with yeast in a large container with an airlock.  When it has finished fermenting, it gets bottled with a little “priming sugar” added to each bottle to cause another fermentation in the bottle – this produces the carbonation.  An excellent discussion with photos is available at WikiHow.

These instructions are provided here for use by adults of legal brewing age.

Recipe from gfzing.com for about 48 twelve ounce bottles of gluten-free beer requiring 2-3 hours of cooking time and about 7 weeks from starting the process to pouring:

Ingredients:
Malt Base – 6lb Sorghum Extract

Specialty Grain –

  • 1lb Flaked Maize
  • 1/2lb Whole Sorghum (for toasting)
  • 1/2lb gluten free Oats (for toasting) – optional

Specialty Sugar – 1/4lb Belgian Dark Candi Syrup (this is a product that is worth the trouble of obtaining – it can be ordered online)

Hops –

  • 1 oz UK Northern Brewer Leaf hops (bittering)
  • 1oz Cascade hops (aroma)

Yeast- Notthingham Yeast (check for gluten free status on the package)
Other-

  • 1/4 tsp Irish Moss
  • 3/4 oz Coriander Seeds
  • 3/4 oz. Bitter Orange Peel (in the event of a beer emergency, you can use the zest of one fresh orange)
  • 8oz Malto-dextrin (a weird, nearly flavorless material that makes a smooth “mouth-feel”)
  • 15 black peppercorns

Other: Priming sugar (about 1 cup for five gallons) dissolved in a couple of cups of water

Instructions:
Toast Whole Sorghum & gluten free Oats in the oven for 20 minutes @ 375 F.

Grind toasted Sorghum & Oats using a grain mill that is only used for gluten free grains, and then combine these with flaked maize.
Maize, Oats and sorghum go in a muslin bag in one and a half gallons cold well water in a large pot – large enough to hold at least 3 gallons.
Heat to 160F, hold at this temperature for 10 minutes.
Remove grains (the muslin bag full of grain will have swelled considerably) and discard.
Add Sorghum extract & Belgian Dark Candi syrup to the grainy water, stir to dissolve. If you have no Belgian Dark Candi syrup you may be tempted to use molasses.  Our advice – don’t use molasses because it will impart a distinctive molasses flavor to the finished beer.  If you must substitute for the Dark Candi syrup, try dark brown sugar or panela.
Bring to boil. ALERT: at this point, there are 60 minutes left in the cooking process. All the times listed next to the ingredients below are the total cooking time for that ingredient. When we say “set the timer” that is to indicate the time between steps.

Start proofing yeast in a cup of water – Nottingham yeast (marked gluten free).
While grainy water and sugars boil, add the following for the minutes indicated (this is a standard beer recipe convention, and you have to study on how beer is made so that this series of instructions will make sense):

  • 1 oz. Northern Brewer Hops (60 min)
  • Set Timer for 45 minutes

When timer goes off, start adding the following ingredients and cook them for the amount of time indicated:

  • 1 ounce Cascade hops (15 minutes)
  • Set timer for 5min, when timer goes off, add
  • 1/4  tsp Irish Moss (10 minutes)
  • Set Timer for 5min, when timer goes off, add
  • 1/2 lb. Malto-dextrin mix with cold water first (5 minutes)
  • 3/4 oz coriander seeds (5 minutes)
  • 3/4 oz bitter orange (5 minutes)
  • 15 black peppercorns(5 minutes)
  • After 5 more minutes, all the cooking is done.

The total cooking time, from the time an ingredient is added to the end of the cooking is show in parentheses next to each ingredient. This is how beer-making recipes are generally written. The instructions about “set the timer for X minutes” are our own addition and show the time between steps. So, the Northern Brewer hops go in, then you wait 45 minutes and add the Cascade Hops, then wait 5 minutes, then add the Irish Moss etc. The last 4 ingredients all go in at once, and they only cook for the last 5 minutes of the boil.

Pour wort through a fine strainer  in to 2 gallons of cold water in a sterilized 6 gallon fermenter.

Add cold water to increase to 5 gallons total volume in the fermenter (it helps to mark the fermenter at the five-gallon level so you know when you have added enough water).
Cool to 72 degrees F.
Measure the starting specific gravity and record.  It should be around 1.040.
Add  the  proofed yeast, give a stir, cover the fermenter and add an airlock.  This mixture should ferment for two or more weeks. This beer will not bubble as vigorously as a barley or wheat beer – it is a gentle fermentation and does best at around 70 degrees.
After the primary fermentation, rack off the beer in to another vessel, add the dissolved priming sugar, give the mixture a vigorous mixing, and bottle in sterilized bottles. Cap the bottles with new caps (you cannot re-use caps).  The beer will be ready to drink in about 3 weeks.

*Most Popular Recipes*, Ask Gf-Zing! - Responses, Drinks, Recipes, Vegetarian beer, gluten free, gourmet, homemade, recipe, vegetarian

Homemade Spicy Tomato and Sweet Pepper Ketchup

0 · Nov 3, 2010 · Leave a Comment

Making your own custom ketchup is easy-peezy!  At gfzing.com, we made a careful study of the available recipes for homemade ketchup, and concluded that the ingredients in most tomato ketchups are pretty much identical.  The spicy ketchup variant here is gluten free and can be served with fries, meatloaf, Shepherd’s Pie, hamburgers, hash browns, corned beef hash or any other dish that requires ketchup.

We tasted the typical store-bought ketchup which is very smooth, mostly sweet, with heavy tomato and celery seed notes – sort of like sweetened and thickened V8 juice! We also read Malcolm Gladwell’s interesting discussion of why there are so many mustards and only one ketchup.  Afterward reading that, we thought that we would not like a ketchup substitute, but we were wrong.  This ketchup is better than bottled ketchup!

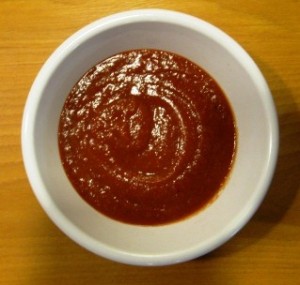
Spicy Tomato and Red Pepper Ketchup
Homemade Ketchup has a rich color and complex flavors

We started with a Saveur recipe for homemade ketchup. We replaced half the tomatoes with sweet red peppers, added sweet potato and dates for sweetening and thickening, and switched out their brown sugar with some agave syrup and gluten free fruit jam, to reduce the amount of refined sugar in the recipe.  We changed the amount of spices, and upped the hot peppers.  The final ketchup has some chutney-like flavors.  It has more flavor than bottled ketchup, and far less refined sugar.  It provides dynamic tension for your meatloaf!

Ingredients:

14 0unces diced or petite cut canned tomatoes

3 long sweet red peppers, stemmed, seeded and sliced

1 cup water

1/2 of a large red onion, peeled and chopped

1 clove garlic, peeled and sliced

1 dried cayenne pepper, stemmed and sliced

2 Tablespoons agave nectar

1/3 cup cider vinegar (we make our own cider vinegar out of homemade New England apple cider, from local apples)

1/4 teaspoon celery seed

1/4 teaspoon dry mustard

1/4 teaspoon ground allspice

1/4 teaspoon ground ginger

1/4 teaspoon ground black pepper

1/8 teaspoon ground cloves

1/8 teaspoon ground cinnamon

1 1/2 teaspoons salt

2 Medjool dates, pitted and sliced

1 1/2 ounces of peeled sweet potato, chopped –  a piece of sweet potato about the size of an extra-large egg

2 Tablespoons plum jam

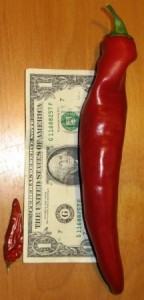
How big are the peppers
A dried cayenne pepper on the left, and a sweet red pepper on the right

The Steps:

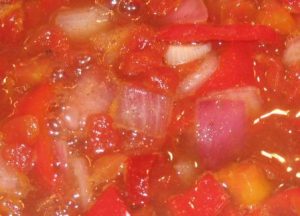
Homemade Spicy Tomato and Sweet Pepper Ketchup before cooking
The ketchup before the cooking...

First, put all the ingredients in a saucepan and cook over medium heat for about 45 minutes, stirring occasionally,  until reduced by half.  The material will start to stick to the bottom of the pan.  Be careful that it does not burn.

When cooked, cool and then puree the mixture thoroughly in a blender or food processor.  Taste, and adjust the salt, sweet, and sour flavors as necessary. That’s it!  Serve warm or cold.  Store, covered,  in the refrigerator.  This is not a “preserve” since it has a low sugar content and low salt content.  It cannot be kept indefinitely.  Make sure all your ingredients, including spices, are gluten free.

Condiments and Sauces, Recipes, Salads and Dressings, Vegetarian cooking, gluten free, gourmet, homemade, recipe, vegetarian

How to Feed a Gluten Free Guest

0 · Oct 30, 2010 · 1 Comment

A friend asked about what to serve a gluten-free guest at dinner.

We advise that a nice menu for entertaining a gluten-free guest might include

  • A simple salad of lettuce and grated carrots with a dressing made of olive oil and lemon juice, fresh garlic, salt and pepper. Do not use croutons.
  • A lamb, fish or chicken dish made with simple ingredients.  Take great care that if you use stock or soy sauce it is gluten free.  Use whole herbs and spices rather than ground spices.  A simple recipe to try might be a Marinated Grilled Chicken.
  • A rice pilaf such as Nilufer’s Khtichri or plain braised potatoes.
  • Steamed broccoli finished with olive oil, fresh lemon juice, salt and pepper, or alternatively a dish made with fresh or frozen green beans, or carrots
  • For dessert, serve a gluten free sorbet or fresh fruit salad.
  • If you want to serve ice cream, ask the gluten free guest if they eat ice cream (some do not eat dairy products), and use a gluten free product.  Haagen Dazs keeps a gluten free list of their products at this site: http://haagendazs.com/flavor_finder/.  About half way down the page is a check box for “gluten free” – check that box and search the site – this will generate a list of their gluten free products. Always check the manufacturer’s site.

As you can see, the gluten free diet is a very healthy diet!

Ask Gf-Zing! - Responses, Holidays, Recipes cooking, entertaining, gluten free, recipes

Banana Cream Chocolate Pie – gluten free

0 · Oct 24, 2010 · Leave a Comment

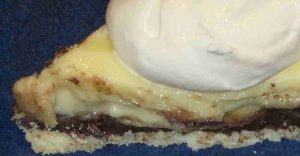
Banana Cream Chocolate Pie Close up
Close up of an actual slice of gluten free Banana Cream Chocolate Pie

This delicious pie is based on one from The Best of Cooking Light (2000).  We have changed a few things and made it gluten free.  As cream pies go, it is relatively light.  For those of you who eat pie for breakfast, we maintain that a slice of this pie is nutritionally not very different from a bowl of sugary cereal with milk and sliced bananas.  So, by all means, eat pie for breakfast!

It is possible to make this pie and serve it in 4 hours – you have to work quickly and chill at each stage.  Chill the pie crust immediately after it is baked, add the chocolate layer and chill, add the bananas and custard and chill again.  In winter, we take advantage of a table on a screened-in porch for these chilling stages. The screens on the porch are necessary to keep squirrels out of the pie.

First, you will need a one-crust gluten free pie shell.  You can make your own using 1/2 of this recipe: Pie Crust Recipe. Roll out a crust and line a 9 inch Pyrex pie plate.

Prick the crust all over with a fork and pre-bake the pie crust for 10-12 minutes at 450 degrees (for this crust you don’t need to use pie weights or dried beans to keep the crust from collapsing.)  In the event of a true pie emergency, you could use a Whole Foods gluten free pie crust from their freezer section.

Gather these ingredients:

For the chocolate part:

  • 1 TB cornstarch
  • 2 TB sugar
  • 2 TB unsweetened gluten free cocoa powder
  • 1/3 cup low-fat milk or gluten free rice milk
  • 2 ounces semi-sweet or bittersweet gluten free chocolate (chopped coarsely)
  • Dash of salt

For cooking the custard:

  • 2 TB cornstarch
  • 1 cup of low fat milk or gluten free rice milk
  • 1/2 cup sugar
  • 1/4 tsp salt
  • 2 large eggs
  • 1 TB butter

After cooking the custard, mix these in:

  • 2 tsp gluten free vanilla
  • 1/4 cup (2 ounces) gluten free cream cheese (for dairy-free, omit this)

Other:

  • 2 cups sliced ripe bananas (2 bananas)
  • Whipped cream, lightly sweetened and flavored with vanilla

You are going to layer up some thick chocolate paste which goes in to the baked pie crust first, then sliced bananas on top of the chocolate, then custard.  Chill for 2 hours or more, then serve with whipped cream!

For the chocolate part: Mix the cornstarch, sugar, cocoa, milk and salt  in a saucepan and cook, stirring constantly until the mixture thickens.  Add the chocolate and stir until it melts.  Spread this mixture over the bottom of the baked pie crust.

For the custard, get your immersion blender ready at your side in case you need it to correct custard disasters.  You basically have two choices.  You can mix the custard materials and cook over a boiling water bath, which takes more time and assures a lump-free custard, or you can mix the custard materials in a sturdy pot, cook over low heat, stirring constantly with a whisk, and if the custard curdles or looks at all lumpy give it a good blast with the immersion blender (taking care not to hurt yourself), adding a little heavy cream if necessary to loosen things up.  Either way works fine.

After you cook the custard mixture, while the mixture is still hot, stir in the vanilla and the cream cheese and mix thoroughly.  If you are making a dairy-free version, leave out the cream cheese.

Slice the bananas and put the slices on the chocolate layer, then spread the finished custard over the bananas.  Chill completely, slice and serve with whipped cream. There won’t be a lot of left-overs.

Make sure all your ingredients are gluten free!

Dairy Free, Dessert, Fall, Holidays, Pie, Recipes, Vegetarian dessert, gluten free, pie, vegetarian

Homemade Garam Masala

0 · Oct 19, 2010 · Leave a Comment

Garam masala is an Indian spice mixture used in many dishes and often added at the very end of the cooking of a dish. It can be 100% gluten free if made correctly.  Like curry powder, garam masala usually seems to be made from a standard list of spices, the amounts of each spice customized according to taste.

Interestingly, if you do a Google search for “homemade garam masala” there are only a million hits – that’s twice as many hits as for “homemade ketchup” or “homemade mayonnaise” but not as many hits as for “homemade mustard”.  What is going on with that mustard?  Are beer drinkers interested in mustard at the season of the Oktoberfest?

Back to the topic at hand.  We compared recipes for Garam Masala from two authors: Julie Sahni and Madhur Jaffrey.  Both have written wonderful cookbooks which are excellent and frequently consulted resources – these authors were instrumental in bringing the world of interesting, largely gluten free, Indian cooking to the North American audience.

For a generic Garam Masala (there are other more specialized types of garam masala as well) these authors offer varying formulas, using the following spices.  The weights in parentheses are just there to give you an idea of the ratio of amounts that could be used – we have measured here the weights for one of the Jaffrey recipes:

Cardamom Seed (25 pods – see the picture below for a couple of pods next to the seeds from 25 pods)

Black Peppercorn (2  1/8 ounces or 62 grams)

Whole Cumin Seed (1 1/4 ounces or 36 grams)

Whole Coriander Seed (1/2 ounce or 15 grams)

Cinnamon Stick (3, 3 inch sticks)

Whole Cloves (4 to 6 cloves)

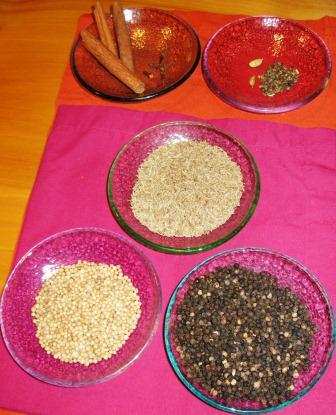
To give you an idea of what this amount of spice looks like, here is the full amount:

Gfzing.com Garam Masala spice picture 3
Garam Masala spices before grinding. Clockwise from top left: Cinnamon and Cloves, Cardamom, Cumin (in cener), Black Pepper, Coriander.

Sahni generally recommends toasting the spices in a dry skillet for 10 minutes, stirring all the while, then cooling and grinding to a powder.  Jaffrey’s instructions generally omit the toasting process and go right to the grinding. Jaffrey sometimes omits the coriander and adds nutmeg.

By volume, Jaffrey’s recipe from Indian Cooking uses 3 times as much black peppercorn as Sahni’s recipe from Classic Indian Cooking.  Other proportions are very similar in both recipes.

Why buy stale old spice mixtures ready-made when you can easily make your own pungent gluten free garam masala using whole spices, toasted (or not) and ground up?

Condiments and Sauces, Cookbooks, Recipes, Vegetarian garam masala, gluten free, homemade, Indian, recipe, vegetarian

Homemade Thai Red Curry Paste

0 · Oct 17, 2010 · Leave a Comment

One reader asked if we had looked at recipes for making homemade Thai curry paste.  Well, we have.  We used the following useful sources :

Seductions of Rice by Jeffrey Alford & Naomi Duguid 1998

Saveur Magazine

Thai in Minutes by Vatcharin Bhumichitr 2004

Thai Cuisine with Jasmine Rice from Eastland Food Corporation

Thai Culinary Art by Srisomboon Bhandhukravi 1993

Terrific Pacific Cookbook by Anya von Bremzen & John Welchman 1995

Thai Red Curry Paste recipes use a basic list of ingredients, and all the recipes seem to include chilies, coriander, cumin, peppercorn, garlic, lemongrass, galangal, a fishy element like shrimp paste or fish sauce, and salt.  Most also include shallots, kaffir lime leaf or zest, and either cilantro leaf or root. A few add nutmeg, paprika, or cardamom.

Dry chilies are usually seeded and soaked. Dry spices are generally toasted in a skillet before grinding. Garlic and shallot are peeled and chopped before making in to a paste. The bottom 3 inches of lemon grass stalk is cut off, the toughest leaves removed, and the whole piece is then smashed with the flat side of a cleaver before the lemon grass is minced.

Shrimp paste or fish sauce must be investigated for gluten free status before using. Shrimp paste is a dry product that is dry roasted before use.

Ultimately, all the ingredients are ground to a homogeneous paste.

Based on the following table, you can see that Thai Red Curry paste is made using a fairly standardized set of ingredients, easily customized by the home cook to make a “signature” gluten free blend.

Thai Red Curry Paste Comparisons from gfzing.com

Make sure that all of your ingredients are gluten free!

Condiments and Sauces, Cookbooks, Product Reviews, Recipes cooking, gluten free, homemade, recipes, thai red curry

Making Your Own Homemade Curry Powder

3 · Oct 15, 2010 · 7 Comments

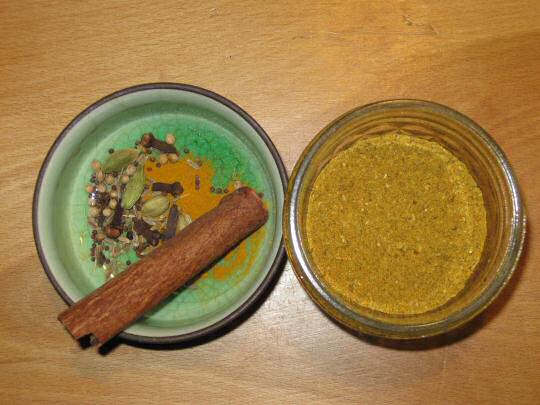
Homemade Curry Powder

It is as easy to make homemade gluten free curry powder as it is to grind coffee!

With a little trial and error you can create your own signature gluten free curry powder!  We use a 30 year old coffee grinder to make ours from whole spices.  Once you make your own, you won’t be able to go back to using store-bought curry powder. Also, your friends will want your recipe.

The Spices:

Make sure that whatever spices you add to your curry powder are gluten free. And, the fresher the spices, the better the flavor.

The Coffee Grinder:

Some recipes will advise you to buy a separate coffee grinder for making spice mixtures like curry powder, but we use one coffee grinder for everything – we have been doing it for decades. After using the coffee grinder for grinding spices, you can clean the coffee grinder using a toothbrush to loosen up ground spices and wipe the grinder clean.  If your coffee grinder is white plastic, the turmeric may turn the plastic yellow, but when you then revert to grinding coffee in the grinder the flavor of your coffee will not be altered.

What amounts to use?

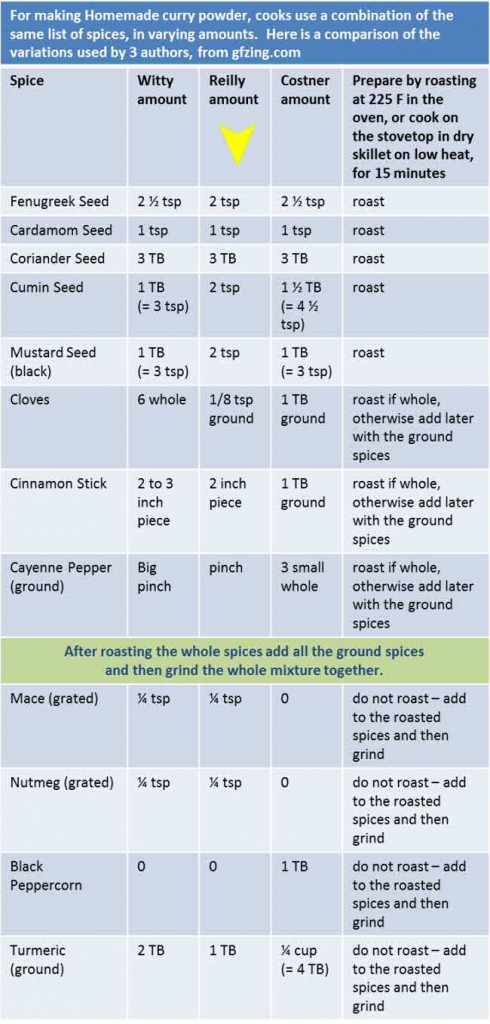
At gfzing.com, we have analyzed a few recipes for homemade curry powder and provide the following table of formulas from some of our favorite cookbooks.  Note that the biggest variation occurs with the turmeric and the pepper.  Turmeric has a surprisingly strong taste, so experiment with it a little to decide how much to use.

Our favorite curry powder recipe comes from Robin Reilly’s excellent book Gluten-Free Baking. We add a whole dried cayenne pepper to her mixture because we like our curry powder spicy. Robin Reilly uses a combination of roasted coriander seed, fenugreek seed, cumin seed, black mustard seed, cardamom seed, cinnamon stick, with added ground turmeric, ground mace, nutmeg, and cloves.  We add a whole dried cayenne pepper to her recipe, then grind it in two batches in the 30 year old coffee grinder.  After grinding the two batches, we mix the stuff together thoroughly and store it in a half pint Mason jar.

Another similar curry powder formula is to be found in Better Than Store-Bought by Witty and Colchie, originally published in 1979.  This is a unique cookbook which shows how to make a large variety of items from scratch.

A third example of homemade curry powder lives in another excellent do-it-yourself cookbook called Gifts of Food, by Susan Costner, published by Consumer Reports in 1984. Again, the list of spices is pretty much the same – varying amounts are used.

In this table, we compare these 3 recipes, demonstrating that indeed, the list of spices is pretty much the same but the amounts differ.  Fiddle with these spices and develop your own signature gluten free curry powder! Package it up nicely, and give it as a gift!

Homemade Curry Powder comparisons
Homemade Curry Powder - comparisons from Gfzing.com

Try the curry powder in these recipes:

Chicken Sticky Rice

Curried Cream of Root Vegetable Soup

Curried Tofu Meatballs

Creamy Lentil Soup with Curry and Chipotles

Rich Lamb and Cornish Game Hen Curry

Pineapple Fried Rice

*Most Popular Recipes*, Condiments and Sauces, Cookbooks, Meat-eater, Recipes, Vegetarian curry powder, DIY, gluten free, homemade, recipes, vegetarian

Feeding a Gluten Free Toddler

0 · Oct 14, 2010 · Leave a Comment

A reader writes asking for gluten free suggestions for their 18 month old, a somewhat picky eater who is currently on a Gluten- and Dairy-Free diet.

Answer:

Well, first of all, it is important to consultant with your child’s doctor, and ask about seeing a nutritionist.  The gluten free diet can be tricky, and it is not always easy to balance the diet, especially in terms of vitamins.  There is a new book: Real Life with Celiac Disease: Troubleshooting and Thriving Gluten Free by Dennis and Lefler, which can point you in the right direction and help with finding resources.

Consider the possibility of using “naturally mushy” foods such as banana, avocado, cooked sweet potato etc.  These foods have a lot of curb appeal for the under 5 set.  Of course, you have to choose those foods that work for you and your family.

You can also make a very nice breakfast “smoothy” in the blender, from frozen orange juice, frozen strawberries, banana, honey, and gluten-free yogurt or gluten-free non-dairy yogurt – it is the basic concept of this smoothy that is important – you should adjust the ingredients to suit your child’s tastes and needs.

For a “sandwich” try making musubi – see the instructions here, and use fillings and accompaniments that your child can eat.

Most importantly, make sure that the diet you are feeding your toddler is nutritionally appropriate for a growing child. Consult your doctor, and ask him/her for a recommendation for a nutritionist as well.

Ask Gf-Zing! - Responses, Dairy Free, Recipes cooking, food, gluten free, kids, recipes, toddler

Gluten Free “Slowed Down” Pumpkin Muffin

2 · Oct 13, 2010 · 1 Comment

This is a story about “slowed down food.”

We have combined the fat-free muffin with the slow food movement, to make the Slowed Down Pumpkin Muffin. The reason that these pumpkin muffins can be called “slowed down” food is because they are meant to be made with canned pumpkin and jarred applesauce, but we had neither one in the cupboard.  So, the instructions here show how you can make them using local squash and an apple, and it also takes more time to make them!  The muffins still use processed sugar, so they are not consistent with full-bore “slow food” cooking.

We won’t pretend that these muffins, which have no oil in them, are non-fat because once you have slathered your pumpkin muffin with butter, all that “no fat” stuff goes out the window!  We also make these gluten free, doubling the flavorings to combat the black hole, flavor-neutralizing quality of gluten free cooking.  Note: Some people who eat gluten free avoid bean flours such as chickpea flour, so check with your gluten free friend before using this recipe.

How to prepare the squash (pumpkin) and apple:

Find a winter squash (pumpkin, butternut, buttercup, acorn – whatever), and a baking apple.  For a baking apple, you could choose a nice big Cortland, or a Northern Spy.  In this case, we used a butternut squash (long-necked pale orange squash) and a Northern Spy apple.

Cut off a chunk of winter squash, about 12 ounces should do it.  Poke several holes in the apple with a fork.  Microwave the squash and the apple on the setting you use for baking potatoes, until they are cooked through. Cool them so that you can peel them without burning yourself.

Peel the cooked squash and apple and remove and discard the apple core and its seeds and the peelings.  Mash the cooked squash and apple separately.  You need 1/3 cup of each.  If by chance you have too much of one, and not enough of the other, simply use enough of each to yield a combined total of 2/3 cup mashed material.

Preheat the oven to 350 degrees F.

Soak 1/2 cup raisins in boiling water while you mix the batter:

Mix dry ingredients in a large bowl:

1 1/2 cups plus 1 Tablespoon Gifts of Nature gluten free All Purpose Flour Blend (INGREDIENTS: Brown rice flour, potato starch flour, white rice flour, chick pea flour, sweet rice flour, tapioca flour, xantham gum)

1 1/2 cups sugar

1/2 teaspoon each: baking powder, baking soda, salt

1 teaspoon each: ground cinnamon, grated nutmeg, ground cloves

Mix the wet ingredients in another large bowl:

Mix the 2/3 cup cooked squash and apple with:

2 eggs

Stir the wet ingredients and dry ingredients together using a fork. This will be an interesting task – at first it will appear that there is not enough liquid, but as you mix the batter it will quickly become the consistency of a proper muffin batter.

Drain the almost-forgotten raisins (throw out the water, save the raisins.)  Add the raisins to the muffin batter. Stir well.

Line 12 muffin cups with paper muffin liners.  Fill each muffin liner to the top. You may be used to filling muffin liners 2/3 full, but in this case you can fill them right to the top.  Use up all the batter for the 12 muffins. Distribute the raisins evenly, to make sure each muffin has its fair share of raisins.

Bake for 30-35 minutes until the tops are dry and the muffins seem done.  You can poke them with a toothpick – toothpick should come out dry. Take cooked muffins out of the oven – the tops of these muffins have a chewy, caramelized quality and the muffins taste great with butter.  Technically, you should allow these muffins to cool before eating.

Make sure all your ingredients are gluten free!

Bread, Breakfast, Dairy Free, Fall, Recipes, Vegetables, Vegetarian, Winter baking, cooking, food, gluten free, muffin, pumpkin, squash, vegetarian

Chicken Sticky Rice

0 · Oct 8, 2010 · 1 Comment

This recipe makes a very nice comfort-food for the gluten free community.

Wash 1 cup of sweet brown rice (this is also called brown sticky rice), put it in a Zojirushi rice cooker, and add 1 1/4 cups of water.  Close the rice-cooker and set the menu to the sweet rice setting and turn it on.  It will cook in about an hour.

While the rice is cooking, in a non-stick pan put 1 teaspoon peanut oil, and stir-fry 1 shallot, peeled and diced, and 1 clove garlic, peeled and minced, for 2 minutes.  Then add 1 teaspoon strong gluten-free curry powder, 1 teaspoon salt, and 1/4 teaspoon sugar.  Stir-fry for 1 minutes.  Next, add 2 boneless chicken thighs, diced.  Stir-fry until cooked through.

When the sticky rice is done, add it to the chicken mixture and stir together with a wooden spoon.  Transfer it to a greased oven-proof casserole dish and bake, covered, for 15 minutes at 350, or make 6-8 tinfoil squares about 10 inches square, put 1/2-3/4 cup of the mixture on each square and make in to a log, then wrap the tinfoil around the rice mixture. Bake the logs at 350 for 15 minutes.  These packets can be kept in the refrigerator and reheated as needed.  They will keep a few days under refrigeration.

The dish is tasty and satisfying!

Make sure all your ingredients are gluten free!

Dairy Free, Fall, Lunch, Meat Dishes, Meat-eater, Recipes, Rice, Winter chicken, food, gluten free, recipes

Toad of Toad Hall – musings on stocking the pantry

0 · Oct 1, 2010 · Leave a Comment

“`All complete!’ said the Toad triumphantly, pulling open a locker. `You see–biscuits, potted lobster, sardines–everything you can possibly want. Soda-water here–baccy there–letter- paper, bacon, jam, cards and dominoes–you’ll find,’ he continued, as they descended the steps again, `you’ll find that nothing what ever has been forgotten, when we make our start this afternoon.'”  from Wind in the Willows by Kenneth Grahame.

Toad really knew how to pack a picnic for his vacation.  Although his pantry is short on the fruits and vegetables, his supplies were not considered  perishable; all were preserved to some extent without refrigeration.  He is packing an off-the-grid picnic back in the day, before electricity, before ziploc bags, back when smoking tobacco was a staple, and people played social games like cards and dominoes before turning in at sundown, with only the dim light of candles and oil lamps.

Are you interested in recreating Toad’s food locker, perhaps without the tobacco?  You will need some good crackers, sardines, potted lobster,  jam and some cheese (which Toad forgot to add to his locker.)  All these things are possible in the gluten free world.

Some fine cracker choices might include Glutano Crisp Bread – a long lightweight rectangular cracker that will stand up to some heavy spreading (tartiner is the French word for spreading things on bread) , Mary’s Gone Crackers with Black Pepper – small round peppery crackers that go well with spreads, Real Foods Multigrain Corn Thins – a circular Australian product about the size of a rice cake only thinner and more flavorful, perfect for making a lightweight open faced sandwich, and perhaps Blue Diamond Nut Thins® Pecan Crackers – these very crisp crackers are salty and crunchy, perfect with cheese.

If you take the British word “biscuits” to mean cookies, then you might stock up on the Almond Horn Cookies product made by Aleia, or Glutino’s Lemon Flavored Wafers, or Vanilla Wafers – Chocolate coated.

For the jam, try making your own strawberry jam, and add a few exotic flavorings to the mix.  If you are new to canning and preserving, the best instructions are available in the Ball Blue Book of Preserving – we have multiple versions of this standard cookbook, and the recipes vary from year to year depending on what is in fashion.  The most recent edition includes an excellent recipe for strawberry-lemon marmalade, requiring the addition of a small amount of minced lemon rind.  You might also add some lavender, cayenne pepper or cardamom to strawberry jam – we have tried all these flavors which work very well with strawberry.

Sardines or herring can be had for small money – the Bar Harbor brand of All Natural Smoked Wild Kippers (herring) are excellent, and at less than $2.50 for 6.7 ounces, they are a bargain and will feed 2 people for lunch.  A couple of slices of Udi’s wholegrain bread, toasted until brown and spread liberally with lightly salted butter, some of these smoked kippers, and a strong cup of Irish tea, and you are set for lunch.

Potted lobster is another matter, somewhat more complicated.  First of all, back in the days before refrigeration people used to “preserve” meats (including shellfish, pigeons, beef etc.) by cooking them and putting the meat in to a wide-mouthed ceramic container called a pot, then covering the top with a layer of melted butter.  They believed that protecting the food from fresh air made it safe to eat.  Oops!  They were wrong about that. Obviously, covering meat with a layer of butter is not an effective method of preserving food, so if you make your own potted lobster according to the old ways, you must refrigerate it and serve it soon.  Many recipes for potted shrimp are available on the internet, and a few for potted lobster although this is less common.  Be careful to treat this product with care, and refrigerate it.

Needless to say, the dominoes and playing cards do not carry any edible risk to the gluten free community.  The letter paper is for writing letters, although today we might write an email. If you want to engage in a congenial correspondence about Toad’s pantry, you can send an email by clicking here: Send email about stocking Toad’s pantry.

It is relatively simple to recreate the Toad’s larder with modern, and gluten-free, ingredients.

Fish and Seafood, Food products, Product Reviews, Recipes food, gluten free, picnic, potted lobster, recipes

Curried Cream of Root Vegetable Soup – gluten free

0 · Sep 26, 2010 · 1 Comment

This tasty soup has plenty of flavor and lots of fiber.  It will fill you up on a cold, rainy day!

In a large soup pot, melt

1 Tablespoon Ghee or butter

Add these ingredients in order as you prepare them, stirring when you add a new item:

1 onion, peeled and sliced

1 leek, slit the long way, cleaned and sliced

3 cloves garlic, peeled and chunked

1 inch piece of fresh ginger, peeled and minced

1 parsnip, peeled, cored and chunked

2 large carrots, peeled and chunked

1 sweet potato or yam, peeled and sliced

Stir fry until the onions are golden, then add:

2 Tablespoons of homemade curry powder (Rebecca Reilly’s recipe is good)

Stir fry until fragrant, then add:

1 quart of gluten free vegetable stock (for vegetarians) or gluten free chicken stock

1 Tablespoon guava or currant jelly

Simmer for 20 minutes until carrots and parsnip are cooked through.

Using an immersion blender, and taking great care to follow the instructions so you don’t get burned by hot soup, thoroughly blend the soup, adding up to one cup of hot water if needed.  You may add heavy cream to reduce the intensity of the flavors or make the soup in to a richer creation, but it is also ready to eat as it is.

To make this soup for a vegan, use vegetable oil instead of ghee/butter, use vegetable stock, and do not add any cream.

Make sure all your ingredients are gluten free!

Fall, Meat-eater, Recipes, Soups, Vegetables, Vegetarian, Winter carrot, curry, food, GF, gluten free, guava jelly, parsnip, recipes, soup, sweet potato, vegetarian

Plantain empanadas (empanadas de platano)

0 · Sep 20, 2010 · Leave a Comment

Plantains are  large, very sturdy-looking banana-like fruits one sees in the grocery store produce section.  They can be cooked when yellowish (called green) or when totally black (sweet).  Gf-Zing! finds plantains to be a wonderful, wonderful gluten free starch.

Empanadas are similar to a turnover, either baked or fried.  The dough can be made from flours or from plantains, using one plantain to make two empanadas.

The easiest way to make plantain empanadas is to buy some yellow-green plantains and a piece of mozzarella cheese, then follow the simple directions on this excellent video: http://how2heroes.com/videos/international/plantain-empanadas from the great Mexican restaurant Tu y Yo.  If your plantains are too green, you will have to wait a few days for them to ripen somewhat.  Plantains sweeten and soften as they darken.

The video demonstration shows the plantains being boiled for one hour. If you are pressed for time, instead of boiling the plantains you can use the microwave.  Wash the plantains, then cut off the ends of the plantains. Make a slit in the skin all the way down one side, the long way.  Wrap each plantain in a paper towel and put them in the microwave on the rotating platter, in one layer.  Cook the plantains on the same setting your microwave suggests for “baked potato.”  When cooked, the plantains will be extremely hot. When they are done, use a potholder to place them on the counter and wait until they cool a bit, then unwrap, peel and proceed with mashing (using a potato masher if you don’t have a molcajete), stuffing and frying as demonstrated in the video by the chef from Tu y Yo.

Fall, Recipes, Summer, Vegetables, Vegetarian, Winter cooking, empanadas, food, GF, gluten free, microwave, plantain, platano, vegetarian

Gluten Free Macaroni and Cheese

0 · Sep 15, 2010 · Leave a Comment

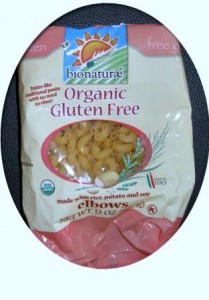
Macaroni and cheese lovers, don’t despair.  You can have perfectly fine macaroni and cheese without wheat.  Use your favorite gluten free recipe, and the BioNaturae organic gluten free macaroni.  Take care to read the package and make sure you don’t accidentally purchase the wheat variety.

We have tried a lot of different brands of gluten free pasta. For macaroni and cheese, Bionaturae is the way to go.  The product is made of rice, potato and soy.  It is quite expensive for pasta, but it is worth the money.  We have no affiliation with the company and they haven’t even sent us samples, we just like the product!

Organic Gluten Free elbow macaroni

For mac and cheese, cook the product slightly less than the package calls for.  For example, the package says cook for 11 minutes, so for mac and cheese cook it for 10 minutes.  No need to rinse this product.  Just follow a gluten free mac and cheese recipe.

Food products, Product Reviews, Vegetarian cooking, food, gluten free, mac and cheese, macaroni, recipes, vegetarian

Roasted Vegetable Soup

0 · Sep 12, 2010 · Leave a Comment

This recipe from Gf-Zing! is perfect for a cold fall day when eggplants and tomatoes are still plentiful at the local farmers’ market.

Preheat oven to 400 degrees.

On a large cookie sheet with a rim, place

1 eggplant, halved the long way, cut side up
3 medium to large tomatoes, stem end removed
1 onion, peeled and halved
6 cloves of garlic, peeled

Brush all the vegetables with olive oil. Roast for 45 minutes.

Scoop the eggplant flesh in to a large pot. Discard the eggplant skin. Add the rest of the roasted vegetables,  4 cups of gluten free chicken or vegetarian stock, and 1 teaspoon of dried thyme.

Bring to a boil, lower the heat and simmer the vegetable and stock mixture for 45 minutes.

Puree the soup using an immersion blender or by transferring the soup to a food processor or blender.

Season to taste with salt, black pepper, and a small amount of sugar if needed.

Serve the soup with crumbled goat cheese or cheddar to sprinkle on top.

Make sure all your ingredients are gluten free.

Fall, Recipes, Soups, Vegetables, Vegetarian, Winter easy, eggplant, GF, gluten free, gourmet, recipe, soup, vegetarian

Baked Brisket – gluten free

0 · Sep 12, 2010 ·

This is an easy way to cook a beef brisket – no fuss no muss, and no gluten.

For a 2 1/2-3 pound brisket of beef

Preheat the oven to 400 degrees.

Quarter 2 peeled spanish onions and place them on the bottom of a dutch oven. Put the brisket on top of the onions, fat side up.

Sprinkle with 1 envelope of gluten-free onion soup mix *, then mix the following and pour on top:

1 cup gluten free tomato ketchup
1 cup water
1/4 cup brown sugar

Cover the dutch oven and bake for 3+ hours, until done. The meat should be very tender. You can then cool and chill the dish, and then remove the fat. After removing the accumulated fat, you can slice the meat, return it to the dish, heat and serve.

* To make a substitute for a package of onion soup mix, follow the copycat instructions available on the internet. For example, Food.com has 2 such recipes: http://www.food.com/recipe/copycat-liptons-onion-soup-mix-24952 and http://www.food.com/recipe/copycat-lipton-onion-soup-mix-153788. Make sure to verify that the beef bouillon you use in making the copycat version is gluten free.

Make sure all your ingredients are gluten free.

Dairy Free, Fall, Meat Dishes, Meat-eater, Recipes, Winter beef, brisket, cooking, food, GF, gluten free, gourmet, recipe

Baked Chicken with Pineapple

0 · Sep 12, 2010 · Leave a Comment

This easy recipe for chicken thighs can be accomplished in a toaster oven, or any other oven. You can also cook the recipe on a grill, but that is not necessary. Any toaster oven will do.

For 4 chicken thighs, to serve 2 people:

Using a sharp knife, slash 4 chicken thighs (bone-in, skin on) through the skin – 2 slashes per thigh. This will allow the spice flavors to penetrate the meat.

Mix the following rub:
1 clove chopped garlic
1 teaspoon black pepper
1/2 teaspoon powdered ginger
1/2 teaspoon dried thyme
1/2 teaspoon dry sage
1/2 teaspoon dry marjoram
1 Tablespoon gluten free soy sauce
1 Tablespoon olive oil

Smear the spice mixture on the 4 chicken thighs. Transfer to a foil lined baking pan (small one that will fit your oven), and bake at 350-375 degrees for 1/2 hour.

Add, 1/4 of a fresh pineapple, peeled, cored and sliced. Raise the heat in the oven to 450-475 degrees and bake an additional 10 minutes. Serve with gluten free buttermilk biscuits and chianti (Italian dry red wine.)

Make sure all your ingredients are gluten free.

Fall, Meat Dishes, Meat-eater, Recipes, Spring, Summer, Winter chicken, cooking, gluten free, recipes

  • « Go to Previous Page
  • Go to page 1
  • Go to page 2
  • Go to page 3
  • Go to page 4
  • Go to Next Page »

Primary Sidebar

Check out our Coupon Collection

Click Here to go directly to the Coupon page

Read more at The Rambling Epicure:

Click Here: The Rambling Epicure

QR code for your phone

qrcode for gfzing
NFCA logo

Blogroll

  • Aloha World Ono Recipes
  • Book of Yum
  • Dulce Cocina sin Gluten
  • Gluten Free Beer Association
  • Glutenfreie Rezepte | kaMehl
  • Hawai'ian Electric
  • Laylita's – Ecuador
  • Nombudsman
  • Papilles et Pupilles
  • Sea Salt with Food
  • The Rambling Epicure The Rambling Epicure is a daily international food chronicle, and the first online newspaper to follow global food trends and news.
  • Triumph Dining

Monthly Archive

Proud member of FoodBlogs

Load up on new recipes, exclusive goodies, + more!

Get the exclusive content you crave straight to your inbox.

Things to Read

Find by keyword

bacon baked baking beans beef berries blueberry cake cheese chicken chocolate coconut cooking curry dessert DIY dried beans easy fish food fruit GF ghee gluten free gourmet homemade lamb maple syrup meat microwave New England Hard Cider pie pork pumpkin recipe recipes rice salad sauce soup stewed strawberries sweet potato thai red curry vegetarian

Copyright © 2023 GF-Zing! on the Cravings Pro Theme